• Home
  • About Us
  • Podcast
  • Strategy Guide Wit
  • Contact

Strategy Guide Reviews

A Strategy Guide for your Strategy Guides

  • Reviews
    • Strategy Guide Reviews
    • Video Game Reviews
    • Mini-Reviews
  • Features
    • Interviews
  • News
  • Unboxing Strategy Guides
  • Columns
    • Gaming Diary
    • Corner of Randomness
  • Videos

A Link Between Worlds Strategy Guide Review

February 20, 2014 By Keri Honea 3 Comments

A Link Between Worlds strategy guide reviewIt’s honestly amazing how dumb The Legend of Zelda games make me feel. So many puzzles with so many variables; sometimes it’s a speed thing, sometimes you need a certain item, sometimes you have to do a certain dance, and sometimes you have to do all three. Sad as it may sound, strategy guides are my personal security blankets for The Legend of Zelda games. I will never have the patience to sort all of the shenanigans out in these games, and I’m always impressed with those who do. Since A Link Between Worlds introduces a completely new game mechanic, the ability to merge into walls, I knew I’d need the A Link Between Worlds strategy guide to hold my hand through a whole new world of puzzle solving. Thanks to the strategy guide, I saved Hyrule, defeated Ganon, and collected everything save for a few pieces of the heart that I could only earn performing annoying mini-games. In fact, I’d go as far as to say that the A Link Between Worlds strategy guide is the best The Legend of Zelda strategy guide out there.

Most Zelda games are fairly linear, yet they have massive amounts of exploration. It stays linear because players can’t explore Hyrule without obtaining certain items from the dungeons. A Link Between Worlds differs from the get-go here, as players can rent almost every item at the beginning. Collecting tons of rupees is also amazingly easy, so after running around smashing pots and trimming hedges for 30 minutes, you will have more than enough to rent everything.

A Link Between Worlds strategy guide

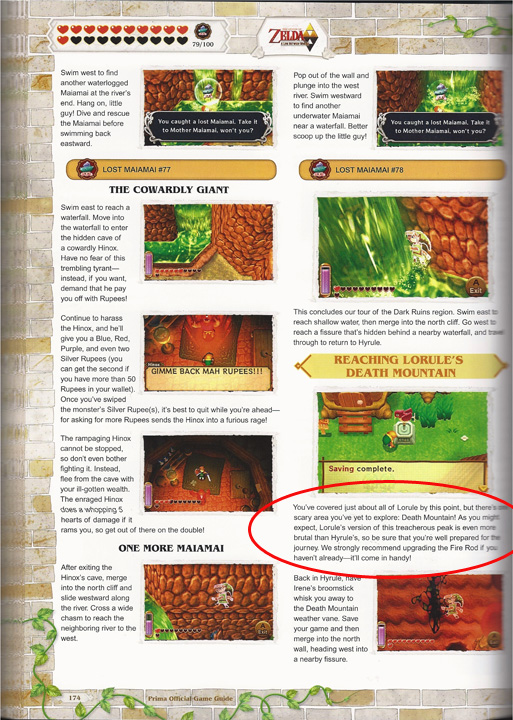
When the guide says “strongly recommend,” YOU DO IT.

The strategy guide is laid out with exploration in mind first, dungeon-tackling later. After Link is able to merge with walls, the strategy guide puts off all dungeon plundering for a few hours in favor of getting everything Link can. This includes getting all the bottles possible, finding all possible pieces of the heart, exploring treasure caves, and finding all of the lost maiamais (that are possible) so Link can upgrade weapons. If you follow the strategy guide to the letter, Link will have 7 heart containers, 3 bottles, and 41 maiamais before he ventures to either the House of Gales or Tower of Hera.

In other words, by following the guide, dungeon bosses will never, NEVER be a problem. I have never cut through bosses with ease like I have with this game, and I know it’s not because the game is easier; it’s because I was so friggin’ prepared.

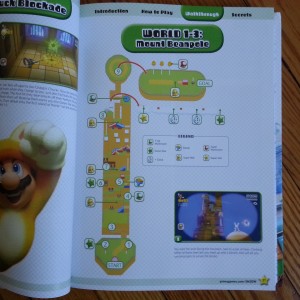
When Link travels to Lorule for the first time, the exploration first, dungeons later emphasis kicks in again. The strategy guide takes places all over Lorule to find every single dungeon and weather vane first. When you’re done exploring, most of the hard work is already done! When you’re ready to go to a certain dungeon, you just summon the witch’s broom to take you to that weather vane.

The A Link Between Worlds strategy guide also provides the most efficient order for completing the Lorule dungeons. The first dungeon on the agenda is the Thieves’ Hideout so that Link can get the Sand Rod, the one item he wasn’t able to rent. The next dungeon is the Desert Palace so Link can get the Titan’s Mitt and find the last baby maiamais. At that point, the only thing Link is missing is the rest of his heart containers; the strategy guide has Link well stocked and prepared for the last six dungeons.

As perfect as the strategy guide was as a whole, there were a few mistakes. A couple of the strategies they gave were actually impossible to complete. For example, when paving the way toward the weather vane in the Dark Palace, on page 171, the strategy guide tells players to avoid a soldier by taking the lower route and jumping down to a staircase. That lower route is blocked by a wall, so players have to face the soldier head on and perform a few stealth maneuvers to get down to that staircase. In the walkthrough for the Dark Palace, the room numbers are a little mixed up on page 231, which caused a bit of initial confusion. Thankfully the descriptions of what I needed to do were detailed enough I was able to figure out which room I really needed to be in.

I marked a total of 4 typos and misinformation, and none of them caused serious frustration. Considering how much goes into a Zelda game, I’m impressed there were only 4 mistakes.

I cannot recommend the A Link Between Worlds strategy guide enough. Stephen Stratton has written numerous The Legend of Zelda strategy guides, and he and Cory Van Grier should be immensely proud of this book. This strategy guide is the new bar for all The Legend of Zelda strategy guides.

SGR Rating: 5/5

Authors: Stephen Stratton and Cory Van Grier
Publisher: Prima Games
Editions Available: Hardcover and Paperback
Acquired via Publisher

Filed Under: Strategy Guide Reviews

Borderlands 2 Game of the Year Strategy Guide Review

February 14, 2014 By Chris Nitz 3 Comments

Borderlands 2 game of the year strategy guide reviewOh Pandora, how I love you and yet how your inhabitants hate me so. Yup, it’s time to dive back into the world of Borderlands 2 thanks to the Game of the Year edition and its corresponding strategy guide from BradyGames. Thankfully, I have wanted to check out the new classes and see how they handle the madness that is CL4P-TP

If this is your first foray into the world of Pandora, spend some time with the basics and class portion of the strategy guide. There is so much info crammed into here that it will make life on this crazy world that much easier. Those who have already tread through the world once, the class portion gives some nice details on the two DLC characters that is worth a look.

Borderlands 2 GotY Strategy Guide Review 1

You make life so much easier!

Due to how much content is in the GotY edition, the main storyline receives its own section. In here, readers will find plenty of content on how to tackle the main objectives of the original story. Each mission starts with a small briefing on what needs doing, complete with rewards and a listing of optional missions. While working through this area, pay close attention to the subtle text under some of the screenshots as these captions tend to offer up small hints that can make life a heck of a lot easier in certain situations. The pages are also littered with information, which had me pausing the game a fair amount to read, digest, and formulate a plan. There were even times I’d just sit down, read a few pages, and then get into the game.

Following the main game are the DLC campaigns. These follow the same formula as the main walkthrough section, but the DLC badge on the left page and yellow highlighted edges help distinguish them.

Those who have a need for completing every task set before them will find the optional missions next. These are not nearly as detailed as the main and DLC sections, but I found them detailed enough that I could tackle them while working on other objectives. It does take a bit of page turning and planning to make trips into the wasteland efficient, but once I got into a groove, the planning became relatively painless.

Completing the strategy guide, we find the weapons, bestiary, and secrets areas. These are separated out by main game and then DLC, which makes navigating the encyclopedia of death dealing that much easier. In the secrets portion, there is a handy breakdown of all the combat, weapon, and general challenges. There are also pages of pictures with all the unlockable heads that players can use to customize their character looks.

I believe the item I appreciated the most was how easy it was to navigate this guide. With the bounty of information scattered about, the side color markings made it easy to quickly find the specific portions I was in need of. Further aiding in this Waldo hunt, the bottom of the DLC walkthrough clearly stated what DLC pack I was looking at.

The thing I love the most is that everything from typography, page coloring, and artwork all tie this book into the art style of the game. It just feels as if this is the manual that was not included with the game. Even items such as the developer quotes are in little Gearbox Software boxes, complete with company logo. The little touches like this might not be evident at first, but go a long way in building a cohesive experience.

Borderlands 2 GotY Strategy Guide Review 2

Oh, homie don’t play that!

While I love the bulk of the Borderlands 2 Game of the Year strategy guide, I have a few issues that really bug me. First off, the return of the confidential weapons. Why on earth would the authors/publisher deem it necessary to block out content from a guide that consumers pay money for? For those a bit lost, as was the case in the original Borderlands 2 strategy guide, in the weapons section, there are certain weapons that are “listed” but are blacked out with a classified banner. I can easily go to any fan website and find the information on this “classified” weapon, so why block these details?

The second gripe I have comes at the construction of the book. More specifically, the pages themselves. The paper stock almost feels like tissue paper, it is that fragile. Compared to the thicker, almost waxy coated, pages from the original Borderlands 2 strategy guide, this is a major downer. I was compelled to flip through the book while being conscious about how vigorously I was treating it. It seems like a minor thing, but with how pretty the guide is, it is something that drug down the experience.

I am satisfied with the quality , and quantity, of the content in this guide, granted the construction could use a bit of a second gander. I don’t hesitate in recommending this to fans of this series as it is a nice collector’s item. Just keep in mind that if you plan to hunt down every item, you’re still going to need access to your favorite fan site.

SGR Rating 3/5

Author: Doug Walsh & Casey Loe
Publisher: BradyGames
Editions Available: Hardcover

Acquired via Publisher

Filed Under: Collectors Editions, Strategy Guide Reviews

Comparing the The Legend of Zelda: Wind Waker HD Strategy Guide

January 30, 2014 By Keri Honea 3 Comments

Wind Waker Strategy GuidesI wasn’t surprised that Prima Games was releasing a new book for the HD version of The Legend of Zelda: Wind Waker. Why reprint the original book when you can modernize its look and sell it again? That’s pretty much what Nintendo did; might as well jump on the same bandwagon. But what did surprise me was the differences in size between the books, as seen on the image to the right. The original is on top, and the new strategy guide for the HD remake is on the bottom. It’s roughly a 200 page difference.

If everything stayed the same save for an update to the graphics, why in the world is the newer book so much bigger? And more importantly, why should anyone buy the newer book?

After sitting down with both books and comparing them side by side, I will be honest with you–the original book will get you through The Legend of Zelda: Wind Waker just fine. However, The Legend of Zelda: Wind Waker HD strategy guide is the better book all the way around.

Let’s look at some comparison photos between the two.

From the table of contents on the first page in both books, you can already see the difference in the layout and design.

The Legend of Zelda: Wind Waker strategy guide table of contents

The original book compacted the entire TOC into a sidebar, whereas the HD book blew it up entirely and broke down each individual section to further help you find what you’re looking for. Case in point, look at the sections for “Islands of the Great Sea” for both books.

The layout of The Legend of Zelda: Wind Waker HD strategy guide is far less compact and has more detailed information in regards to, well, everything. One part I had a ton of trouble with when I played Wind Waker on the GameCube was in the first “real” dungeon on Dragon’s Roost Island. Link had to kill a Magtail that patrolled a rock in the middle of a lava pool. If Link didn’t do this, then he couldn’t throw the pots of water into the lava from the rock and progress. To say I had trouble taking care of the Magtail would be putting it lightly. Check out how much more detail the HD book provides on getting through this part.

The Legend of Zelda: Wind Waker strategy guide - Magtail The Legend of Zelda: Wind Waker HD strategy guide - Magtail

This is just the walkthrough for one little enemy in the middle of a dungeon. Imagine how much more detailed all of the information is throughout?

Care to see a few more examples? Here’s a side-by-side comparison of the same mini-game and collectible information from Windfall Island in the Islands of the Great Sea appendix:

OG-Islands HD-Islands

Notice how everything just looks so bunched up in the original guide? The HD guide has it more spread out with larger screenshots.

Here’s a side-by-side comparison with the Triforce Charts appendix:

OG-Charts HD-Charts

I think you can see my point, as well as why the HD guide is so much thicker than the original. When you spread out all that info that was in 4-5 columns per page to 1-2 columns, the book is going to get long in a hurry. A thicker book may seem like it’s less efficient, but I think it’s easier and faster to find what you’re looking for when information is spaced out instead of crammed into one page.

So guess which book I’ll be using whenever I find time to get into Wind Waker? I never finished the game when it originally released, but I hope with this newer, more informative, and easier to navigate (hahaha! see what I did there?) tome, I’ll be less frustrated while playing. Maybe I’ll actually finish a console Zelda game!

On the flip side, the tear-out Sea chart is the one thing that isn’t bigger in the HD guide than the original. Holy cow.

seachart
You tell me which one you think is easier to use while navigating through the seas of Wind Waker.

Authors: Stephen Stratton and Garritt Rocha
Publisher: Prima Games
Editions Available: Paperback and Collector’s Edition
Acquired via Publisher

Filed Under: Strategy Guide Reviews

Super Mario 3D World Strategy Guide Review

January 23, 2014 By Chris Nitz 2 Comments

Super Mario 3D World strategy guide reviewOh Mario, why do you have to be so friggin entertaining? Yes, the new Super Mario 3D World is a must own game for anyone with a Wii U. It blends nostalgia with new technology and then turns up the fun to 11. With such a bright and fun game, it is nice to see Prima bringing their A-Game with their Super Mario 3D World strategy guide.

After a brief introduction on how the guide is laid out, the authors dive into how the game plays. Anyone that has ever played a Mario game can pretty well skim this section as the mechanics are like meeting up with an old friend for coffee and instinctively picking up your conversation right where you left off. I do recommend stopping by the character and Power-Up/Form section as they do give good detail on how each character plays and what new items, such as the cat suit, do. For those that want to bring friends into the mix, the multiplayer portion will help keep things from getting too crazy!

The bulk of the book goes to the walkthrough. Each stage begins with an overall map of the stage with stamps, stars, 1-ups, rings, and bosses clearly marked. There are even arrows showing how the stage connects and progresses. More exploded views are marked and gone into later on in the section. This made it very easy to see where I was missing a stamp or a star as I made my way to 100% completion.

When can I have turn-by-turn directions?

When can I have turn-by-turn directions?

I found the bosses laid out fairly coherent and easy to follow. There was just enough about the battle described to clue me into any sort of nuances that I might need to look out for, while not breaking down every detail as to take away from the overall challenge

Finishing the guide is a small area containing secrets and some artwork. The secrets are short, but they fill you in on how to obtain the Luigi 8-bit game, new playable character, and some of the Easter eggs scattered throughout. Let’s not forget the ever important warp locations and where to haul a shell to rack up massive amounts of lives.

I found that navigation through the guide was fairly easy thanks to the colored side markings on the pages. Each stage is its own color, and so if I wanted to work on world four, I just flipped to the brown/rust colored area and away I went.

Overall I was happy, but there were two things that got to me. First was that some of the maps get pretty cluttered due to the amount of stuff they are trying to show off. Between all the rings, items, costumes, collectibles, and such, some maps look like the cartographer sneezed detail all over the place and was too lazy to clean it up. These are rare occasions, but something to be aware of.

The second issue I have comes with that extra art section. This book is beautiful. The cover is gorgeous, and the typography keeps the pages feeling fun and tie it into the game rather well. The added art area, while a bonus, just felt weak as it is renderings of the Mario cast. I would have loved to see something a bit more, such as painted worlds, artist sketches, or even fan art from a contest. It just felt like this was thrown in to say it was there, but the opportunity to capitalize on it was squandered.

While I understand that Mario games are typically not that complicated, I found Super Mario 3D World that much more entertaining with this guide. Not having to scour every nook and cranny for that one missing star was great. Also, let’s face it, this book just looks damn nice on a bookshelf or coffee table. Fans, you owe it to yourself to snag this!

SGR Rating 4.5/5

Author: Alexander Musa & Geson Hatchett
Publisher: Prima Games
Editions Available:
Hardcover
Acquired via Publisher

Filed Under: Strategy Guide Reviews

The Wonderful 101 Strategy Guide Review

January 15, 2014 By Keri Honea Leave a Comment

The Wonderful 101 Strategy Guide ReviewWith Platinum Games’ titles, they’re more about finishing each level with flair on the hardest difficulty known to man and collectibles than they are story. In other words, it’s gameplay, gameplay, gameplay with them, and you better be prepared for some fast action, nimble fingers, and a lot of patience as you fail…A LOT. If you want to cut out the middle steps and go straight to big profit, that’s when you pick up the strategy guide. The Wonderful 101 strategy guide from Prima Games focuses on helping players earn those platinum medals on the 101% Hard difficulty their first time, not their 101st time. At the very least, players can find all of the collectibles and unlock all of the secret missions in one go.

I am downright terrible at Platinum Games’, uh, games. They move at insane speeds, button mashing never really works, and you have to have patience due to a high death rate. All three of these elements pretty much requires me to have a strategy guide so I don’t hurl the Game Pad across the room in frustration. You might wonder why I even bother with this studio’s games, but that’s a debate for another day. The point is I couldn’t have gotten through this game without the strategy guide’s help; it was practically as glued to my hands as the Game Pad during each session.

Each mission is framed with the medal requirements for each difficulty, a list of enemies for each difficulty, and then the walkthrough complete with screenshots. The screenshots were fantastic for seeing the ideal moment when to execute a certain attack, defense, or Unite Morph. They also helped me find exactly where I needed to be heading as I occasionally got a little confused and lost (it didn’t happen often, but when it did, I was very, very lost). This presentation and layout made it very easy to quickly find where I needed help when I wasn’t following the strategy guide letter by letter.

The Wonderful 101 Strategy Guide ReviewOf course, if I wasn’t following The Wonderful 101 strategy guide letter by letter, I missed out on many, many collectibles. Instead placing collectibles in call-out boxes on the pages, the collectible pickups were mixed in with the written walkthrough. At least the collectibles are printed in bold, making them easier to see when glancing at the page. At the same time, the book has collectibles that can only be earned when replaying the mission in call-out boxes, which helps you plan when you will replay a mission and how often.

The only other issue I had with the strategy guide was the occasional misnumbering of missions. The game would tell me I was on mission 14, but the strategy guide had that mission set as mission 12. It didn’t happen often, but again, if I wasn’t following the guide by the letter, I would have to pause the game to find what I was looking for in the book. I also wish the strategy guide explained what a Unite Build was in the command portion of the book, because I unfortunately wasn’t able to play the game for a couple of weeks after playing the tutorial, and it wasn’t for several missions that the game required a Unite Build. I was completely lost at what to do, the strategy guide didn’t explain it, and I had to look it up online. Of course the command was super simple and I felt silly for forgetting how to do it, but it still should have been explained in the strategy guide. It wasn’t even explained in the tutorial walkthrough.

Even with these minor, minor complaints, The Wonderful 101 strategy guide was my security blanket during my entire insane acid trip down The Wonderful 101 road. Those who want to just burn through the story on Very Easy mode may not need what the strategy guide has to offer, but if you’re a completionist or want to get through the game as efficiently as possible, do not forget to pick up a copy of The Wonderful 101 strategy guide.

SGR Rating: 4/5

Author: Alexander Musa
Publisher: Prima Games
Editions Available: Paperback
Acquired via Publisher

Filed Under: Strategy Guide Reviews

  • « Previous Page
  • 1
  • …
  • 14
  • 15
  • 16
  • 17
  • 18
  • …
  • 44
  • Next Page »

Follow us!

Subscribe!

Upcoming Strategy Guides

 Nothing here. Come back later. 😢

Latest Strategy Guide Reviews

The Walkthrough by Doug Walsh Review

Red Dead Redemption 2 Strategy Guide Review

Mega Man 11 Strategy Guide Review

God of War Strategy Guide Review

Far Cry 5 Strategy Guide Review

Friends of SGR

  • BradyGames
  • Dan Birlew – Guide Writer
  • Doug Walsh – Guide Writer
  • Future Press
  • Game Enthus
  • GameWires.com
  • Piggyback
  • Press the Buttons
  • Prima Games
  • Racing Games

Top Posts & Pages

  • Unboxing the Epic Mickey Collector's Edition Strategy Guide

Copyright © 2025 · Web crafted by Warkhammer


Loading Comments...