• Home
  • About Us
  • Podcast
  • Strategy Guide Wit
  • Contact

Strategy Guide Reviews

A Strategy Guide for your Strategy Guides

  • Reviews
    • Strategy Guide Reviews
    • Video Game Reviews
    • Mini-Reviews
  • Features
    • Interviews
  • News
  • Unboxing Strategy Guides
  • Columns
    • Gaming Diary
    • Corner of Randomness
  • Videos

Call of Duty: Ghosts Strategy Guide Review

January 6, 2014 By Blake Grundman Leave a Comment

Call of Duty: Ghosts strategy guide reviewMore often than not, shooters have been given the benefit of the doubt when it comes to strategy guide design. Most books have either focused too little on the multiplayer or were so hung up on the multiplayer coverage that the single player campaign was almost neglected entirely. There have been very few that managed to strike a fair balance between the two modes, so upon seeing that BradyGames’ new Call of Duty: Ghosts strategy guide had a decent split, at least in terms of page count, it seemed like an interesting change of pace. Can the most recent outing in Activision’s financial workhorse also yield a rare win for FPS guides as well? Only time will tell…

If you are a newcomer to the Call of Duty franchise, it is essential to jump into the guide’s first ten pages of what amounts to “FPS 101,” with a significant amount of fervor. However, if you are among the majority of the gaming audience, this is far from your first rodeo. It’s at least important to check and see if the early commentary about general first-person shooter strategy differs from what most might consider to be common sense. Probably the most useful of the lead-in section are the lists and screenshots of each weapon, explaining each of its strong suits. Also, take note that there are no detailed stats like the obligatory refill time, clip size, power, and accuracy in this section, because that is covered exhaustively in the multiplayer rundown.

Without much fanfare, the text abruptly delves into the single-player walkthrough. Consisting of a total of eighty-six pages, the observations should help players better navigate their way through the campaign on the “hardened” difficulty. Once again, it is worth noting that the player may be playing at a lower difficulty, meaning that enemies encountered and general attack strategies may be slightly different.

Each of the game’s eighteen missions (of which some are broken down into sub-missions) start out with a full page, top-down view of the map, along with a call-out section containing the character that the player is controlling, as well as the name of any supporting troops. For those who are new to Call of Duty, understanding who you are controlling is essential to comprehending the story because the perspective jumps around from person-to-person throughout. Also included in many of the mission intros are bullet points of the objectives and the weaponry available at the start.

Within every mission walkthrough, there are several interesting pieces of information that are presented to the reader. For one, special encounter based achievements are spelled out directly in the body of the rundown. Those who have always complained about having to go back and re-play missions in order to accomplish special tasks should finally be silenced. The same actually goes for the in-game collectible, “Rorke Files.” Directly where they would occur within the text of the commentary, it is cut away to, along with a location screenshot as well. This helps keep the flow tight, while also minimizing backtracking. Hopefully more guides will move away from the disjoined call-outs in the margins of a page and instead adopt this approach. In the long run it probably saves the writer time, while also helping to alleviate a player’s frustration. It is a win-win for all parties involved.

The campaign layout itself isn’t that different from what most readers are familiar with. All pages consist of two columns, one larger than the other, punctuated with many, and I mean MANY screenshots. Along with objective specific images, there are also more cinematic shots that are probably meant to provide a better idea of the setting of each mission. In many cases this layout does tend to feel a smidgen claustrophobic, but is mediated by the select few call-outs that are utilized. A useful example of this is the “Know Your Enemy” sections, which are meant to help the reader differentiate between the often similarly dressed adversaries and teammates. Sure, it is silly that these sections actually need to exist from a game design standpoint, but it was nice that the author saw the need and worked to proactively mediate the confusion for the reader.

After the single player mode has been completed, there is always the series’ coveted multiplayer waiting to be conquered. Given that every dudebro under the son is waiting to saw a player’s head off at a moment’s notice, it should go without saying that the more than two hundred pages of coverage should be a must-read for anyone hoping to put up a decent fight. Luckily the “Basic Training” section should be extremely helpful in getting players up to speed on everything from the basics of the mode, down to the more minutia based strategies like proper reloading technique involving both timing and canceling, useful explosive tactics, and how to use cover to its fullest. HUD (heads up display) highlights, effective mini-map use and strategic kill-cam tips are also outlined. Lastly, it wraps up by spelling out changes that have been handed down since previous games, such as adjustments to killstreak bonuses, dynamic map events, and the sharing of field orders between squadmates. All-in-all, even veterans would be better off checking out this section, if for nothing other than seeing the newest updates to the game engine.

If you were worried about the lack of weapon detail in the single player campaign, rest assured that the multiplayer coverage more than makes up for any deficits. There is an impressive total of thirty pages focused on absolutely anything that a player could ever want to know about how the arsenal is tuned. All weapons have their own sections dedicated to each variety of firearm. They even go as far as to include cluster plots, laying out how the spray of repetitive shots will play out over time, grouped by the add-ons that are equipped. Then there are a bevy of bar charts demonstrating things such as how many shots are needed to kill an enemy over assorted distances, variations on the same formula demonstrating how that changes depending upon what firing method is being used (burst fire vs. automatic, and so on…), reload times, and even mag capacities depending upon the add-ons in use. For those that only need a more generalized impression of each class of weapon, there are also simple pro and con lists for all weapons, and generalized traits that are worth understanding. Regardless of the needs of the player, every reader should be impressed with what is easily the most analytically sound weapons section ever compiled in print.

Another extremely key component to achieving online success in all Call of Duty titles is crafting the most complimentary perk package, depending upon a given player’s style of combat. The perks are broken down item-by-item, discussing why it is important and the ways that it can be most efficiently utilized. More importantly, the author also saw fit to explain why certain perks are bad when used by certain play styles. This is ultimately more valuable than knowing the upsides, because it helps newbies become aware of habits that could ultimately lead to their downfall. Lastly, there is a significant amount of time spent discussing the various killstreaks and support drops that are at a player’s disposal. Each individual event, the number of kills needed to unlock the attack, and how it explicitly works is spelled out at a level that only the most dedicated members of the audience would ever want to know. Granted, that isn’t a bad thing by any stretch of the imagination, it just makes for rather dry reading in general.

What follows these impressive walls of technical text is essentially eighty seven pages of pictures. In this case, the pictures are maps of every online multiplayer arena. There are several maps for each stage, showing critical locations in the different game modes, as well as an overhead view with hints as to which weapons should be used at certain locations on the map. At the very least, being able to get an idea of the scale of each location makes looking over each full-page shot ideal for the inner strategist in every soldier.

Wrapping up both the multiplayer coverage and the book as a whole are a bevy of different breakdowns, specific to each online mode. Though this may seem more rudimentary for veterans of former Call of Duties, newer modes like “Kill Confirmed,” as well as “Grind” and “Blitz” are worth looking into, in order to prevent the inevitable making a fool of one’s self. This is then flanked by a pro-tips section that specifically relates to custom class design. Really, this should be more required reading for the target audience, to help prevent from manic trial and error later on down the road. Rounding things out are basic gloss-overs of the “Extinction” stages, as well as general talk about the included Clan Wars metagame. Virtually everything included in this last area are worth looking into for even the most experienced of players.

Judging by the impressive breadth of content covered in the Call of Duty: Ghosts strategy guide, the team over at BradyGames had their hands full. Luckily they were more than up to the task and delivered one of the better FPS guides on the market. The fair balance between single player and multiplayer coverage did a great job of highlighting key concepts, while still providing an insane amount of depth where the need existed. All levels of player will find very valuable information to glean, without feeling like the text is pandering or talking over their head. If you are even considering making the jump to hardcore Call of Duty-dom, this would be a fantastic place to start.

SGR Rating: 4.5/5

Author: Phillip Marcus, Thom Denick, Jason Fox, Rich Hunsinger, Trevor Martin, Arthur Davis, Jon Toney, Daniel Herrera, and Jamison Carroll
Publisher: BradyGames
Editions available: Paperback and Collector’s Edition
Acquired via Publisher

Filed Under: Strategy Guide Reviews

Assassin’s Creed IV: Black Flag Strategy Guide Review

December 31, 2013 By Matthew Green 1 Comment

Assassin's Creed IV: Black Flag strategy guide reviewHistory is a big place. It’s dangerous to go wandering around the Caribbean without proper guidance. Thankfully, Piggyback Interactive have compiled the meat and potatoes within Ubisoft’s Assassin’s Creed IV: Black Flag in a helpful strategy guide that leads players step by step and place by place through the adventures of Edward Kenway and his pirate comrades. While not essential to the Black Flag experience, this strategy guide certainly helps to overcome the game’s frustrating and puzzling moments while also providing enough general, generic assistance to not spoil absolutely everything.

The Assassin’s Creed series is packed full of a twisting, confusing narrative that spans several sequels and side-games, so for those coming into the world of Assassins and Templars late (or those who just need a refresher), the strategy guide thankfully opens with a lengthy recap of each main game in the franchise across both the past and present timeline (minor titles like Assassin’s Creed II: Discovery and Assassin’s Creed III: Liberation go overlooked). Extensive spoilers detail the story of Desmond Miles and his ancestors, bringing everyone up to speed on the story so far. Honestly, I found this part of the strategy guide to be the most helpful before I even began playing the game as after all these years and so many games, I’d forgotten a lot of the Creed lore.  More strategy guides need a recap section of this style for long-running, story-heavy franchises.

Speaking of refreshers and recaps, the strategy guide also include a detailed look at just how the gameplay in the Creed series works. A primer explains basics such as how to read the onscreen display and the concept of mission synchronization to general character controls to more advanced tactics like effective stealth and combat maneuvers. In the old days, most of this material would have been covered in the game’s printed manual, but in this era of cost reductions and saving paper, it’s up to strategy guides like this one to pick up the slack and provide a clearly explained reference. Creed veterans may skip over this section on the way to the actual walkthrough, but it’s worth a look.

The walkthrough itself comprises the majority of the strategy guide’s actual guide portion. Each mission in each sequence is outlined and explained point by point with a summary of objectives, descriptively labeled screenshots to show optimum routes through areas, and paragraphs of text which explain what to do and how best to do it. Anyone wanting to follow the strategy guide beat by beat can certainly do so, but it can be a bit too detailed at times if one wants to avoid plot twists or other surprises. I found myself only referring to the guide when outright stuck in order to not accidentally find out what was about to happen next. A similar section for the game’s many side quests follows, blowing out every optional task, mini-game, and upgradable unlock condition.

For better or worse, Black Flag features online multiplayer modes. The strategy guide includes a full look at these modes and explains how to play them effectively. Each character is listed with gorgeous artwork and their unique ability sets. Scoring and progression are explained, but the real draw for multiplayer enthusiasts is the large printed overhead maps of each stage.  Planning raids and attacks has never been easier thanks to having access to a plan view of the playfield. There is more about multiplayer explained here in this section than in the game itself, and I was glad for the additional information.

It’s a series tradition for Assassin’s Creed to leave players with questions after the credits roll, so to put some lingering doubts to bed, the strategy guide concludes with a large “Extras” chapter which poses some of the more common questions raised by the game and answers them with interesting and informative explanations. There’s also a quick list of unlockable secrets and the conditions required to open them such as bonus outfits, swords, shanties, and cheats. Finally, a massive selection of production and promotional artwork leads into information on the game’s key characters and settings in a feast for the eyes.

It’s difficult to find a bad word about the Assassin’s Creed IV: Black Flag strategy guide. I had the pleasure of reviewing the collector edition of the guide which is an impressive hardback volume containing sixty-four additional pages of content. Free access to the bonus eGuide is also included as well as a beautiful fold-out map of the game world. Fans of the game who want more information about Edward Kenway’s world will enjoy the biographical and story content, while those looking for just the nuts and bolts of assistance will find their needs met. It is recommended.

SGR Rating: 5/5

Author: James Price
Publisher: Piggyback Interactive
Editions available: Paperback and Hardcover Collector’s Edition
Acquired via publisher

Filed Under: Strategy Guide Reviews

Skylanders SWAP Force Strategy Guide Review

December 23, 2013 By Chris Nitz 2 Comments

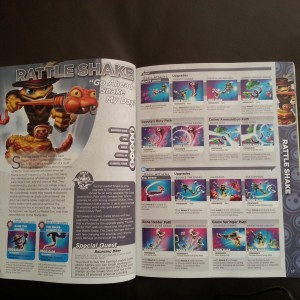
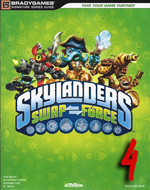
Skylanders Swap Force strategy guide reviewAs I am a toy photographer, the Skylanders games have always appealed to me. It was not until our beloved EIC told me we were getting the Skylanders SWAP Force guide that I finally bit the bullet and dove into the deep end of the pool. With my toy obsession filled, I can say that the game, the collectable figures, and the guide from BradyGames is something that totally make my inner nine year old self scream with joy!

The beginning of the guide is chock-full of information surrounding all the figures and the basics of the game. As this is my first foray into this fun and colorful world, it was nice to learn how the portal accessory worked, the nuances that make Swap Force different from the prior two games, and the general mechanics of the game. The game might not be all that complex by hardcore gamer standards, but I still found plenty of info that made my first romp in this strange land a bit easier.

I must own them all!

I must own them all!

The biggest chunk of the first 127 pages goes to breaking down all the characters in the game. This even includes a few pages dedicated to figures from prior games. After the brief summary of prior characters, the guide dives into all the new characters, including some backstory, stats, and moves list. I found that there is just enough info here to aid in my future figure purchases without being long winded or overly boring. This section is finished off with brief descriptions of all the enemies and bosses that fill the game.

From here, the guide tackles the various locations in the game. Collectibles, enemies, detailed maps, and stage dares are easily findable at the beginning of each area. From there, readers will find a detailed description of how to easily progress through the area, complete with details on how to obtain all the spark locks scattered about. For a game that many would write off as simplistic and childish, there is an amazing amount of stuff to do.

The last chunk of the guide goes to all the bonus stuff that there is to do. I found that reading up on the various challenges before diving into them made for a lot less frustration, which is great when you’re playing with a Zelda-themed Wii U controller. The time attack and score mode sections are more there for reference on what players need to do in order to obtain the best scores. Finally, the last few pages go towards a giant listing of collectables, accolades, and achievements. Anyone looking to get the most mileage out of this game will be spending a good amount of time with the last portion of this guide.

I was playing this game on the Wii U and I didn’t find any major issues with the guide correlating to the game. The stage walkthrough, character breakdown, and extras all flowed well and I didn’t find myself confused about what to do. I say this because I have read some people say that the Wii version of the game doesn’t match up so well to the guide. I cannot confirm this, so those that want to play it on the older Wii system might want to do a bit more research. I should also note that this guide does not cover the 3DS version of the game, which still bums me out.

My only gripe about this strategy guide is that it makes me want to buy all the figures just to try them out. I’ve spent who knows how much time just reading the front of the book, making notes, and checking my local stores for various characters.

Skylanders SWAP Force might not be that difficult of a game, but I still found this guide useful. I’m using it to manage my growing collection of figures and it saved me from rage throwing a terribly expensive controller. This is a solid guide for anyone new, or experienced, to this fun world.

SGR Rating 4/5

Author: Ken Schmidt
Publisher: BradyGames
Editions Available: Hardcover and Paperback
Acquired via Publisher

Filed Under: Strategy Guide Reviews

Kingdom Hearts 1.5 Strategy Guide Review – Part 1

December 20, 2013 By Keri Honea Leave a Comment

Kingdom Hearts 1.5 strategy guide review Yep, I’m pulling a Square Enix with this strategy guide review. Since the Kingdom Hearts 1.5 strategy guide covers two full games, I’m going to have to review this guide in piecemeal. Naturally, part 1 will cover the Kingdom Hearts Final Remix portion of the strategy guide.

For whatever reason, Square Enix decided to make a Final Remix version of Kingdom Hearts because apparently they admire George Lucas and they can’t leave well enough alone. The end product added a couple of new cut scenes (which I admit are nice) and a bunch of new heartless that are a complete beating, and oh hey, these have your precious synthesis items now. That hasn’t been so nice. They also for whatever reason moved around the treasure chests, their contents, and a few of the trinity marks. Most of the chests are in the exact same spot, so why their contents had to be jumbled up is beyond me. Therefore, if you still have that lovely Kingdom Hearts strategy guide written by Dan Birlew, it isn’t exactly going to be very helpful, especially if you want to find all of the trinity marks and synthesize everything in the Moogles’ shop. However, it’s sad to say that the Kingdom Hearts 1.5 strategy guide isn’t that helpful either, as when it comes to the collectibles, it’s very obvious the authors copied and pasted a lot of the data from Dan Birlew’s guide without double-checking that it was accurate with the Final Mix.

The walkthroughs themselves were excellent. They were extremely well written, especially the passages regarding Wonderland, Monstro, and Hollow Bastion, as it is sadly easy to get completely turned around and lost in these worlds particularly Wonderland (still despise that level 10 years later). I’d like to say that I didn’t get lost in either of these worlds because I had played them once before, but that was definitely not the case, and I greatly depended on the strategy guide to help me navigate through those insane maps. The walkthroughs also helped lead you to the most efficient path of traversing through each world and picking up every available collectible along the way. For collectibles that you couldn’t pick up yet, such as those that required the glide abilities to reach, the strategy guide presented them in handy little call-out boxes so you could easily identify them when you came back through a second, third, or fourth time.

Not much changed in the Kingdom Hearts Final Mix since the game’s original release in 2002, in that the maps are the same, the bosses are the same with the same tactics, the gummi ship routes are the same, and Sora has to perform the exact same tasks as he did before. However, there are new heartless that Sora can’t defeat by simply swinging his Keyblade around willy-nilly. Some of the heartless are susceptible to magic, and some are susceptible to only certain types of magic. If it wasn’t for the strategy guide, I would have avoided these heartless at every turn just because that’s a huge headache at times. The guide helped me cut to chase and know up front what I needed to do to defeat them. Many people probably won’t care about this, but if you’re trying to harvest rare items for synthesis, you do have to deal with these annoying buggers at some point.

And that’s all the good I have to say about the strategy guide.

Collectibles are huge in Kingdom Hearts, especially in the first game where Sora can collect equipment, items, synthesis items, trinity marks, and the 99 dalmatian puppies. One of the biggest reasons why I bothered half the time to look for all of the treasure chests was not to score parts for my gummi ship; it was to find all of those wayward puppies. I even had more motivation this time to hunt down and activate each and every trinity mark because I wanted that Trophy. So I heavily relied on the strategy guide, much like I did with Dan Birlew’s strategy guide before, and its maps to help me find every single treasure chest and trinity mark. The maps were sound and crystal clear with marking the chests, its contents, and all of the trinity marks. Where the strategy guide went wrong was marking what was in each chest.

As I said earlier, the treasure chests were all in the same locations as the first game, but their contents were often very different. What may contain an Aero-G from the first game may contain puppies in the Final Mix. The labeled contents of some of the treasure chests were so wrong, I honestly wonder if the writers simply copied and pasted from Dan Birlew’s book. Sometimes the appendix for the puppies would say a group of puppies was in one location, but when you looked at the map in that world, those puppies were nowhere to be found. For example, for puppies 58-60, the appendix said that they were in a chest in the Queen’s Forest. If you look at the map, these puppies are not labeled anywhere. I checked the original guide, and sure enough, those puppies were in the Queen’s Forest. I was baffled and quite furious, but I continued my search through Wonderland as I still had a white trinity mark to activate. When I went to the secret area to activate said trinity mark, I also triggered an archway of flowers to release a chest that the strategy guide said would contain a Thundara-G. Lo and behold, that chest contained the puppies I was looking for. I was stunned. The walkthrough said it was a Thundara-G, the map said it was a Thundara-G, and not surprisingly, the original guide said it was a Thundara-G. After the third batch of puppies I found in a different location than advertised, I’m somewhat convinced the writers never finished playing the game.

Their synthesis appendix further evidenced that they did not finish playing the game. I don’t even know where to begin with the synthesis appendix. It’s two pages, and on the left side, the writers listed “all” of the items needed for synthesis. Then on the right page, they list all of the items that can be synthesized and their required ingredients. It doesn’t take long to see that the list of the left page is missing several key ingredients. So, where do you find these ingredients? It’s time to flip through the book and read up on every heartless and see what they drop. Wouldn’t it be more efficient to list where to get all of these items in the synthesis appendix as well?

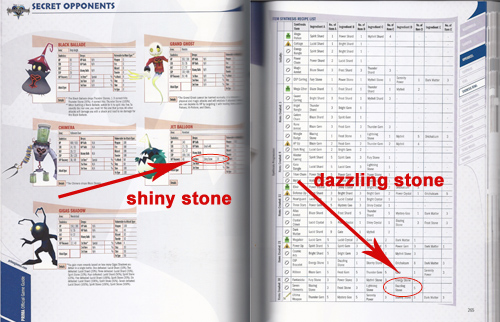
Oh but that’s not the only problem with the synthesis appendix. The writers apparently used different translations for some of the items and then didn’t confirm that they used the same name in each spot. Case in point, look at the pages below.

KHFM-translationOn the heartless page, it says the heartless will drop a “shiny stone.” There is no mention of a “shiny stone” anywhere in the synthesis appendix. What is mentioned is a “dazzling stone.” I had to look up extra help online to figure out where I could get this non-existent dazzling stone, and that’s where I learned that there could be two translations. That’s not confusing at all or anything. Here’s the kicker–when you defeat that heartless in the game, it clearly says it drops a dazzling stone. What this says to me is that the authors didn’t complete the synthesis in the game, and they used scripts they received from Square Enix or another translation. Maybe the writers didn’t think that synthesis was that big of a deal, but it doesn’t excuse sloppy work.

As another piece of proof that perhaps the writers didn’t play most of the game, they didn’t even get the rewards right for completing the Coliseum cups solo. They copied what the original guide said, and that information is incorrect.

On the surface, the Kingdom Hearts 1.5 strategy guide seemed like it was going to be as great as the original guide. Everything seemed to be in place, all of the chests and trinity marks were correctly marked, the walkthroughs were clear and concise, and the appendices appeared to have everything in order. Dig a little deeper, and it’s unfortunate to find incorrect information, translation problems, and suggestions that the writers simply copied from an older strategy guide. The first half of this strategy guide has been a disappointment indeed.

SGR Rating: 3/5

Authors: Michael Searle and Cory Van Grier
Publisher: Prima Games
Editions available: Hardcover
Acquired via publisher

Filed Under: Strategy Guide Reviews

Battlefield 4 Strategy Guide Review

December 5, 2013 By Blake Grundman Leave a Comment

Battlefield 4 Strategy Guide reviewIt is not very often that a guide comes around and knocks the traditional formula on its ass. Then entered the Prima Games’ Battlefield 4 Strategy Guide at stage right, which gleefully overturned the tables that previously held all of your expectations about what a game guide should be. Gone are the days of a laborious single player campaign walkthrough. It isn’t like the developer spent years developing that as an integral component of a cohesive experience, right? After all, who needs that useless garbage when all people really care about in a Battlefield title is the multiplayer experience. Will this new approach bode well for the Battlefield 4 guide, or does the shift in focus take away from what strategy guides are all about?

If there were ever a guide that could be labeled as a grade school textbook, Battlefield 4’s would meet the description to a T. Sure the subject matter might be a bit more on the saucy side, but cover-to-cover, it is the comprehensive end all be all, for what is widely considered to be the most complex and diverse multiplayer shooter on the planet. But every good story has a beginning, and the writers saw fit to properly acknowledge that with an introduction section that covers the legacy of the Battlefield brand. This is also complimented by behind the scenes discussions with the key team members that have been a part of the series since the beginning. Though it seems almost too brief, it is fantastic to get insights into the original goals of the developers, the brand’s evolution and where it is going in the future.

DICE’s tight ties to the book are further evidenced in the “Road to Battlefield 4” section that follows. Each major mechanic section is actually penned by a key member of the game’s design team, including multiplayer lead Thomas Andersson. Each developer spends a significant page count emphasizing what were key modification and/or additions in the most recent outing, such as adjustments to class structures, the new “Levolution” system, “Commander Mode”, vehicles and much more. Having the individuals who essentially owned specific features of the final product break down what makes this newest version so special does wonders for imbuing even the most trivial of components with the passion of those who made it possible. This is a fantastic way to help re-introduce traditional Battlefield players to the new mechanics and inform newcomers what to expect when they first venture into the immense and intense world of online multiplayer.

Next up is the meat of the actual multiplayer guide, but first it is worth mentioning the interesting approach Prima took to the drafting process. Veteran guide writer David Knight has teamed up with four of the best Battlefield players in the world to co-author this massive tome. Though it is a little unclear as to who is writing each individual general commentary segment, there are numerous specific call-out portions that are dedicated to a specific member of the team as a “pro-tip.” These are actually scattered throughout the guide and provide insight into many different strategic elements that take place over the course of a match, but more on that later.

Leading things off is a thirty page “Battlefield Bootcamp” that is dedicated to breaking down all of the key aspect of the game, its mechanics, modes, interactive elements that extend beyond the warzone itself, and most importantly, standard multiplayer tactics. It is imperative that players read this area, especially virgins to the series. Even then, noobs will probably still be eaten alive, but at least they will be able to speak the same language with their online brothers in arms. There is nothing worse than being saddled with a clueless chunk of cannon fodder. This will help prevent you from being that lame duck.

What follows the “101 class” in the ways of online combat are sixty eight pages of infantry information. Some of the key topics touched upon are proper class selections, weapon and perk loadouts, and the various unlock progressions for each unit type. Additionally, there are also several more “pro-tips” for each class, from each of the contributors. It is very interesting to see four varying approaches to using the same variety of soldier. If nothing else, it further demonstrates how versatile and complex the online ecosystem can be in the world of Battlefield. While this alone would be substantial enough to stand on its own, the majority of this section is actually reserved for detailing the title’s countless weapons and their respective modifications. Though it is hard to say if the information in this section is actuate, over a month after its release, it is still at least a valuable reference point for those needing to compare the pros and cons of different firearms.

And what would a Battlefield game be without vehicles? The franchise’s multiplayer suite is probably best known for its extensive use of these mobile weapons of mass disruption. Just like every other chapter, each grouping of motorized mayhem is laid out efficiently, including a list of the equippable upgrades available for purchase and advanced tactics that will utilize them the most effectively. Most of the tactics call-outs are focused towards the seasoned veteran, but even rookies see their benefits in time.

Once this has all been combed through, then comes the most impressive and expansive portion of the entire book: multiplayer map analysis. To put it into perspective, the smallest map commentary still boasts an extremely healthy twenty four pages. Considering that there are ten individual maps covered in the book, this would help explain the collection’s impressive two hundred and seventy pages. All of the stages’ are initially led off with general impressions from the writing staff and explanations of its marque levolution(s). These are then followed with dissections of each multiplayer mode, all the way down to recommended squad compositions throughout a battle. The more objective commentary is also buffered with additional “pro-tips,” from the resident expert writers. While the information contained within is fantastically detailed and almost overly explicit, it did feel like there were many pieces of art that, though beautiful, could probably be deemed superfluous. This sometimes led to pages feeling more claustrophobic or visually distracting than necessary. Everybody loves a good side profile shot of a tank or downed helicopter, but when the game itself features a plethora of them already, it probably isn’t necessary to include these unless critical to the strategy being discussed in the text.

Anchoring this massive manuscript are extremely brief campaign and achievement/collectables section. How brief, you ask? Why, a mere eleven pages. Yes, it is understandable that multiplayer makes up a vast majority of the guide, but why even bother to include even a reference to the single player, when it is going to be glossed over so egregiously. There are any number of explanations as to why this might have occurred, but it doesn’t change the fact that the main character’s name is only mentioned once and all but the introduction page consists of a continuous wall of spreadsheets. Unless Prima has plans of selling a single player guide separately, to call this effort disappointing would be like calling Thomas Edison a tinkerer.

One last piece of the puzzle is the prominently promoted digital/mobile component. Sadly, this two ends up lacking the original content necessary to justify its existence, aside from potentially being updated should new balance changes be introduced into the game. It has yet to be shown if it will be further augmented when new DLC is released, but this might be a step in the right direction. Pouring additional gas on the flame, the single player is still an afterthought. Sure, at least there is now a video playthrough of each stage to watch, but there is no direction, voice over commentary or so much as sliver of additional information, aside from the video timestamp where collectables are uncovered and a list of weapons available in each stage.

For fans that are exclusively consumers of Battlefield 4’s online multiplayer, Prima Games’ official guide will prove to be a wealth of information, the likes of which have rarely existed outside of dedicated fan sites and enthusiast forums. However, those that are focused on a single player walkthrough will be much better served turning to specialty sites online. It is hard to say whether this is a step backwards or simply sidestepping the bigger issue of whether or not print guides for a constantly evolving online experience are even valid in the internet age. Regardless of this author’s opinions on the matter, it still doesn’t excuse neglecting to cover half of such a prominent title, without communicating that to the reader before purchase. Misleading the audience is never a good foot to start out on, so buyer beware.

SGR Rating: 3/5

Author: David Knight, Michael Cavanaugh, Michael Chaves, Marcus Lovejoy, and David Walsh
Publisher: Prima Games
Editions available: Paperback and Collector’s Edition
Acquired via Publisher
Filed Under: Strategy Guide Reviews

  • « Previous Page
  • 1
  • …
  • 15
  • 16
  • 17
  • 18
  • 19
  • …
  • 44
  • Next Page »

Follow us!

Subscribe!

Upcoming Strategy Guides

 Nothing here. Come back later. 😢

Latest Strategy Guide Reviews

The Walkthrough by Doug Walsh Review

Red Dead Redemption 2 Strategy Guide Review

Mega Man 11 Strategy Guide Review

God of War Strategy Guide Review

Far Cry 5 Strategy Guide Review

Friends of SGR

  • BradyGames
  • Dan Birlew – Guide Writer
  • Doug Walsh – Guide Writer
  • Future Press
  • Game Enthus
  • GameWires.com
  • Piggyback
  • Press the Buttons
  • Prima Games
  • Racing Games

Top Posts & Pages

  • Unboxing the Epic Mickey Collector's Edition Strategy Guide

Copyright © 2025 · Web crafted by Warkhammer


Loading Comments...