• Home
  • About Us
  • Podcast
  • Strategy Guide Wit
  • Contact

Strategy Guide Reviews

A Strategy Guide for your Strategy Guides

  • Reviews
    • Strategy Guide Reviews
    • Video Game Reviews
    • Mini-Reviews
  • Features
    • Interviews
  • News
  • Unboxing Strategy Guides
  • Columns
    • Gaming Diary
    • Corner of Randomness
  • Videos

Gears of War: Judgment Strategy Guide Review

April 5, 2013 By Keri Honea 2 Comments

Gears of War: Judgment strategy guide reviewWhen Epic Games and People Can Fly announced that Gears of War: Judgment would implement a smart spawn system, thereby removing the possibility for players to memorize a level, I knew that the strategy guide writers for the game would have their work cut out for them. Whyile the smart spawn system wasn’t as extensive as I was led to believe, it still laid some tricky groundwork for the guide writers. Not to mention, each level would contain a Declassify mode, adding additional challenges for both players and the strategy guide writers to face. Of course, the strategy guide team at BradyGames was up for the challenge, and they knocked the Gears of War: Judgment strategy guide right out of the park. In fact, I enjoyed the strategy guide far more than I enjoyed the game itself.

In many ways, Judgment was structured similarly to past Gears of War games–large sections divided by smaller chapters. With Judgment, instead of breaking up the sections by scene, the sections are divided by who is testifying on behalf of the actions of Kilo squad. Within each bit of testimony, the section is broken up by 7-8 missions, which are more or less distinguished by scene. Each mission is extremely short by Gears standards; at the longest, they took me 10 minutes. At their shortest, especially if they were timed missions, they took less than four minutes. As such, you can see why the smart spawn system wasn’t as detailed as I had originally feared it to be; rather, what changed each time you visited the area was what enemies showed up. Don’t get me wrong, this still greatly changed my approach to getting through a level–defeating hordes of wretches is actually trickier than a team of drones and maulers. Because of this system, it was obvious that the writers played each level numerous times on the different difficulties so they could account for every possible scenario that would be thrown at the player. I would always know at the start of the mission what possible enemies could appear and where, even with the missions that had different waves of enemies.

Gears of War: Judgment strategy guide

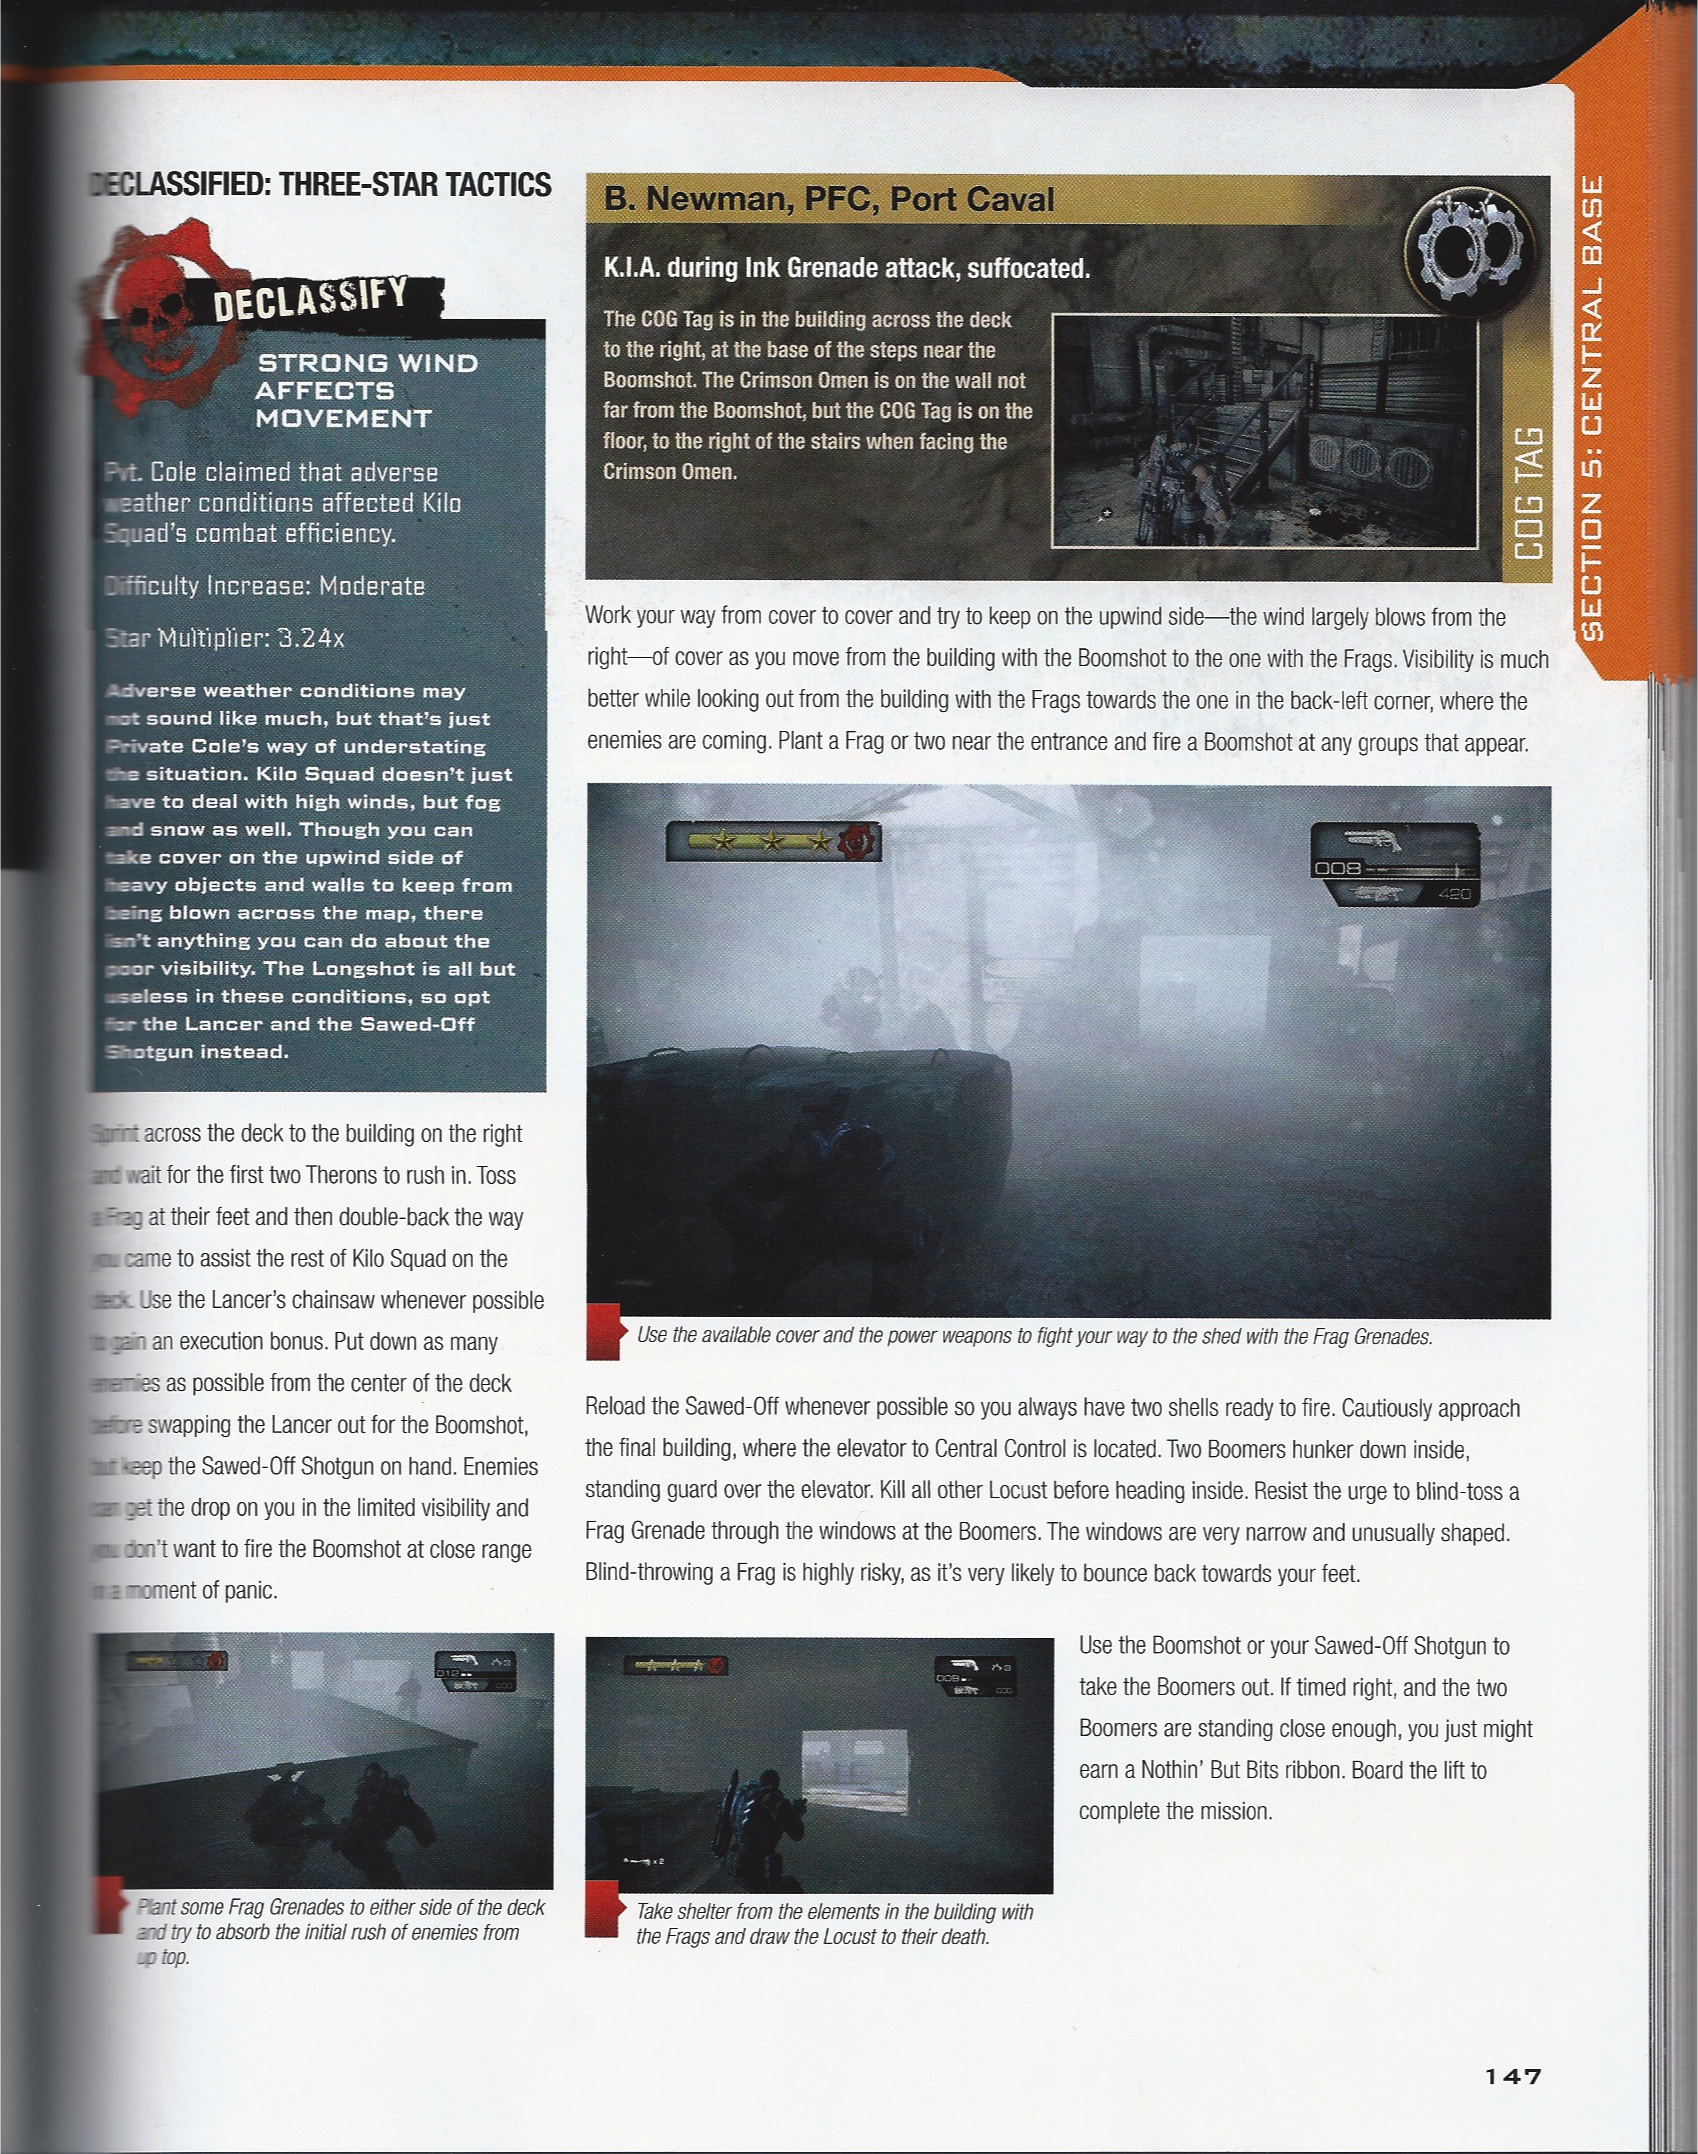
Declassify call-out box is super, super handy. Notice the call-out box for the COG tag? It will let you know if it’s feasible to snatch the tag during Declassify or not!

The point of Judgment is more of getting a three star award at the end of each mission for your performance than surviving the Locust forces, so the focus of the walkthroughs was on getting the highest ranking possible first, surviving second. It was kind of assumed that if you could get three stars, you would survive. Most importantly, the walkthrough always gave strategies for getting that three-star ranking without playing the mission as Declassified. When you turn the Declassified mode on, the stars fill far faster because the mode adds a greater level of difficulty. If you’re hunting for COG tags or you just don’t want to play Declassified right away, these strategies are crucial for filling up those stars. The fastest way to fill the stars is by earning ribbons, and the strategies are quick to tell you which ribbons are possible to obtain and the best way to earn them in rapid succession. Thanks to these tips, I was able to rack up at least two stars on every mission I played that I did not Declassify–as confusing as that probably sounds.

Since the Declassified mode added an extra set of parameters to each mission, such as adding a time limit, restricting weapons, reducing visibility, or adding more difficult enemies, the guide presented a separate call-out box with the Declassified mode details and its own strategies. I greatly appreciated this for two reasons:

  1. The strategy guide went into more detail about what the Declassified setting actually did than the game would. For example, the game, for one mission, said that Kilo had a reduced ammunition supply. The guide explained that this meant Kilo started with 30 rounds of ammunition for Lancers and there were no ammo boxes on the map.
  2. By knowing fully what I was up against beforehand, I could make an educated decision as to whether I felt like playing the level Declassified or not. I cannot stand time limits in any game, but I played a few of the Declassified missions that imposed time limits thanks to the strategy guide going over how difficult this challenge was, what the time limit was for each level of difficulty, and the level of gaming finesse you had to have to get through it. If the guide said you needed to be a master at performing head shots in quick succession, I skipped it. If the guide said you had to be fast, but by using this or this weapon, you could easily do it, I at least tried it. Believe it or not, I actually did most of the timed missions.

Gears of War: Judgment strategy guide
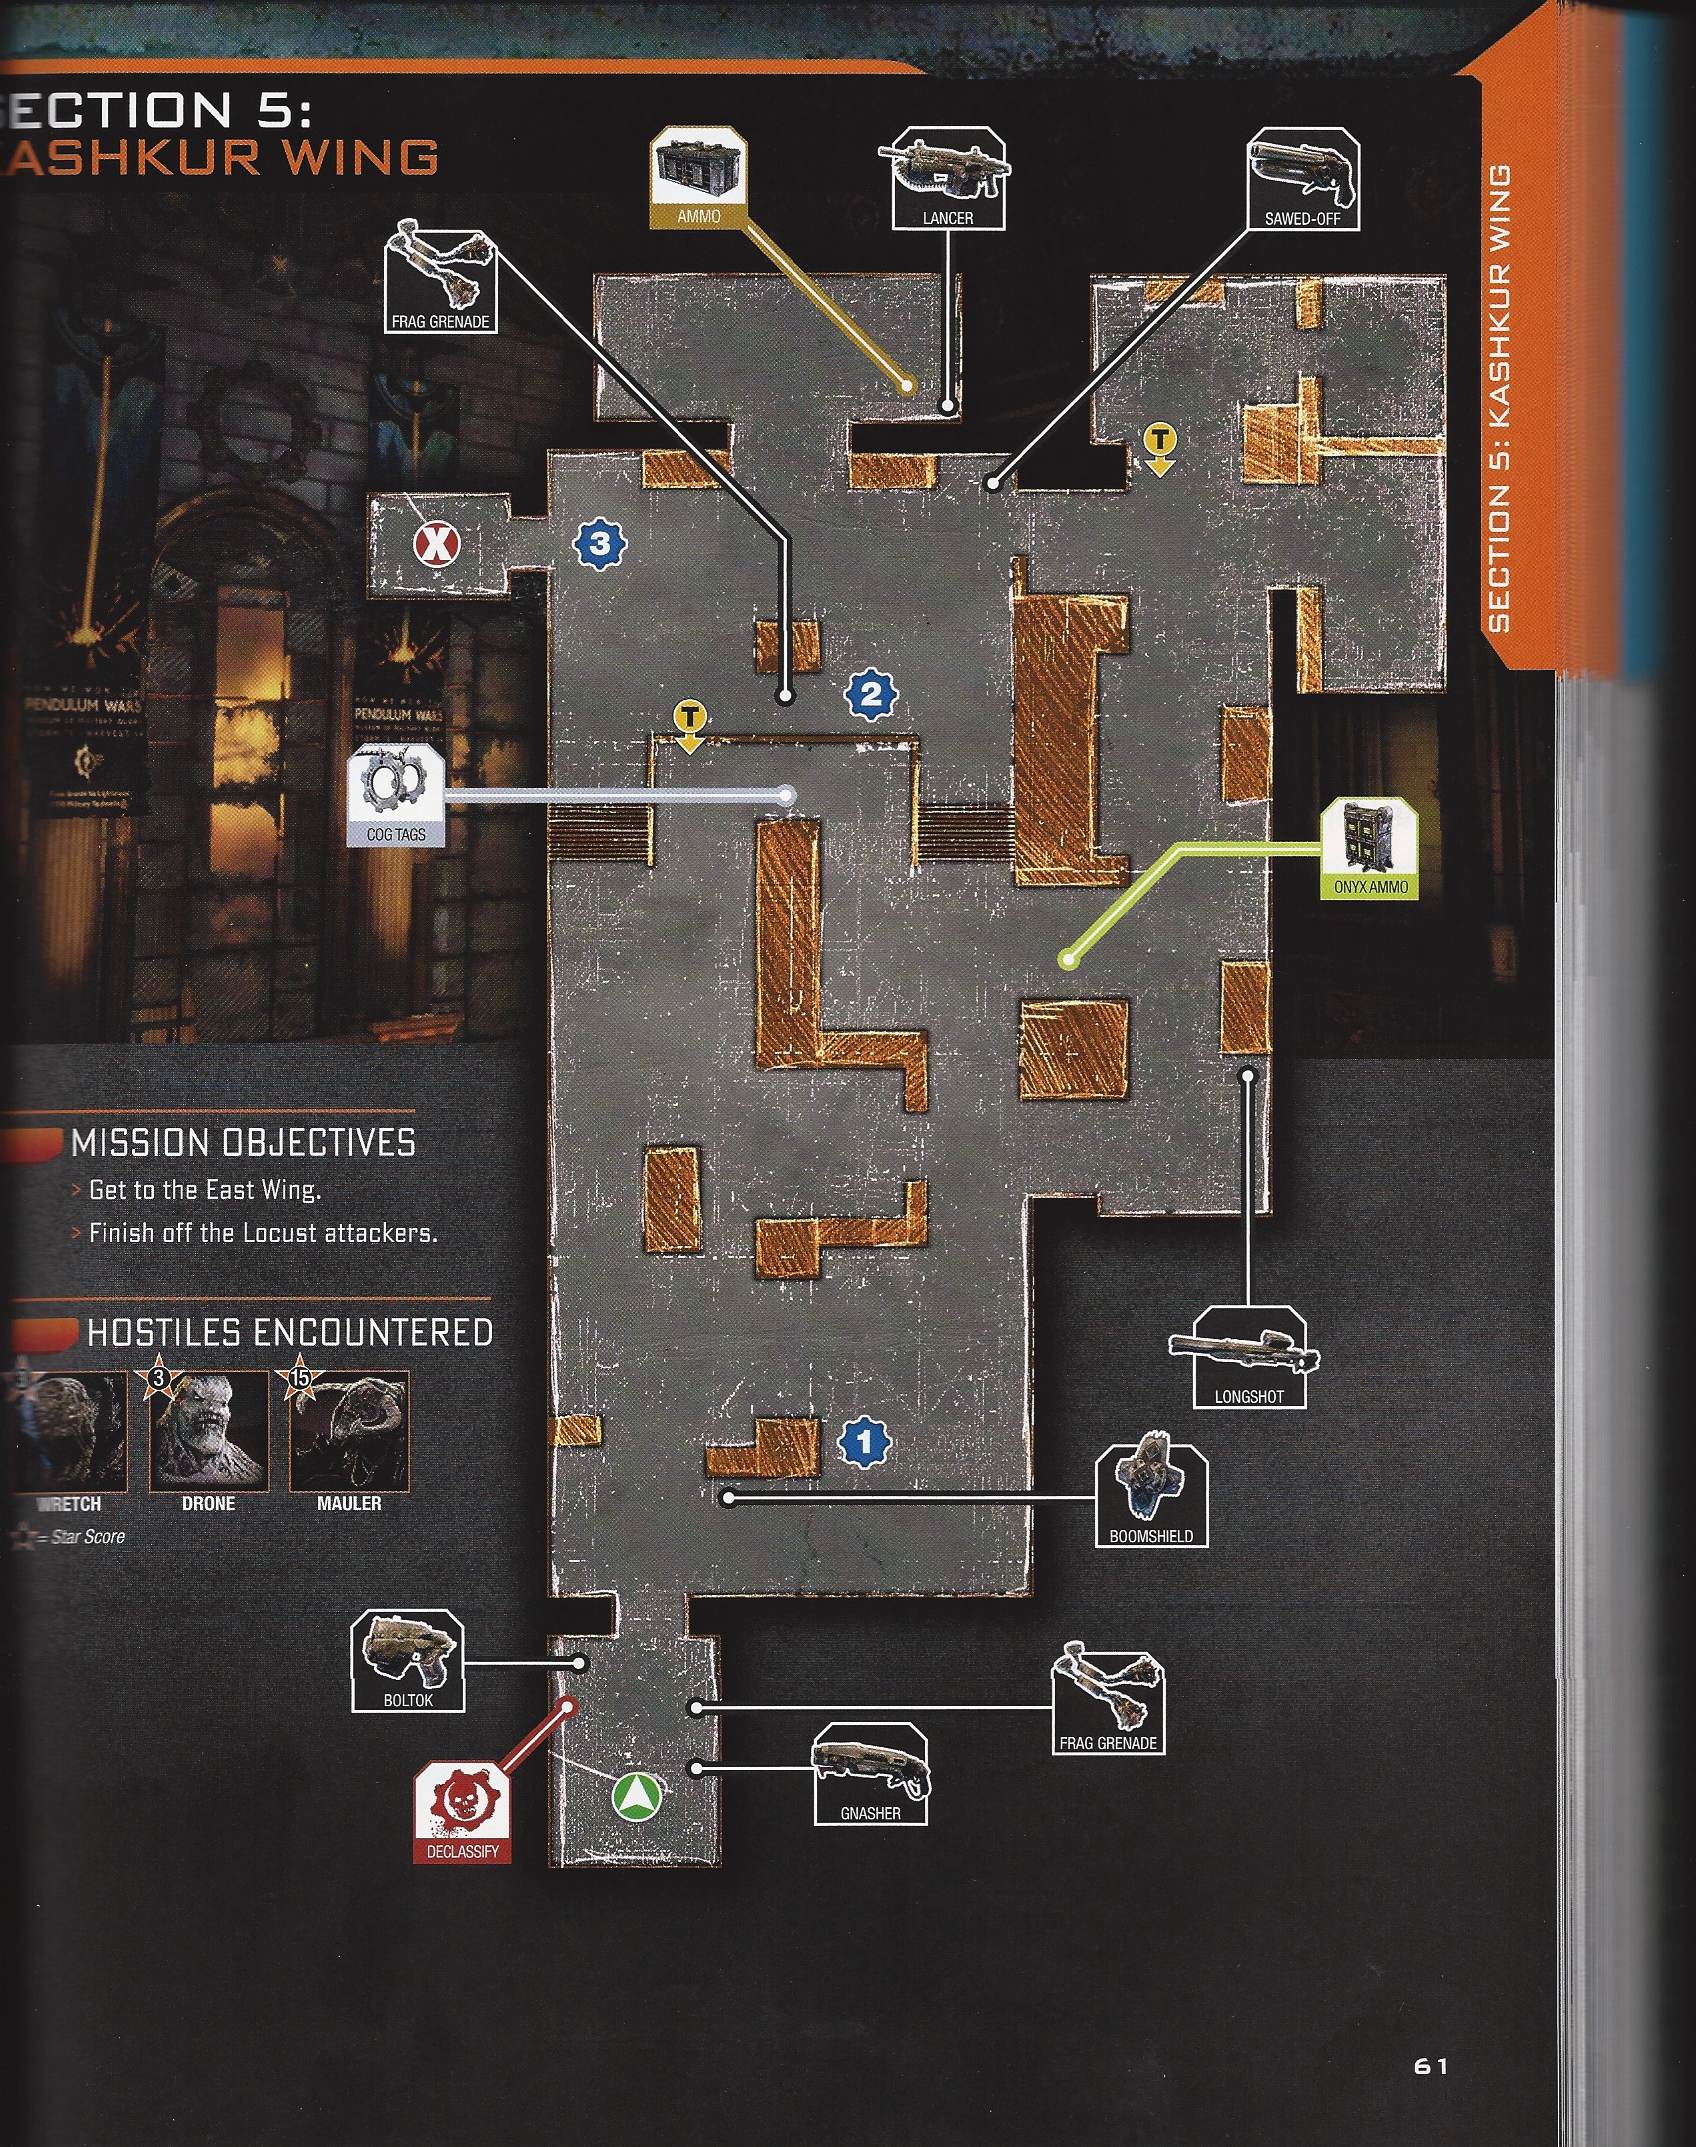
As I’ve said before, the missions are incredibly short, save for those in the Aftermath campaign, so the maps aren’t that entirely useful for the main campaign unless you’re hunting the COG tags or you REALLY REALLY REALLY need that Onyx Ammo box. That said, it didn’t stop the strategy guide team from creating some really detailed maps. I only found two flaws with all of the maps: one map was missing a COG tag marker, and another did not have the Declassify marker. At least it’s nearly impossible to miss the Declassify markers when traversing through the campaign, and I found that one wayward COG tag easily enough since all COG tags have their own call-out boxes in the walkthrough. (For the record, thanks to the strategy guide, I found all 48 COG tags in my first playthrough.)

Since Gears of War: Judgment itself is so incredibly short, and is not that difficult on a Normal setting with no Declassify modes activated, I cannot recommend the Gears of War: Judgment strategy guide if this is all you’re going to do with the game. However, if you want those COG tags (some are not easy to find, trust me) and you want those three-star ratings on harder difficulties with the Declassify mode turned on, then BradyGames’ strategy guide is your perfect companion to Kilo squad.

SGR Rating: 4.5/5

Authors: Doug Walsh, Michael Owen, Kenny Sims, Jim Morey
Publisher: BradyGames
Editions available: Collector’s Edition
Acquired via Publisher

Filed Under: Strategy Guide Reviews

Metal Gear Rising: Revengeance Strategy Guide Review

March 25, 2013 By Nicholas Michetti 1 Comment

Metal Gear Rising: Revengeance Strategy Guide ReviewMetal Gear Rising: Revengeance marks a distinct gameplay departure from the MGS series. Instead of a stealth game, Raiden’s spin-off offers fast-paced stylish action similar to games such as Devil May Cry and Bayonetta. Gamers who are following Raiden from his roots in more traditional Metal Gear games to MGR:R may encounter some difficulties, especially with a game that has experience points so strongly tied to battle rankings. Piggyback’s Metal Gear Rising: Revengeance strategy guide, though, is a one-stop resource that should be able to help players get the best battle rankings and all of the Battle Points (MGR:R’s XP) that they need.

Two of MGR:R’s big gameplay focuses are Zandatsu (the game’s signature finishing maneuver in Blade Mode) and parrying (how attacks are countered). The strategy guide will let players know everything that they need to in regards to these mechanics, especially what enemies can be hit with a Zandatsu immediately or what damage qualifications are necessary to get one, what enemy attacks can or can’t be parried, and what signs players should look for to be ready to parry an attack. The information can be invaluable at times and can help players significantly increase their rank.

Speaking of increasing rank, the strategy guide’s advice for specific combat situations is focused on players gaining an S-Rank in every ranked battle. The guide also assists players with engaging in the right styles of combat, helping them learn effective techniques that can be used when facing enemies in future battles. Following the guide’s advice closely or even just keeping specific points of advice in mind can be the difference between a B rank and an A or S rank. Performing better in battle results in earning more Battle Points, which further results in players being able to give Raiden more upgrades and access more weapons. The guide even makes recommendations about what specific upgrades players should invest in before moving on to the next chapter, which are virtually spot-on. The level of accuracy for the guide even extends to item locations, as mostly everything is exactly where the guide says it is, with rare few exceptions.

The official guide also has a vast amount of data in it, from how the scoring system works, what parts of an enemy are strongest or weakest (down to color labeling representing the strongest and weakest areas), how much damage enemy attacks do, the stats for each weapon and sub-weapon, and more. For players who would eventually like to master MGR:R, the guide provides all of the relevant data necessary to assist them with their goal. Tables containing information on how a battle is graded (time, Zandatsus, kills, etc.) accompany every ranked battle and the guide also has No Damage and No Kills tables available when applicable. Finding information in the guide is very easy as well, as the pages have very clean layouts and call-out boxes are well implemented. The guide’s item discovery/level layout sections are separate from the battle sections, which may see gamers flipping pages back and forth a bit, but that’s ultimately a minor nitpick.

If the strategy guide has one downside, though, it’s that the S-Rank only strategies may be intimidating for some players to pull off, especially those players who are new to this style of game. The guide admits that pursuing S-ranks right away isn’t a good idea, saying that on a first playthrough, gamers should just play for fun and familiarize themselves with the game’s core techniques. While most of the guide’s advice can be used quite well for an initial playthrough, newcomers may struggle a bit trying to keep up and there are occasional sections that recommend equipment that players won’t have on their first-run playthrough or may not have unlocked yet. However, the guide’s advice also will immediately become much more clear and perhaps even more accessible on a second playthrough. (A second playthrough on MGR:R is easily accomplished with a game length of around ten hours or so, which can be shortened even further by skipping cut scenes.)

As for the Collector’s Edition value, MGR:R’s CE guide has a sixteen-page artwork section with comments from staff from Kojima Productions and Platinum Games who worked on the game. The section isn’t particularly a must-have, but it provides a nice look at some of the artwork that went into the game and may be a plus for players looking to pick up the great Yoji Shinkawa textured paper lithograph depicting Raiden that comes with the guide. The guide also has a nice hardcover with an image of Raiden on the front, split down the middle with an electrically charged blade. Fans less enthusiastic about Metal Gear may not enjoy the extras as much, but for the Shinkawa lithograph and the additions to the CE, the $10 difference in comparison to typical paperback guides will be worth it for hardcore fans of the franchise.

If someone is new to playing MGR:R and seeking advice or is looking for advice on how to get S-ranks in every battle in the game, the Metal Gear Rising: Revengeance strategy guide is absolutely worth picking up. The guide is packed with as many bits of essential information as imaginable to help players figure out how to defeat an enemy that they’re having difficulty with, get through boss battles with greater ease, get the best possible ranks in combat, and have an easier time playing the game all-around. Regardless of experience level with this type of game, the guide is more than capable of helping players beat or best MGR:R. Piggyback’s guide is simply a must-have for anyone who might be looking to pick one up for Metal Gear Rising: Revengeance.

SGR Rating: 4.5/5

Publisher: Piggyback
Editions available: Hardcover Collector’s Edition
Acquired via Publisher

Filed Under: Strategy Guide Reviews

Crysis 3 Strategy Guide Review

March 19, 2013 By Blake Grundman Leave a Comment

Crysis 3 strategy guide reviewCrysis is a brand of first-person shooter that has become synonymous with pushing PC technology to the point that it taps out in virtual agony. Though never the most challenging or impressive gameplay wise, the unique wrinkles that it provided to the traditional shooter had helped the developer Crytek etch out a corner of the market where high production values were paramount above all else. As is the case with most FPS games, it would seem that the “run-and-gun” mentality of most titles would not lend themselves well to strategy guides. If you commonly think this way, oddly enough, this time you couldn’t be more wrong with the Crysis 3 strategy guide.

If chess and the garden variety first-person shooter were to have a baby, the result would be Crysis. Combining the diversely different tech found in the player’s nanosuit with all of the different weapons at the player’s disposal renders the game approachable in virtually every way known to man. Like getting the jump on enemies? Slap on the invisibility perk and shank those bastards like you are the new kid in the prison yard. Prefer to run into the middle of the fray and unleash all hell? Fire up the hardened shell and start throwing some ‘bows. The other two primary skills of speed and strength also work to compliment playing through the campaign in either a stealth or action mode. In response to this flexibility, the Crysis 3 strategy guide’s walkthrough is actually covered twice in the text, breaking down both gameplay options.

Splitting the walkthrough into two pieces is by far the best approach to covering the single-player component. This also makes it easy for the player to switch back and forth between gameplay approaches, on the fly. As long as you are familiar with how a table of contents works, you should be good to go. One important thing to note when comparing these parallel commentaries are that rather large chunks of text are re-used in both sections. While this isn’t really all that horrible considering it is more story based synopsis or observations, it might have been nice to have a different dialog between versions. Regardless, the writing is solid enough that it isn’t that big of a deal in the broad scheme of things.

I personally found the descriptions of interactions throughout the campaign breakdown to be extremely amusing. Using phrases like “start popping heads” to describe sniping is just one of many examples of text used to provide cheeky, yet completely worthwhile analysis of a situation. The call-out sections are also extremely useful when learning how to down specialized (and primarily alien) enemies for the first time. There is both important information that applies to that specific encounter, as well as any others that may come later on down the road. Be sure to pay close attention, because understanding these key concepts pay dividends in the long run.

Thankfully, the enemies are tightly scripted in Crysis 3 . This means that virtually every aspect of the walkthrough is spot on. Everything from weapon drops to enemy locations are spelled out in detail and can be either dispatched or avoided (depending upon which approach the player is using) by following the directions to the T. Rarely ever is there a case where something in the text proves to be inaccurate, which says quite a bit about the time that the author invested in the game. Sure, it is one patch away from rendering the walkthrough nothing more than expensive kindling, but as of right now things seem damn near spot on.

As useful as any guide can be helping a player through the single player campaign, rarely do you find a strategy guide that is even remotely as useful when it comes to the multiplayer portion of the game. The Crysis 3 tome is a rare exception to this rule, dedicating a staggering quarter of the entire text to the often neglected mode. Considering that this is where many would argue that the meat of the overall game lies, it is an extremely welcome change from the norm.

The author really had their work cut out for them in trying to concisely describe each of the title’s numerous multiplayer modes. If you are familiar with online shooters, most of this section will be old hat, but in the case of Hunter and Extraction mode, even seasoned veterans would be wise to take note of some of the knowledge dropped on the pages. It could make the difference between digital life and death. Another nice touch are the different suggested player roles in a team, as well as suggested loadouts for these respective positions. Additionally, every single perk and power-up is discussed, which should help the inner strategist in everyone.

In one final victory for the reader, each map has a full page dedicated to the a top-down view of layout, with certain specific locations called out for spawn points, weapon drops, or other places of interest. These maps are then complimented by a half page writeup, which discusses both strategy and the kind of gotchas that would only come from hours of trial and error. The smart gamers out there would be wise to take all of these pieces of commentary to heart if they plan on getting a leg up on the competition.

If there were one downfall to this otherwise exceptional guide, it would have to be the lack of pages dedicated to showing off the fantastic art assets of the game. Crysis 3 is the type of experience that looks beautiful, so why this wasn’t taken full advantage of is a bit baffling. Yes, these sections are certainly not crucial to the overall value of the book from an actual “guiding” perspective, but why not give the reader the chance to stop and smell the proverbial roses?

Players that are looking to improve on all aspects of their Crysis 3 experience should look no further than this strategy guide. It provides more than enough guidance to the audience, while not inundating them with useless information. Plus, the addition of a stellar section dedicated to multiplayer makes this far and away the most comprehensive guide for a first-person shooter that I have ever encountered. So what are you waiting for? Get down to business and send those aliens packing, thanks to a little help from your buddies over at BradyGames!

SGR Rating: 4.5/5

Author: Michael Lummis
Publisher: Brady Games
Editions available: Paperback
Acquired via Publisher

Filed Under: Strategy Guide Reviews

Ni No Kuni Strategy Strategy Guide Review

March 5, 2013 By Chris Nitz Leave a Comment

Ni no Kuni strategy guide reviewI must be honest in that I had no idea what Ni No Kuni was until I saw the cover art for the strategy guide from Prima. This simple glimpse had me digging for more info about the game and ultimately led to dropping some cash for a preorder. All I can say is that I am so glad I snagged this game, and even more so that I was able to use this guide throughout my many hours of playing in this unique and wonderful world.

To start, the Ni no Kuni strategy guide wreaks of quality. I don’t know what Prima did, but even just thumbing through the pages I noticed they felt thicker with a hint of a waxy coating. I found this hard to believe so I had my wife flip through it and she confirmed my feelings. Whatever Prima did, and factoring in that this may seem like a small detail to some people, it is a wonderful touch to bring up that quality feeling for the consumer.

Yummy yummy details

Yummy yummy details

That attention to detail only carries over into the content that fills those waxy pages. While the game does a decent job of breaking down all the mechanics over the span of a few hours, the strategy guide provides a bit more detail. Anyone that might struggle with swapping familiars in and out or what to look for in enemies as to when to prep for a devastating attack, this section is the missing manual. I found myself reading through this a few times just to pick up more tricks to aide my combat skills. There is a lot to Ni No Kuni, so do not just skim over the first 22 pages, but rather take the tips and tricks to heart as they can save a controller from being thrown across the room in frustration.

Now usually the main walkthrough would start after the game basics, but Prima drops in the giant section for familiars. As these are the lifeline of the game, a lot of time goes into studying every drop of info here. Every familiar contains an easy to read breakdown of what they are capable of, their metamorphoses, unlock conditions, and strengths and weaknesses. Seriously, at 432 pets to collect, prepare to spend a good amount of time here. The last few pages provide a handy listing of all the fighting tricks these battlers are capable of performing.

Mr. Drippy has all kinds of advice for you

Mr. Drippy has all kinds of advice for you

Finally, the walkthrough section begins. He we find not only a play-by-play of how the story unfolds, but some nicely detailed maps of where main quests, tasks, provisions, armor, and so much more might be found about the world. I also found the boss breakdown to be of great help as it prepared me for what to look for, what to avoid, and ultimately led to simplifying some very brutal battles. I should also note that this saved me some time in trying to get chests that I was not able to get until I acquired a new tool and trick.

What I did like is that the various tasks (side quests) not only have their own section (right after the main walkthrough), but they also have small blurbs about them in the main walkthrough. This saves a good amount of time flipping back and forth, as there is a lot of that already with the familiar area.

This does bring me into the task section. For those that may want more info on the abundance of side objectives, this section will make for a happy life. Any prerequisites, rewards, small descriptions of what to do, and when each task is unlocked may be found right here. The reward even details how many stamps one gets upon completion. I so loved this when I had limited time to play, but I only need two or three stamps to fill out my card.

The last section is an appendix that contains a thorough breakdown of enemies, items, important (see storyline necessary) items, and trophies. I didn’t spend as much time in here as I thought I would, but I did find myself coming here to find various weapon information as well as studying the various stats for some of the more difficult creatures in the latter part of the game.

I must also compliment Prima on their Heart of Ni No Kuni portion. This is at the very end of the book and it contains interviews and concept art for one of the most gorgeous games I have enjoyed in recent months. I recommend any fan take some time to read the interview portion as it really provides some meat to what it took to make this game and bring the vision to life, while the concept art is just a wonderful look at how the artists mind works when designing the assets.

Easy navigation for the win!

Easy navigation for the win!

One big thing to note here is how Prima even simplified navigating through the Ni no Kuni strategy guide. If you look at the side of the book, you will notice dark markings in a staggered pattern. These also correlate to a change in page colors. The main walkthrough, for example, is the middle marker on the yellow pages while tasks are the fourth marker down on green pages. While this may not seem like such a big deal, I found that I started to use this coding system for quickly jumping into the different areas of the guide if I had closed it during my play session.

I am extremely pleased with this strategy guide. If you are on the fence about this guide, just splurge and pick it up as it is worth every penny. The quality is superb and the amount of time it will save you in the long run is totally worth the investment. It also looks nice on the coffee table!

SGR Rating 4.5/5

Author: Howard Grossman
Publisher: Prima Games
Editions Available: Hardcover
Acquired via Publisher

Filed Under: Strategy Guide Reviews

DmC: Devil May Cry Strategy Guide Review

February 21, 2013 By Keri Honea Leave a Comment

DmC strategy guide reviewDmC: Devil May Cry can really be summed up with two gaming elements: collectibles and massive boss fights. Okay, so it does have an emphasis on combos, but in terms of strategy guide meat, the combos are nice pieces of fluff that are more for each individual player’s benefit and play style. A strategy guide can’t really help players with combos, since players will prefer certain combos that are unique to each player’s gaming style. For example, I am terrible with executing well-timed combos (there’s a reason why I don’t review fighting games and their strategy guides), so any combos I saw that required a pause in button pressing was immediately ignored. Any combos that were a mash of buttons–particularly mashes of the same button–were instantly added to Dante’s repertoire. The only combos the DmC strategy guide called upon were the combos automatically given when Dante learned a new ability, and selfishly, I was most grateful for that. I might have thrown the strategy guide across the room if it called on me to use a specific combo I needed to purchase–especially because knowing my luck, it would be a combo I couldn’t master.

Now that I’ve completely digressed from the original point of that last paragraph, let’s get back to the two main elements of DmC: collectibles and massive boss fights. The game itself is pretty straight forward and doesn’t really host a fear of getting lost. There is some exploration in each level for collectibles, and like other DmC games before this one, several collectibles in each level aren’t accessible until you get a certain power later in the game. The strategy guide does a great job highlighting where to find each of these collectibles in the walkthrough. However, if you’re going back through the game or individual levels to open up areas you couldn’t before, obviously you aren’t going to want to re-read the walkthrough. That’s where the handy-dandy quick reference guide in the back comes in, which goes over every collectible and where to find it in a level. The quick reference also gives a nice heads up on all the secret missions (challenge doors), so you can read up on each mission and determine whether you want to partake in the challenge or not before walking inside.

As for the boss fights, it can be argued that the boss fights are a little force-fed as to what you need to do, especially the first real boss fight (the Succubus). While for the most part you could make that case, at least the DmC strategy guide never treated the player as such. Each boss was neatly laid out in their own separate walkthrough pages at the end of that particular mission. Each boss fight begins with a callout box listing the boss’s weak points, attack warnings, and basic tactics players should use against the boss. Think of it as a TL;DR section for those who don’t want to read the detailed strategy. Of course, I read the detailed strategy as I’m terrible fighting bosses. I found each strategy to be sound and they helped me get through each fight the first time and with little frustration.

As great as the DmC strategy guide is, I do have one complaint about it. The main walkthroughs really focused on obtaining every collectible possible, and sometimes snagging these required really convoluted paths, particularly the level in the soda factory. For those who aren’t out to catch ’em all, the directions may feel disorienting and lost-inducing, such as how to get through the soda factory. For the most part, this isn’t a huge problem as the levels are linear, but on occasion, it is easy to get turned around and confused as to where you need to grapple to next. If you’re trying to read the walkthrough, you’re only going to get more confused.

Since the DmC strategy guide really is for the collectible completionists anyway, my one complaint really doesn’t detract from the guide as a whole. The strategy guide is still the perfect companion for those who really want to get everything out of the game, and it nicely offers up extra assistance for those playing on the far more difficult settings.

SGR Rating: 4/5

Authors: Michael Lummis and Chris Burton
Publisher: BradyGames
Editions Available: Paperback
Acquired via Publisher

Filed Under: Strategy Guide Reviews

  • « Previous Page
  • 1
  • …
  • 19
  • 20
  • 21
  • 22
  • 23
  • …
  • 44
  • Next Page »

Follow us!

Subscribe!

Upcoming Strategy Guides

 Nothing here. Come back later. 😢

Latest Strategy Guide Reviews

The Walkthrough by Doug Walsh Review

Red Dead Redemption 2 Strategy Guide Review

Mega Man 11 Strategy Guide Review

God of War Strategy Guide Review

Far Cry 5 Strategy Guide Review

Friends of SGR

  • BradyGames
  • Dan Birlew – Guide Writer
  • Doug Walsh – Guide Writer
  • Future Press
  • Game Enthus
  • GameWires.com
  • Piggyback
  • Press the Buttons
  • Prima Games
  • Racing Games

Top Posts & Pages

  • Final Fantasy III Strategy Guide review by FuturePress
  • Unboxing the Epic Mickey Collector's Edition Strategy Guide

Copyright © 2025 · Web crafted by Warkhammer


Loading Comments...