• Home
  • About Us
  • Podcast
  • Strategy Guide Wit
  • Contact

Strategy Guide Reviews

A Strategy Guide for your Strategy Guides

  • Reviews
    • Strategy Guide Reviews
    • Video Game Reviews
    • Mini-Reviews
  • Features
    • Interviews
  • News
  • Unboxing Strategy Guides
  • Columns
    • Gaming Diary
    • Corner of Randomness
  • Videos

World of Warcraft: Mists of Pandaria Strategy Guide Review

October 18, 2012 By Chris Nitz Leave a Comment

Mists of Pandaria strategy guide reviewAh World or Warcraft (WoW), you are the juggernaut that so many games try to tackle, yet you remain king of the hill. During your 10-year reign, countless players have died in your dungeons, slain numerous bosses, cleared heaps of dungeons, and battled for coveted gear. It seems now you want to bring back players by enticing us with cute pandas and martial arts. Well, it worked!

What does not work is the Mists of Pandaria strategy guide from BradyGames. I have to slightly deviate from my normal review style not only due to how this guide is laid out, but because I feel the need to save WoW veterans some time. If you are a WoW addict and have any amount of time, six months or so, in this game, you can skip this guide. If you are completely new to this Blizzard crack, have NEVER EVER touched an MMO, or just like having books in your bookcase, then go ahead and read on.

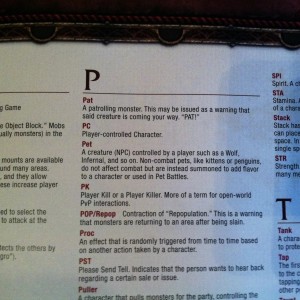
Well crap, that is what a pet is.

The first 203 pages take the reader through the basics of not only an MMO, but also WoW itself. If you’ve never heard of a Blood Elf Death Knight or what an Auction House is, then these pages will serve you well. This section not only has a comprehensive glossary of terms, but it also contains a small blurb on life as each race as well as how to get through their starting areas. I need to note that there is a small excerpt here on picking a class, more on this later. On the plus side, this is your first glimpse at the new talent screen.

From here, the guide gets all sorts of scatterbrained. The next 50 pages actually breakdown the new features of the Mists of Pandaria expansion, including the pet battle system and mechanics. This is a good place for all players, new and old, to spend a few moments as it does cover how characters/UI/reputation/professions change, sometimes rather drastically. It is not much, but there is a smidgen of useful info here.

The next 32 pages tackle all the newly added dungeons, raid areas, and the continent of Pandaria itself. It also covers the revamped dungeons like Ragefire Chasm and Scarlet Monetary. This is good content to study for all you hardcore dungeon crawling raid fans, as this is where you are spending countless hours farming for gear.

Now we hit 164 pages of what the heck. Remember how I said I would cover the classes later, well that is because they appear in greater detail towards the back of the book. This also applies to picking a profession, like cooking, as well as PvP tips and tricks. I say “what the heck” because this whole area feels misplaced and needs placement at the front of the guide. Why make readers go through all the races and then have to flip to the back to find out info on the classes? This does not jive with the basics of character creation. It also means that new players who are playing on PvP centric servers are also diving into the back of the guide to get valuable info before they sink hours into character development. This seems like so much more work than it needs to be.

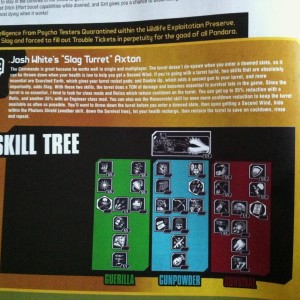
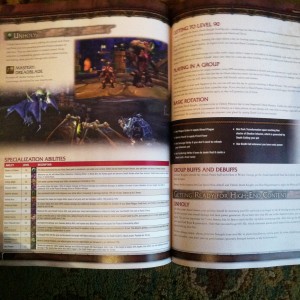
Despite some misplacement, there is some meaty info in here for novices. New players can read how each class grows and matures between level one and ninety. All talents, spells, and abilities appear in clean charts that are simple to read and easily usable in planning a new character. Old timers may want to look in here as well as this is the easiest place to see how various spells now behave as well as what might be missing from a beloved class. The authors did try to make this portion specific enough to help new players pick something they would like, yet kept it vague enough that future patches and hot fixes will not render the info completely useless.

A six-page bestiary covers the new creatures added in this expansion. It does give level info and locations for each creature, along with a brief description of each. This is handy for all those go to x location and kill y amount of z enemy.

Wait, what did Blizzard do to my class

Lastly, we hit the achievement section, which is lackluster at best. Almost every guide I have reviewed contains something similar, but with a nice table showing the achievements, their value, and how to obtain the harder ones. While I fully understand that WoW is a big game with countless things to do, showing me the in-game achievement screen and then regurgitating info that is clearly ascertained from that screen feels terribly cheap. Instead, give me info on how to score some of the more difficult achievements. This tiny section is totally skipable.

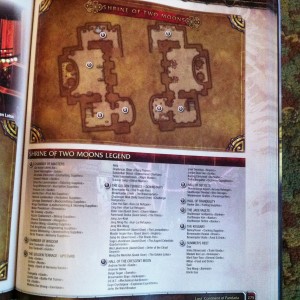
This is a hard guide to recommend. The bulk of the info in here is stuff veteran players either know already or can quickly figure out within a few moments upon logging into the game, or the game spoon-feeds novices as they make their way up the level ladder. The maps are nice, but they make up a small portion of this guide, and are freely available online. As a long-time player, I cannot see spending money for a few pages detailing the changes to the game with a few handy charts showing me changes to my beloved Mage or Hunter. At the end of the day, this just makes me a sad panda as I so wanted to love this strategy guide.

SGR Rating 2.5/5

Author: Michael Owen, Kenny Sims, Joe Branger, Forrest Walker, Howard Scott Hughes, Ken Schmidt
Publisher: BradyGames
Editions Available: Collector’s Edition and Paperback
Acquired via Publisher

Filed Under: Strategy Guide Reviews

Dishonored Strategy Guide Review

October 17, 2012 By Keri Honea 2 Comments

Dishonored strategy guide reviewI’ve compared Dishonored to Deus Ex: Human Revolution ever since I saw previews for it at E3 earlier this year, and while the story and setting are obviously quite different from that of DXHR, the basic ideas behind both games were relatively the same. The main character is a body guard who has some powers to be either extremely lethal or extremely sneaky, and the game itself is very open in how it can be played, depending upon whether the player wants to be lethal or sneaky. As such, I completely counted on the Dishonored strategy guide to be a little similar to the DXHR strategy guide to offer both options of lethal and sneaky gameplay (I’ll start using different words in a bit, I promise). As I said in my initial impressions, the Dishonored strategy guide did do this much, which pleased me greatly. Unfortunately, the written content itself made using the guide’s walkthroughs a very frustrating ordeal, forcing me to rely mostly on the maps and appendices for any sort of proper guidance.

The layout and organization of the strategy guide is nearly flawless. Each mission begins with an overview of the goals, sidequests or special actions, lists of collectibles, chaos requirements, and maps with legends. From the get-go, I always knew what I needed to look for and I could plan my playthrough according to my goals for chaos (high or low chaos affects your ending) as well as prepare for the kinds of enemies I would face. For someone who gets edgy and tense playing stealth as much as I do, I needed this kind of planning. I could instantly look at the maps and take note of how spread out the runes, bone charms, and Outsider Shrines were and determine if I thought any of them were worth the risk of getting caught, potentially setting off alarms, or forcing me to kill lots of people–as I really hated reloading.

Dishonored strategy guide maps

The maps with their legends were so in depth, I found myself using these to plan my treks through Dunwall more than I was relying on the walkthroughs themselves. The fact that the walkthroughs were really hard to follow made my dependence upon the maps even stronger. In particular, these sentences had me running around in circles in absolute confusion for a better part of 10-15 minutes:

A series of metal posts leads to a stone wall. Stay on top until you can see an area littered with broken and defunct equipment on the right. Head into this area and look for a small opening on the left. Use it to climb into the guard quarters, but be careful of the lone patroller. Knock him out and put him out of sight, and then grab the Rune under the bunks.

When this is done, turn your attention to the nearby moat full of fish. Possess one and use it to slip through the bars and into the tower proper.

For starters, there are two different sets of metal posts in this area. Both lead to stone walls, and both lead to areas of broken equipment on the right. I of course, took the wrong path that brings you to an area that stops severely short of the guards quarters. The path the guide wanted me to take is the outside perimeter of this region, all along the top of the main stone wall.

Dishonored strategy guideSecondly, it took some running around the bunkhouse to find this moat. It wasn’t along the entire back of the bunkhouse, and access from the building was severely limited from where I was. If I had been told to take the stairs on the left and head toward the center of Dunwall, I would have found the moat a lot sooner. However, this isn’t the main problem I had. The biggest problem was finding this grate to take as the fish. The moat water is extremely dark, and the only way I could find it was by possessing numerous fish (had to possess others when the fish I was in died) and swim along the walls. I kind of hoped there was a screenshot of the grate and where it was in the moat–because to be honest, I was convinced I was not even in the right moat after awhile–but instead, all I had was the screenshot to the right, that only showed me the door I would walk through after I finished my swim through the grate. Words cannot express how not useful this was.

Dishonored strategy guideThe page layout for the walkthroughs was, for the most part, great. The call-out boxes for the sidequests and special actions really helped me make sure I didn’t miss anything that I wanted to complete, and even the call-out boxes alerting me to prime places for Achievements/Trophies were greatly appreciated. However, what I really wanted was call-out boxes for the collectibles. Collectibles were mentioned in the written walkthroughs for the specific paths they laid out, but if you really wanted to “catch-em-all,” you had to rely on either the maps or the detailed appendix that is complete with screenshots.

As a whole, I found the Dishonored strategy guide to be more frustrating than anything else. I felt constantly lost and confused as to where I was supposed to go, and most of the time, I abandoned the guide’s walkthroughs for my own just because I couldn’t make sense of them. The maps and appendices are this strategy guide’s absolute saving grace.

SGR Rating: 3/5

Authors: Michael Lummis, Rick Barba, and Chris Burton
Publisher: BradyGames
Editions Available: Paperback
Acquired via Publisher

Filed Under: Strategy Guide Reviews

Borderlands 2 Strategy Guide Review

October 11, 2012 By Chris Nitz Leave a Comment

Borderlands 2 Strategy Guide reviewAh Pandora, you do not even know how much I missed running around your barren lands while terrorizing your psychopaths. Now that I am back and causing Handsome Jack all kinds of issues, I can say I truly did miss the musing of CL4P-TP. Oh Pandora, what secrets do you have to hide this time around?

Well, now that I got that out of my system, let’s look at the Borderlands 2 strategy guide that BradyGames assembled for this highly praised sequel. The first few pages take players through the basics of the game. While I knew things like going for the headshot, elemental damage is a viable way to twiddle down health bars, and I need to shoot exploding barrels for extra bang per round, I did not anticipate the added notes and tables diving into greater detail and thus providing me an advantage before I even created my first character. This section is chock full of useful nuggets of info, and I returned a few times to make sure I understood the mechanics and utilized them to their full potential. There is a little something here for novices and veterans alike, so don’t skip it!

Damn the choices

Next up in the Borderlands 2 strategy guide is the new Vault Hunters section, and this is something I encourage all players to spend a few moments with. Not only does this look at the four playable characters, but it goes into their skill trees and elaborates what the significance of each branch is and why one may want to invest points in it. This is immensely useful for preplanning, especially for anyone who wants to play with friends. Each character ends with a breakdown on strategies for solo play and co-operative play. The authors even dropped in a “suggested” skill tree to help ease indecisive players into the world of Pandora. I tested two of these suggested builds and found them to be fairly solid for both solo and co-op play. I did modify them after some time to suit my play style, but as a starting point, they are an easy way to alleviate some of the confusion on how to best optimize each character.

Now that a new Vault Hunter is born, it is time to scour the world of Pandora for clues, and this is where the walkthrough becomes as useful as one well placed headshot. Each new area starts with a map that details where to find items like save points, Cult of the Vault markers, bosses, and ammo/life/cars. The pages that follow go into how to obtain those accursed Cult of the Vault markers, how to battle bosses, and details for the main quest line in that area. A nice perk is that each new mission has a small blurb detailing the objective, XP, money, and suggested level, thus making it quick and easy to determine if this is something to tackle now or hold off on for a few levels.

I ended up using the maps in this section quite frequently. They not only helped me get to each Vault marker, but they aided me when I ran out of ammo for my favorite pistol or stumbled upon a data recorder. I did have trouble every so often understanding how I was supposed to get to specific points to nab a Cult of the Vault marker or hidden data recorder, but the included screenshots added visual reference points that eventually got me going in the right direction. Another nicety is that each boss encounter includes strategies for completing the specific challenges for all four of the playable characters, which is a great way to add just one more Badass Point to the list.

What did drive me nuts is that the optional missions don’t sit in the main walkthrough, but rather after it. This ended up leading to a lot of flipping back and forth so I could look at the map and then jump back to read details of each side quest. To add to that frustration, the optional mission section is listed in alphabetical order, and it makes for hunting down details on what to do almost as confusing as finding the Vault itself. I firmly believe that this should be incorporated into the main walkthrough as it makes for an easier time completing everything in one area before us completionists move onto a new segment of the game.

Classified my ass

While I can excuse the segregation of main quests from side quests, I have a harder time when it comes to the weapons portion of this guide. There is some great info on what each weapon type does and why a player may choose it for various encounters throughout their time in the game. However, there is too much “classified” information in here. People that buy a strategy guide don’t do it to have chunks of info excluded, and that is exactly what BradyGames does with select items here. I want to know where I can buy the Raket Pawket Badaboom and the specs on it, not be shafted with knowing it exists but it is classified. The section is still nice, but that lack of info is just a punch to the face.

Redemption comes in the last few portions of the Borderlands 2 strategy guide, starting with a fairly complete Bestiary. I believe that every enemy I tried to find from the game came with a brief description along with a table breaking down how their life changed in multiplayer, damage, XP, critical hit area, and any weaknesses they may have. This also includes where the enemy resides and what, if required, optional quest it is on.

Following that is the secrets section, which includes how to unlock every new head for those who want to customize their characters even further. There is also a heap of tables breaking down all of the challenges in the game, and that includes all of the level specific challenges. Anyone looking to maximize their badass points, this is the section to study like a college kid cramming the night before a big final. Completing this is the obligatory breakdown of achievements/trophies and their associated point values.

There is a small portion dedicated to easter eggs that I am still trying to figure out how I feel. The guide mentions them, but it doesn’t tell you how or where to get them–AT ALL. On one hand, this is a strategy guide and I expect all information to be covered throughout the guide. On the other hand, finding an easter egg in the game is fun and adds to the exploration. The jury is still out on just how good or bad this is.

What I found this guide lacked the most was some form of index or detailed table of contents. Sure, the side missions come sorted alphabetically while the main walkthrough follows the game chronologically; however, there is still no easy way to quickly find specific info. This ultimately ends up with a lot more page flipping and hunting than is necessary in a guide with this much content scattered about.

Quotes from the devs are a nice touch

At the end of the day, I found the bulk of the Borderlands 2 strategy guide rich with detail and entertainment. I love the fact that BradyGames included character art and developer quotes throughout the pages. They once again did a great job making the guide feel as though it were part of the game and not just some secondary accessory. I still cannot excuse shafting players with “classified” info, but that is in a relatively small portion of the book yet it is still info that consumers pay for. However, this is a solid buy and I can still recommend it to any hunter. Now, I must go back to blowing the heads off some Psychos!

SGR Rating 3/5

Author: Doug Walsh & Joe Epstein
Publisher: BradyGames
Editions Available: Hardcover and Paperback
Acquired via Publisher

Filed Under: Strategy Guide Reviews

Dishonored Strategy Guide Initial Impressions

October 9, 2012 By Keri Honea 1 Comment

Dishonored has been high on my anticipation list ever since E3. This year has been full of sequels, so it’s great to see a new IP, especially since the new IP looks to be so promising. Critically, the game appears to be just as great as it seems. I’d be excited about it even if it did bad critically, because what I played at QuakeCon made me happy, critics be damned. However, when I did play Dishonored at QuakeCon, I was under massive panic because I realized that this was the first time I’ve ever played a stealth game without a guide. I’m so horrible at stealth it isn’t funny, and it doesn’t help that I don’t have much patience for it either. So yes, imagine my delight when BradyGames confirmed that yes, there will be a Dishonored strategy guide from their house. I obtained a copy of the guide today, and I spent a little time flipping through it.

When I saw Dishonored at E3 this year, I said that the game is a steampunk Deus Ex: Human Revolution. When I played a sample of it at QuakeCon, it only enhanced my initial feelings. This is in no way a bad thing; it’s a fantastic thing, especially if you liked DXHR. As such, as soon as I got the strategy guide, the first thing I looked for in the walkthroughs was to see if it indeed was set up like DXHR. One thing DXHR and Dishonored both have pushed is that the game allows players to play how they want: with stealth or with mass murder. Therefore, the strategy guide needs to provide strategies for both methods of gameplay, and to my delight, it does.

Dishonored Strategy Guide

stealth

Dishonored Strategy Guide

mass murder

One other thing I found that made me immensely happy was the fact that all of the collectibles listed in the back were accompanied with screenshots where to find them. However, it is unfortunate that the walkthroughs themselves do not point out where to find collectibles. The collectibles are in the maps in the beginning of every mission, but they’re not in the written walkthroughs, which will require lots of flipping back and forth for completionists. I’m glad that there are no call-out boxes for the collectibles, because the guide pages are a bit cluttered up with call-out boxes anyway with side notes, side missions, and Achievement notes. That said, the collectibles could still be mentioned, perhaps in bold, within the walkthrough itself with page references to the appendix. This wouldn’t alleviate any page flipping, but it would at least help prevent missing any wayward items.

Dishonored Strategy Guide

appendix-only

At first glance, the Dishonored strategy guide looks like it would have everything a user could want from the guide, at least it does content-wise. We shall see what the final review unveils in time.

Filed Under: Initial Impressions

Guild Wars 2 Strategy Guide Review

September 20, 2012 By Chris Nitz 1 Comment

Guild Wars 2 strategy guide reviewReviewing a guide for any MMO is a tricky bit of work. These types of games constantly change and so info in the book quickly becomes outdated. There is also the issue that almost all of these games guide the player along lower level areas while introducing tidbits of the games various mechanics in small chunks, which most commonly happens between levels 1 to 20. What BradyGames has done with their Guild Wars 2 strategy guide is make a textbook for the MMO 101 class.

BradyGames starts this guide out with some lore on the Guild Wars 2 universe, and I enjoyed this greatly as I never fully played the original Guild Wars or any of the subsequent expansions. This portion gave me some history on world events, the races and their trials and tribulations, and how the world got to be so crazy. I actually read this portion twice just because it intrigued me and brought me that much closer to the game world itself.

From there, the strategy guide dives into the basics of multiplayer online games. I am talking these are basics down to what leveling is and slaying monsters works. Anyone that does not know what pulling or kiting is; this is the section to study. For those that this is not their first go-round in an MMO can skip right on by, as there is nothing new or earth shattering covered here.

The guide then moves into each profession, along with what weapons unlock what skills. I strongly recommend looking through this section before embarking into creating a character as this is a decent glimpse into how each profession works and what their roles in group battles are. This actually saved me a bit of time as I was able to see what I wanted to play and what fit my play style best. Each skill includes a blurb on what it does along with any cool down to consider. Do note that cool down times change as this game ages and profession balances drop into place, so do not always expect this info to be 100% accurate.

As with all MMOs, there is plenty to do for people that just want to make in-game items. Sadly, this is where the guide drops the ball with a measly six-page spread dedicated to helping players get their craft on. Sure, making stuff in GW2 is not overly complicated, but in my eyes, it deserves a bit more than this.

The guide then dives into the world and monsters players can encounter while playing. I have to be honest in that I never used this section. NCsoft did a wonderful job of making each area somewhere I just roamed and explored. Outside of some vista points and strategically place points of interest, the game itself encourages players to roam around and participate in quests and world events. I had a hard time trying to stick to some sort of script while I played and so I just closed the book here and immersed myself in the scenery while slaying countless enemies. From a new user point of view, this does provide some insight into how the game works but again, it is just some repetition of what the game already provides through various help screens and tutorials.

BradyGames does their best to enlighten a gamer on how player-vs-player works, but this is something that is only mastered through countless hours of play. The basics of how to conquer a fortress and rudimentary concepts of staying alive on the battlefields flow from page to page. This is a starting point that newcomers should look through, but the master sensei decrees one hour of practice every day to be an necessity on the stage of world dominance.

We finally arrive at one of the most used portions of the guide, and that is the maps of each area. I found myself here more than any other as I worked for the 100% completion bonuses of each area. While the guide does a nice job pointing out Asura Gates, points of interest, and quest hearts, it lacks showing where each vista point is. I do not need a breakdown on how to obtain every vista, but knowing their general location would help. The lack of these on the maps is a letdown and does diminish their value some.

If you are totally new to the world of Guild Wars, or have NEVER touched an MMO before, then theGuild Wars 2strategy guideis going to be of some use to you. However, veterans may find the maps handy but those are also freely available online and some even include videos on how to obtain the harder points of interest and vistas. I found the lore portion to be great and highly entertaining, yet I also found the crafting section to be weak and useless. I recommend that anyone considering this guide to head to their local bookstore and flip through the pages before dropping hard earned money on it as this is made for a very niche audience.

SGR Rating 3/5

Authors: Michael Lummis, Kathleen Pleet, Edwin Kern, Kurt Ricketts
Publisher: BradyGames
Editions Available: Collector’s Edition and Paperback
Acquired via Publisher

Filed Under: Strategy Guide Collector's Editions, Strategy Guide Reviews

  • « Previous Page
  • 1
  • …
  • 22
  • 23
  • 24
  • 25
  • 26
  • …
  • 44
  • Next Page »

Follow us!

Subscribe!

Upcoming Strategy Guides

 Nothing here. Come back later. 😢

Latest Strategy Guide Reviews

The Walkthrough by Doug Walsh Review

Red Dead Redemption 2 Strategy Guide Review

Mega Man 11 Strategy Guide Review

God of War Strategy Guide Review

Far Cry 5 Strategy Guide Review

Friends of SGR

  • BradyGames
  • Dan Birlew – Guide Writer
  • Doug Walsh – Guide Writer
  • Future Press
  • Game Enthus
  • GameWires.com
  • Piggyback
  • Press the Buttons
  • Prima Games
  • Racing Games

Top Posts & Pages

  • Final Fantasy III Strategy Guide review by FuturePress
  • Unboxing the Epic Mickey Collector's Edition Strategy Guide

Copyright © 2025 · Web crafted by Warkhammer


Loading Comments...