• Home
  • About Us
  • Podcast
  • Strategy Guide Wit
  • Contact

Strategy Guide Reviews

A Strategy Guide for your Strategy Guides

  • Reviews
    • Strategy Guide Reviews
    • Video Game Reviews
    • Mini-Reviews
  • Features
    • Interviews
  • News
  • Unboxing Strategy Guides
  • Columns
    • Gaming Diary
    • Corner of Randomness
  • Videos

Transformers: Fall of Cybertron Strategy Guide Review

September 14, 2012 By Keri Honea 1 Comment

Transformers: Fall of Cybertron strategy guide reviewFor the most part, the Transformers: Fall of Cybertron strategy guide is okay. Much like the game itself, the strategy guide does nothing to really go above and beyond what is expected for an action game. The general walkthroughs exist, collectibles are listed, and multiplayer maps are presented. While all of the information is correct, the strategy guide never took that extra step in giving the player everything possible to complete the game to 100% for Achievements and Trophies. In this day and age, this is a downright necessity for all console strategy guides–with the exception of guides for Wii-only games. In addition, typos and really odd ways of saying Transformers’ names suggest that not much research or quality assurance went into the guide either. Yes, all of the information within the guide is accurate, but the Transformers: Fall of Cybertron strategy guide as a whole lacks that extra polish and completionist material that makes it truly a useful guide.

Transformers: Fall of Cybertron strategy guide

So convenient!

The walkthroughs themselves are impeccable. like War for Cybertron, Fall of Cybertron (FoC) is pretty linear as where to go with a straightforward story and mission parameters. This time around, though, FoC has more collectibles, and as a result, the layout of the levels is far more conducive to exploration. There are two sets of collectibles, audio files and blueprints, and while some are strewn out in the middle of the player’s path, several require venturing to the roads less traveled by. Players who follow the strategy guide by the letter will pick up every collectible their first try without a problem. Even if you miss a few, the game allows you to play any chapter at any time, so it’s simple to backtrack and pick up wayward blueprints and audio files. As an added bonus, the guide included a screenshot of where the collectible is, which was immensely appreciated, especially when I got lost in the corridors a time or two.

The strategy guide was also really great at pointing out any Easter Eggs and little fun morsels the developers threw in just for fun. For example, there are a few times where Soundwave and his tape deck minions spy on Autobots, and unless you know where to look, you’ll miss them entirely. They don’t add anything to the story or even to the gameplay, but it was funny to catch Soundwave spying on me and hear him yell, “Autobots inferior! Soundwave superior!” as he ran away. Also, I would have completely missed Frenzy running on a conveyor belt in Soundwave’s lab like it was a treadmill, if not for the guide. Again, it doesn’t add anything, but it’s fun, like most Easter Eggs. In this case, the Easter Eggs were arcade mini-games that were quite well hidden in a few of the levels.

Transformers: Fall of Cybertron strategy guide

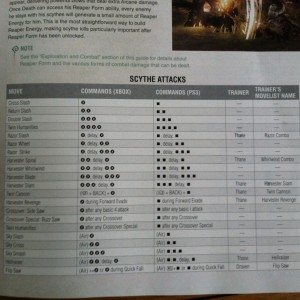
Autobot Jazz? Really?

While the Fall of Cybertron strategy guide did so many things well, it’s hard to overlook so many things that came off as lazy and sloppy. For example, the fact that the write misspelled Arcee’s name as “Acree” when pointing out her random pinup poster is a bit unforgivable. This is the one time in the entire game/guide that she is even mentioned, and it’s in a callout box in gold…highlighting the mistake for the world to see. I cringed when I saw it. No other Transformers’ names were misspelled, but I’m really curious as to why a couple of the Autobots’ names contained “Autobot” before the name, as shows in the image on the left. Why in the world would he be called “Autobot Jazz”? I gave the guide the benefit of the doubt before I judged too harshly, and checked to see what the game called him, both in spoken dialogue and in the subtitles. In both instances, he was just called Jazz, thereby making it incredibly ridiculous for the guide to label him this way. The guide called him “Autobot Jazz” in every instance, not just one or two times. “Autobot Ratchet” received the same treatment. Oddly enough, no Decepticons were given the “Decepticon” prefix before their names.

The biggest disappointment of the entire guide was the lack of Achievement/Trophy help. Each chapter charges players with a specific challenge to get a random Achievement/Trophy. For example, in Chapter III, the special  Achievement requires players to “take out a cluster of eight Decepticons using Metroplex’s Air Strike.” The strategy guide never once calls attention to this Achievement in the walkthrough. It never mentions the player can get a special Achievement here, never suggests the best spot to try to snag it, and never suggests a best method to go about doing it. In the back of the guide, where the Achievements are listed in a nice table, the guide offers zero advice on how to earn each Achievement. What is the point of having a strategy guide if there are no strategies for how to obtain 100% in Achievements and Trophies? For many people, this is all they want out of any form of help in the first place.

This lack of Achievement/Trophy support clouded over most of everything else the Transformers: Fall of Cybertron strategy guide did very well, and the sloppiness with the Transformer names only darkened the clouds. As much as the strategy guide nailed the walkthroughs and the hunt for collectibles, it didn’t go that extra mile to give the player all the tools needed to complete the game to 100%. In the end, it left me with lots of disappointment.

SGR Rating: 3.5/5

Author: Rick Barba
Publisher: BradyGames
Editions available: Paperback
Acquired via Publisher

Filed Under: Strategy Guide Reviews

Darksiders II Strategy Guide Review

September 13, 2012 By Chris Nitz 1 Comment

Darksiders 2 strategy guide reviewI am not ashamed to admit that I am a fan of the Darksiders franchise. Sure, the games do get a bit long and somewhat repetitive, but the world is immersive and the stories do engage me while I crawl from dungeon to dungeon. I am also thankful that Prima was kind enough to let me review the Darksiders II strategy guide as it provided a nice compass on my spelunking adventures!

Anyone who played the first game already knows that the combat in this game leans towards combo junkies. This is where Prima does a nice job with the beginning of the guide by going into great detail over the combat and exploration aspects of the game. Everything from the basics of wall grabs and swimming to complete charts detailing every combo with various weapons make an appearance. What I liked a lot were the tips scattered about this section. They not only pulled the info together, but also aided in making this combo rich game that much more fun.

After handling the fundamentals, the guide dives into the walkthrough of this lengthy game. This area is chock full of screenshots, maps, tips, and other useful information. I found it to be pretty thorough and easy to follow, with the rare exception being that some item location descriptions can become a bit cryptic, but the included screenshot usually aids in deciphering these riddles.

Another nicety is that each mini-boss and every main-boss receive a good amount of attention. The guide nicely describes behaviors and what to look for in order to bring each baddy down to their knees. I found myself relying on these sections after several failed attempts on my own. I also found I cursed myself for not seeing something as obvious as mines here, or a crevasse there.

The last bit of goodness in the walkthrough portion is that it starts with a small description of each area as well as a breakdown of what one can expect to find in their dungeon crawling endeavors. I also liked that each area ends with the optional sidequests listed, thus giving me the option of tackling those or continuing with the main story. One subtle addition is the recommended levels attached to each sidequest. This saved me a lot of time and frustration from tackling objectives I had no right in doing so early in the game.

Speaking of sidequests, the next section is dedicated to these time sink morsels. While the details on these are small blurbs of what to do and where to do it, I still found it easy to tackle them thanks to the descriptions and tips included. Also included are the rewards and recommended levels for tackling each quest.

This section does also include a breakdown of each side area along with maps and locations of items like Boatman coins, Stones of Power, and so on. While these areas are optional, Prima put the same care and love into them as though they were part of the main quest line, and that I appreciated that so much. In addition, yes, explanations on how to solve the various puzzles throughout the game are easy to read and understand.

The inclusion of an appendix is more helpful than I first gave it credit. This is full of charts detailing where to find every item and collectable scattered about the world. It may lack maps and pushpins of where to find things, but the maps scattered about the rest of the guide do a fine job in filling in that piece. Completionists will want to spend time combing through this portion as they quest for that 100% trophy/achievement.

Finally, we arrive at my favorite section–the behind the scenes pages. This consists of an in-depth interview with the developer, along with a look at how the art went from concept to reality. It is an amazing glimpse into how this game came together and a view into some of the thoughts and ideas behind making Darksiders II what we have now. I strongly recommend reading this over some morning coffee or to pass time at lunch.

Overall, I am very happy with how Prima handled this guide. The little touches like a table of contents on the right side showing where I am in the book down to solid combat tips made me appreciate it. While I strayed from the walkthrough portion a few times and struggled finding some items, I relied on it more than I thought I would. If you are a fan of the Darksiders franchise, this is a must purchase!

SGR Rating 4/5

Author: Stephen Stratton
Publisher: Prima Games
Editions Available: Paperback
Acquired via Publisher

Filed Under: Strategy Guide Reviews

LEGO Batman 2 Strategy Guide Review (console)

August 23, 2012 By Keri Honea 1 Comment

LEGO Batman 2 strategy guide reviewEvery LEGO console game has two parts to it: the mission chapters and the hub world. The chapters provide the traditional campaign mode of a game, and the hub world is the place for exploration and unlocking numerous collectibles. While the chapters have plenty of collectibles, nothing can compare to the large number in the hub worlds. LEGO Batman 2 has quite possibly the largest hub world of any LEGO game I’ve ever seen, and I thought the hub world for LEGO Star Wars III was massive. This hub world spans across Gotham City broken up into three large regions and includes 12 red bricks, over 150 gold bricks, several vehicles, and numerous citizens in peril to find. The LEGO Batman 2 strategy guide definitely had its work cut out for it, and I have to say, when it comes to the hub world, the guide was spot on. Unfortunately, the guide for the chapters portion suffered from a number of inaccuracies.

When it came to the hub, the guide really went above and beyond the call of duty for finding all of those darn collectibles. Each Gotham City region was separated out with its own section, and each region contained the following:

  • a map of the region with every collectible numbered and color-coded;
  • a legend with each corresponding collectible along with requirements for obtaining said collectible;
  • legend checklists for the user to mark off collectibles; and
  • detailed screenshots and walkthroughs for obtaining each and every collectible.
LEGO Batman 2 strategy guide checklist

Oh yes, I wrote in my strategy guide this time.

To be honest, the map and legend checklists were all I really needed and expected, but the fact that it included detailed walkthroughs for each one greatly surprised me. It really came in handy when I needed to make sure I was in looking in the right zone or was about to embark on the right obstacle course.

Then, in case those weren’t enough, there were appendices in the back of the guide that were nothing but checklists for all of the collectibles. No matter which method you preferred to keep track, you had a few ways to do it.

The checklists themselves were so incredibly appreciated. There are an obscene number of gold bricks scattered across Gotham City, and many of them are found in similar-looking places. Being able to check off each gold brick found prevented plenty of back-tracking later. Considering how massive Gotham City is, well, these checklists alone make purchasing the guide worth it and are the guide’s biggest asset.

If only the chapter sections were as accurate, then the LEGO Batman 2 strategy guide would have set the new bar for being absolutely perfect. All of these inaccuracies with the chapters could be considered very minor. For example, some of the Super Hero Stud requirements had the wrong numbers. In another instance, the instructions for finding a minikit in Freeplay Mode left out a couple of steps, including the need to switch to a certain character. It was lucky that the character was not one that the player needed to collect outside of story mode, otherwise it could have been a frustrating situation.

It’s a shame that the chapters were not as perfect as the Gotham City hub section, because they are what keep the guide from earning a perfect score. However, they definitely don’t mar any recommendations for purchasing this strategy guide. If you want to 100% this LEGO game, I can’t recommend Prima Games’ LEGO Batman 2 strategy guide enough.

SGR Rating: 4/5

Author: Stephen Stratton
Publisher: Prima Games
Editions Available: Paperback
Acquired via Purchase

Filed Under: Strategy Guide Reviews

Spec Ops: The Line Strategy Guide Review

August 9, 2012 By Keri Honea Leave a Comment

Spec Ops: The Line strategy guide reviewSpec Ops: The Line sprang out of nowhere after E3 with little pomp and circumstance, and it quickly made a name for itself as a military third-person shooter that had a real, honest-to-goodness story. In fact, the game’s story is really one of the only features that stands out about it in comparison with other shooters. Spec Ops has more than a good story; it forces the player to make difficult choices that do affect pieces of the game. With games like this, the strategy guide must do several things: be accurate for both collectibles and with what to expect, present all options as the come up, and above all else, avoid spoilers. The Spec Ops: The Line strategy guide greatly exceeded all expectations.

The layout of the strategy guide is what makes the guide as excellent as it is. Since the story to the guide itself is linear and rather straight forward, that can create either a guide with lots of white space or an overindulgence with screen captures and art. Much like the strategy guide for The 3rd Birthday, Spec Ops The Line strategy guide brilliantly blends the balance of art, screenshots, and written strategy content that makes each page both aesthetically pleasing and efficient for finding information.

Spec Ops: The Line strategy guide

See how perfectly the collectible callout is placed within the walkthrough?

Many times, collectibles in games are just little extra perks, but in Spec Ops, the collectibles unfold more of the story. There’s definitely a greater sense of need in collecting them over merely being a completionist. Spec Ops does not have that many collectibles, but they’re easy to overlook as a few can only be collected shortly before or shortly after a major cut scene in the game. In the front of each chapter, the guide lists how many collectibles the chapter has, what they are, and in what order they can be found in as a heads up. Then, each collectible is clearly marked in the walkthrough section. These aren’t mixed in the walkthrough content, but they’re in separate callout boxes that are positioned in the walkthrough sections where the collectibles are located in the game. The only way that users will miss the collectibles is if they are too busy focusing on and absorbing what they just saw in the game and not occasionally glancing at the guide for the collectibles.

But it’s still very easy to pick up missed collectibles. Once you complete the game, you can replay chapters, and the game conveniently points out how many collectibles you have found in each chapter and how many can be collected. From there, it’s a matter of flipping the guide to the appropriate chapter and picking up the wayward collectible. There’s also an appendix before the multiplayer section that lists all of the collectibles and where to find them. The guide cautions users before using this appendix, however, as it also presents the complete dialogue attached to the collectible. I personally appreciated this part of the guide as I thought about what I had experienced with the game and wanted to recall certain pieces without firing up the Xbox. At least none of these collectibles are spoilers to the overall story.

Aside from the guide layout and collectibles, how did it handle all potential spoilers? I suppose the real answer lies in how much you flip ahead. If you stick with where you are in the game and in the guide, you will never run across a spoiler. Even when the guide presents to you your choices in a particular manner, it will never once tell you what the consequences of your actions are for choosing this over that. It lets you see your choice unfold on the game screen instead of in the guide. For someone like me who wants to always make the best decision at all times, I was both elated and frustrated that the guide wouldn’t come out and say which decision was best. At the same time, it always pointed out choices that weren’t entirely obvious from the game presentation. This was always appreciated.

When a game is as short as Spec Ops: The Lineis, it’s easy to expect the strategy guide–if there even is one–to be short and a bit half-assed. It’s always refreshing to see strategy guides that make the most of it and present a near-perfect blend of strategy and video game art without sacrificing any of the usefulness of the book. After all, there’s nothing worse than a useless strategy guide. The Spec Ops: The Line strategy guide is, by far, one of the best mash-ups of strategy and art I have come across yet.

Even better, all of its written strategy was absolutely flawless.

SGR Rating: 5/5

Author: Doug Walsh
Publisher: BradyGames
Editions Available: Paperback
Acquired via Publisher

Filed Under: Strategy Guide Reviews

Max Payne 3 Strategy Guide Review

July 31, 2012 By Blake Grundman Leave a Comment

Max Payne 3 strategy guide reviewMax Payne is one of those franchises that you have to love. Staring the game’s namesake, Max Payne, as a shit-out-of-luck cop trying to make sense of his life, the series has been widely acclaimed by critics and fans alike. It was so popular, in fact, that it was very loosely adapted into a film released in 2008. This year marked the return of the dysfunctional gumshoe, to a level of praise that echoed of the original installment. With Rockstar at the helm this time around it was essentially business as usual and critics devoured it with enthusiastic fervor. Can BradyGames’ Max Payne 3 strategy guide for the game live up the brand’s prior levels of success, or is it better discarded like a junkie in an alley?

What would a guide be without a strong introduction to the game mechanics? Thankfully the reader will never have to find out, because the authors knocked it out of the park. Though the standard experience in Max Payne 3 differs little from other installments in the series, newcomers will find breakdowns of painkillers, bullet time, (or as they like to call it, shootdodging) cover usage, and kill cams to be fairly useful. Even though it isn’t unlocked until after completing stages throughout the campaign, this section also steps through the variety of different Arcade modes that eventually become available. Some may consider this to be slightly out of sequence, but in all reality, the introduction is probably the most logical location for this to reside. Wrapping up the chapter is a comprehensive analysis of every firearm in the game containing key bits of information such as rate of fire, damage, clip size and caliber. Armed with the introduction’s knowledge, any player would be adequately prepared to pump adversaries so full of lead that they could be used to draw a stick figure.

Next up is what could be considered the meat of this tome, the campaign walkthrough. Each chapter, which just so happens to conveniently correspond with a numbered chapter in the story line, starts out with a brief synopsis of what is happening in the plot and the overarching mission objectives. These first couple of pages are amongst the most stylish and well laid out sections of the entire guide, complete with numerous vibrant screenshots. Unfortunately, what follows doesn’t quite live up to the same level of organization.

In order to tackle sections in a more comprehensive manner, chapters are broken up into what amounts to logical slices of the map. Contained inside these subsections are extremely detailed walkthroughs that demonstrates how obsessively scripted the enemies are. Everything from where enemies will emerge from, what character types they will be and even what weapon loadouts they will have is spelled out explicitly. The tactics necessary to dispatch these cronies are broken down in a matter-of-fact way, that almost takes any surprise out of the game. But if you are using a guide to begin with, what else could you ask for?

Some of the other tidbits of information that can be found in each map segment are lists of every weapon available, as well as the location of all collectables and golden weapon pieces. As is the case with every chapter introduction, there are an incredible abundance of screenshots at the reader’s disposal. The problem is while these shots are pleasing to the eye, probably a third of these images are completely unnecessary. What results is an extremely cluttered layout that is far too busy for the eye to parse all at once. If they were attempting to model the walkthroughs after a graphic novel style, it was a smashing success.  However, when reading for content, this chaos tends to cause more harm than good. Organization criticisms aside, the actual text on the page is an greatly detailed and extremely thorough documentation, but it isn’t done any favors by the constantly shifting layout that feels as if they tried to cram too much on a single page.

Just in case the reader happened to miss the collectibles that were already shown once in the campaign, once the walkthrough is complete, there is a section dedicated to all of the clues and golden gun pieces that were already pointed out in the text. This is a baffling decision considering that in most cases the EXACT SAME image is shown, along with a very similar, if not completely echoed commentary on each item. If this was not information that was already presented earlier in the book, then this section would make complete sense, but when you are just re-cropping the same image and re-wording the same information, it reeks of trying to pad the content.

Wrapping up the guide is a rather brief thirty two pages dedicated to the game’s multiplayer mode. Considering that this is the first time that any kind of multiplayer has appeared in a Max Payne title (other than what was originally slated to be included in the first installment, but was scrapped in order to get it out the door) you might think that the author might have seen the need to fill out this area in more detail. Giving them the benefit of the doubt, this may have been the result of never being able to play multiplayer prior to launch.

What actually is present is the traditional rundown of different game modes, mechanics, and avatar customizations. Bursts, which are essentially the equivalent to “perks” in other popular online shooters, are discussed in a lackluster generic fashion, with no attention being paid to how they can be utilized strategically in battle. Once again following the multiplayer trend of only containing surface level statements that mean relatively nothing, the weapon details also prove to be a fairly useless collection of information that seem uninformed at best. The most damning evidence of the author never playing the multiplayer is the map segment. Here you would think that each stage would be broken down, noting different strategies, strong points or weapon spawn locations. Instead, the reader is treated to a single black-and-white image of each stages floor plan. THAT’S IT! In a day and age where multiplayer is king and can prolong the lifespan of a game indefinitely, this should be a refund-worthy offense. When all that could be mustered was a single screenshot, this shows a blatant disregard for the reader and represents a critical failure in the publication that is inexcusable.

At best, BradyGames’ Max Payne 3 strategy guide is a roller coaster ride of highs and lows. If the reader were to consume the campaign walkthrough as only a document, it could be considered to be an overwhelming success. On the other side of the coin, a cluttered and “screenshot happy” layout undoes any triumph that the text accomplishes. Add in the barely present multiplayer section that is insultingly bare bones, and you have a recipe for a guide that underachieves on virtually every level. If this guide were a debutant that Max had to protect, he would probably just sell her to the enemies for booze money. At least then he could have something useful to consume.

SGR Rating: 2.5/5

Authors: Tim Bogenn and Rick Barba
Publisher: BradyGames
Editions available: Paperback
Acquired via Publisher

Filed Under: Strategy Guide Reviews

  • « Previous Page
  • 1
  • …
  • 23
  • 24
  • 25
  • 26
  • 27
  • …
  • 44
  • Next Page »

Follow us!

Subscribe!

Upcoming Strategy Guides

 Nothing here. Come back later. 😢

Latest Strategy Guide Reviews

The Walkthrough by Doug Walsh Review

Red Dead Redemption 2 Strategy Guide Review

Mega Man 11 Strategy Guide Review

God of War Strategy Guide Review

Far Cry 5 Strategy Guide Review

Friends of SGR

  • BradyGames
  • Dan Birlew – Guide Writer
  • Doug Walsh – Guide Writer
  • Future Press
  • Game Enthus
  • GameWires.com
  • Piggyback
  • Press the Buttons
  • Prima Games
  • Racing Games

Top Posts & Pages

  • Final Fantasy III Strategy Guide review by FuturePress
  • Unboxing the Epic Mickey Collector's Edition Strategy Guide

Copyright © 2025 · Web crafted by Warkhammer


Loading Comments...