• Home
  • About Us
  • Podcast
  • Strategy Guide Wit
  • Contact

Strategy Guide Reviews

A Strategy Guide for your Strategy Guides

  • Reviews
    • Strategy Guide Reviews
    • Video Game Reviews
    • Mini-Reviews
  • Features
    • Interviews
  • News
  • Unboxing Strategy Guides
  • Columns
    • Gaming Diary
    • Corner of Randomness
  • Videos

BioShock Infinite Strategy Guide Review

May 3, 2013 By Keri Honea 1 Comment

BioShock Infinite strategy guide review
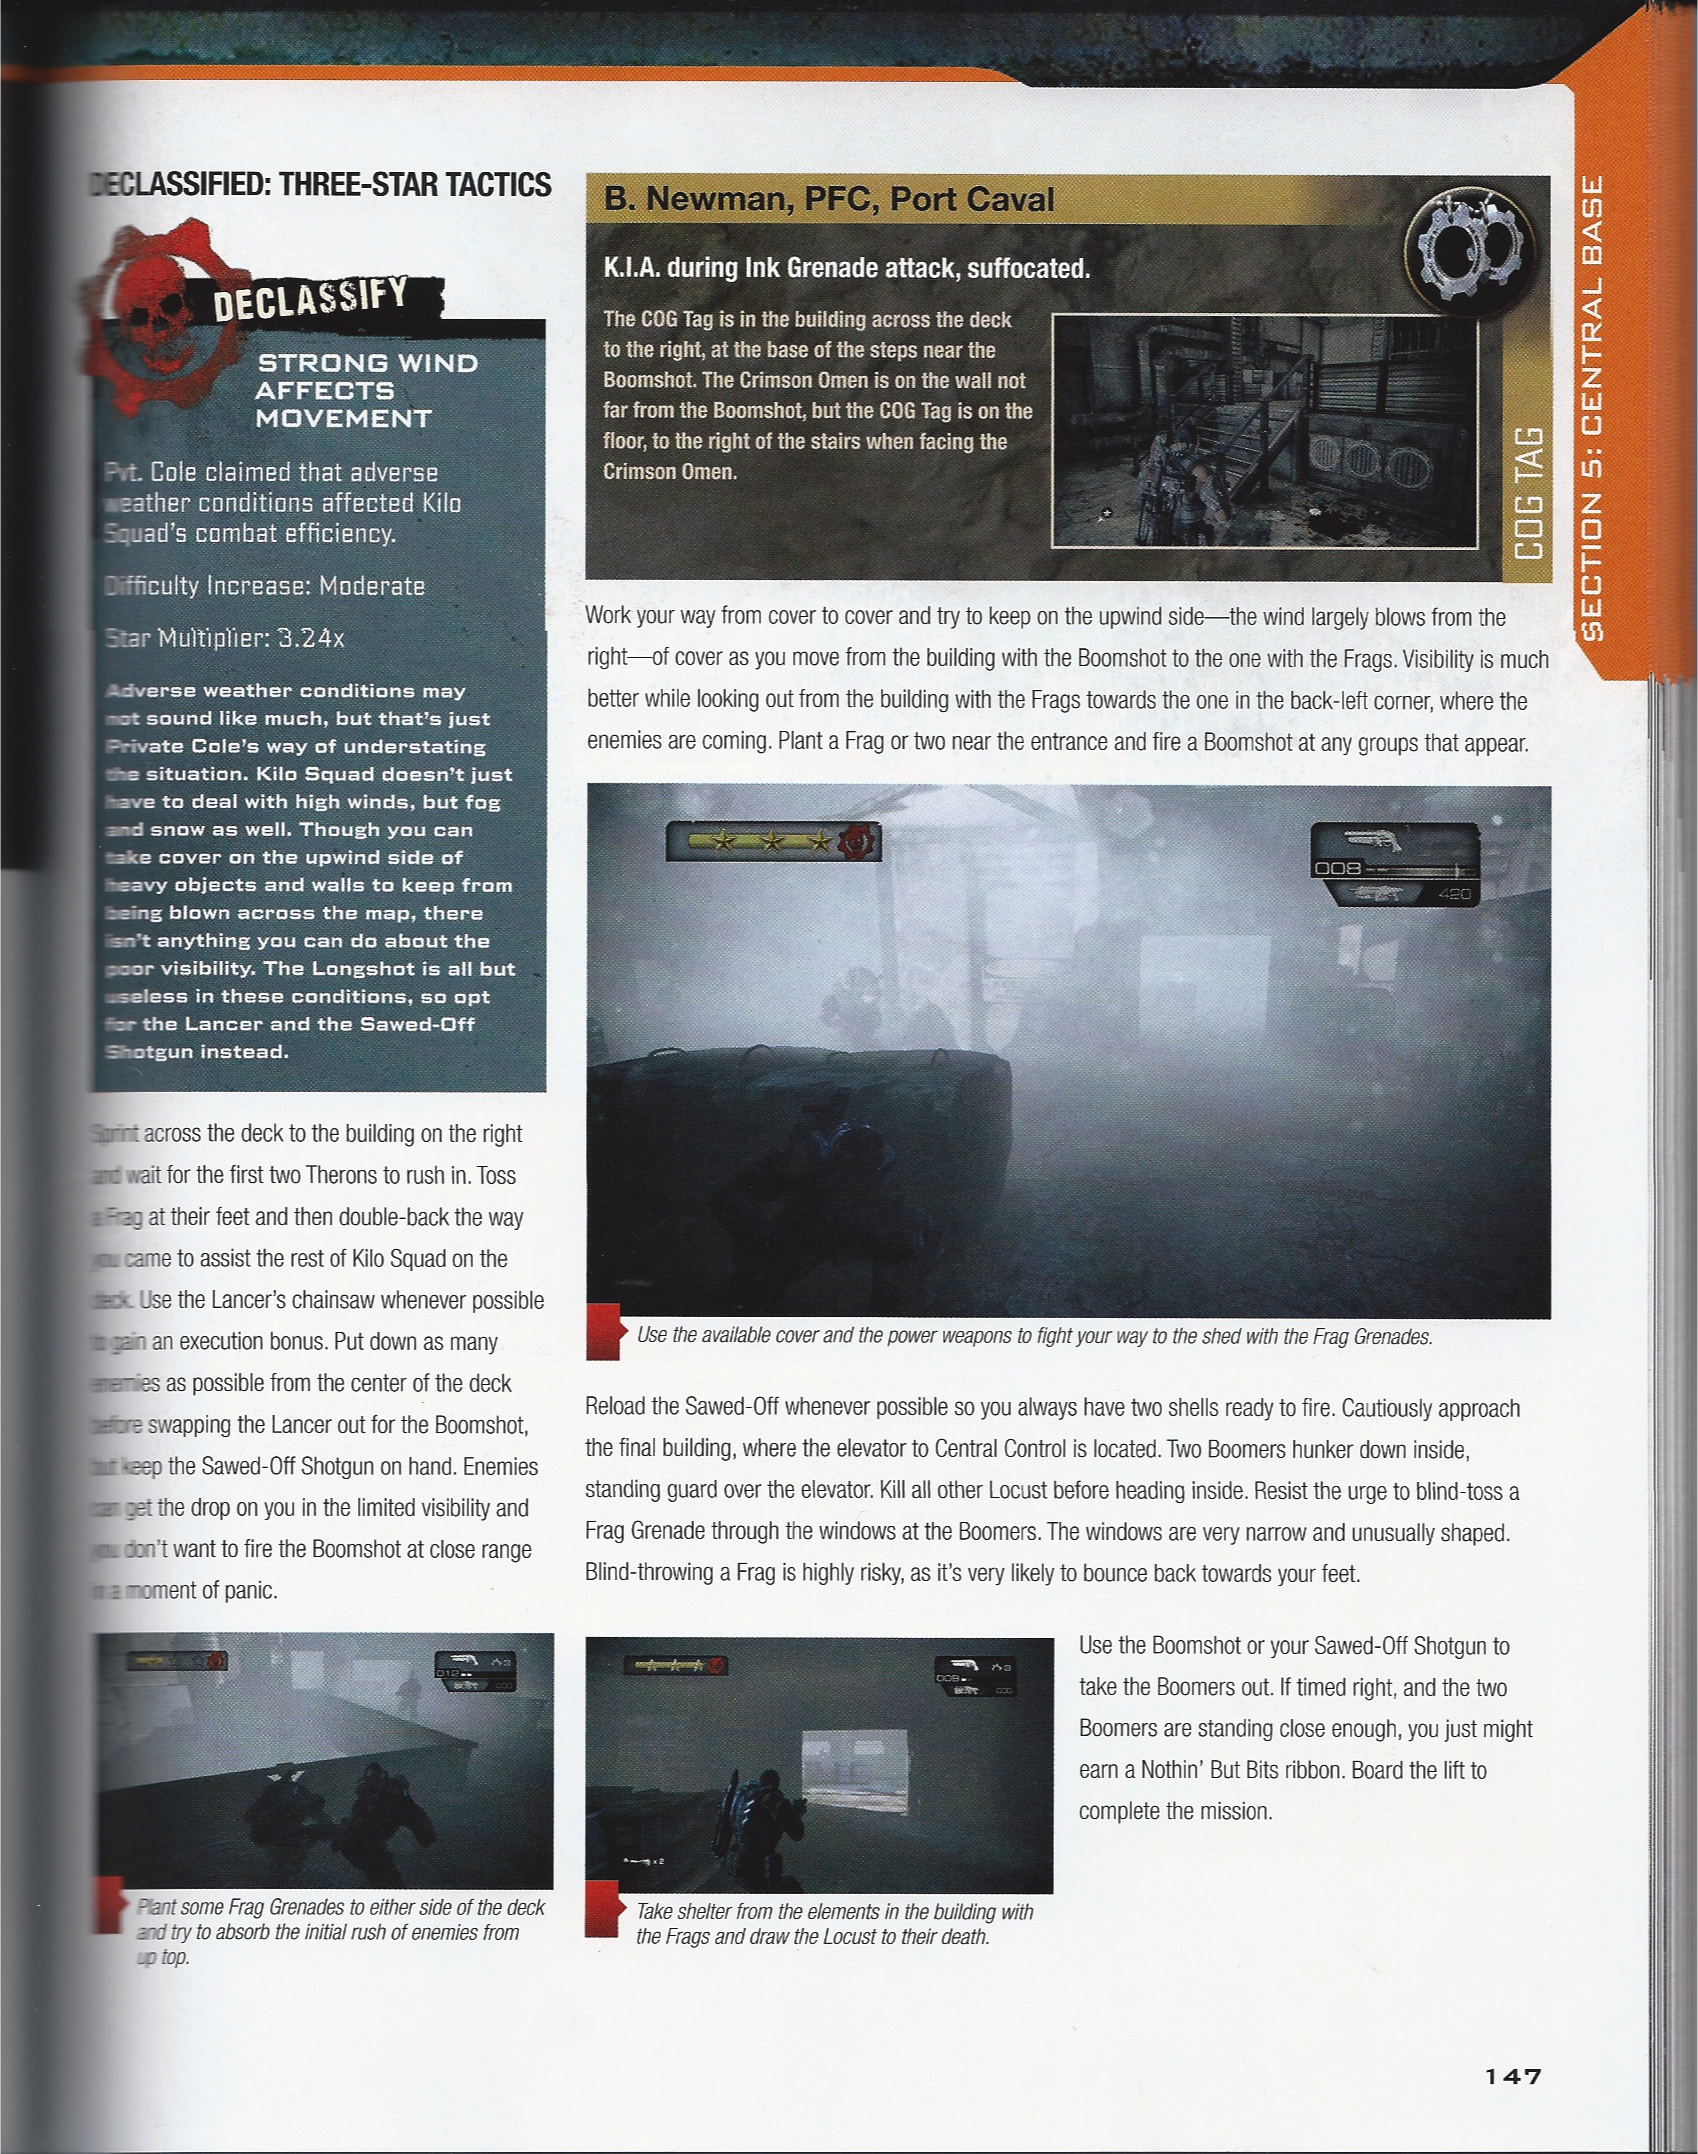
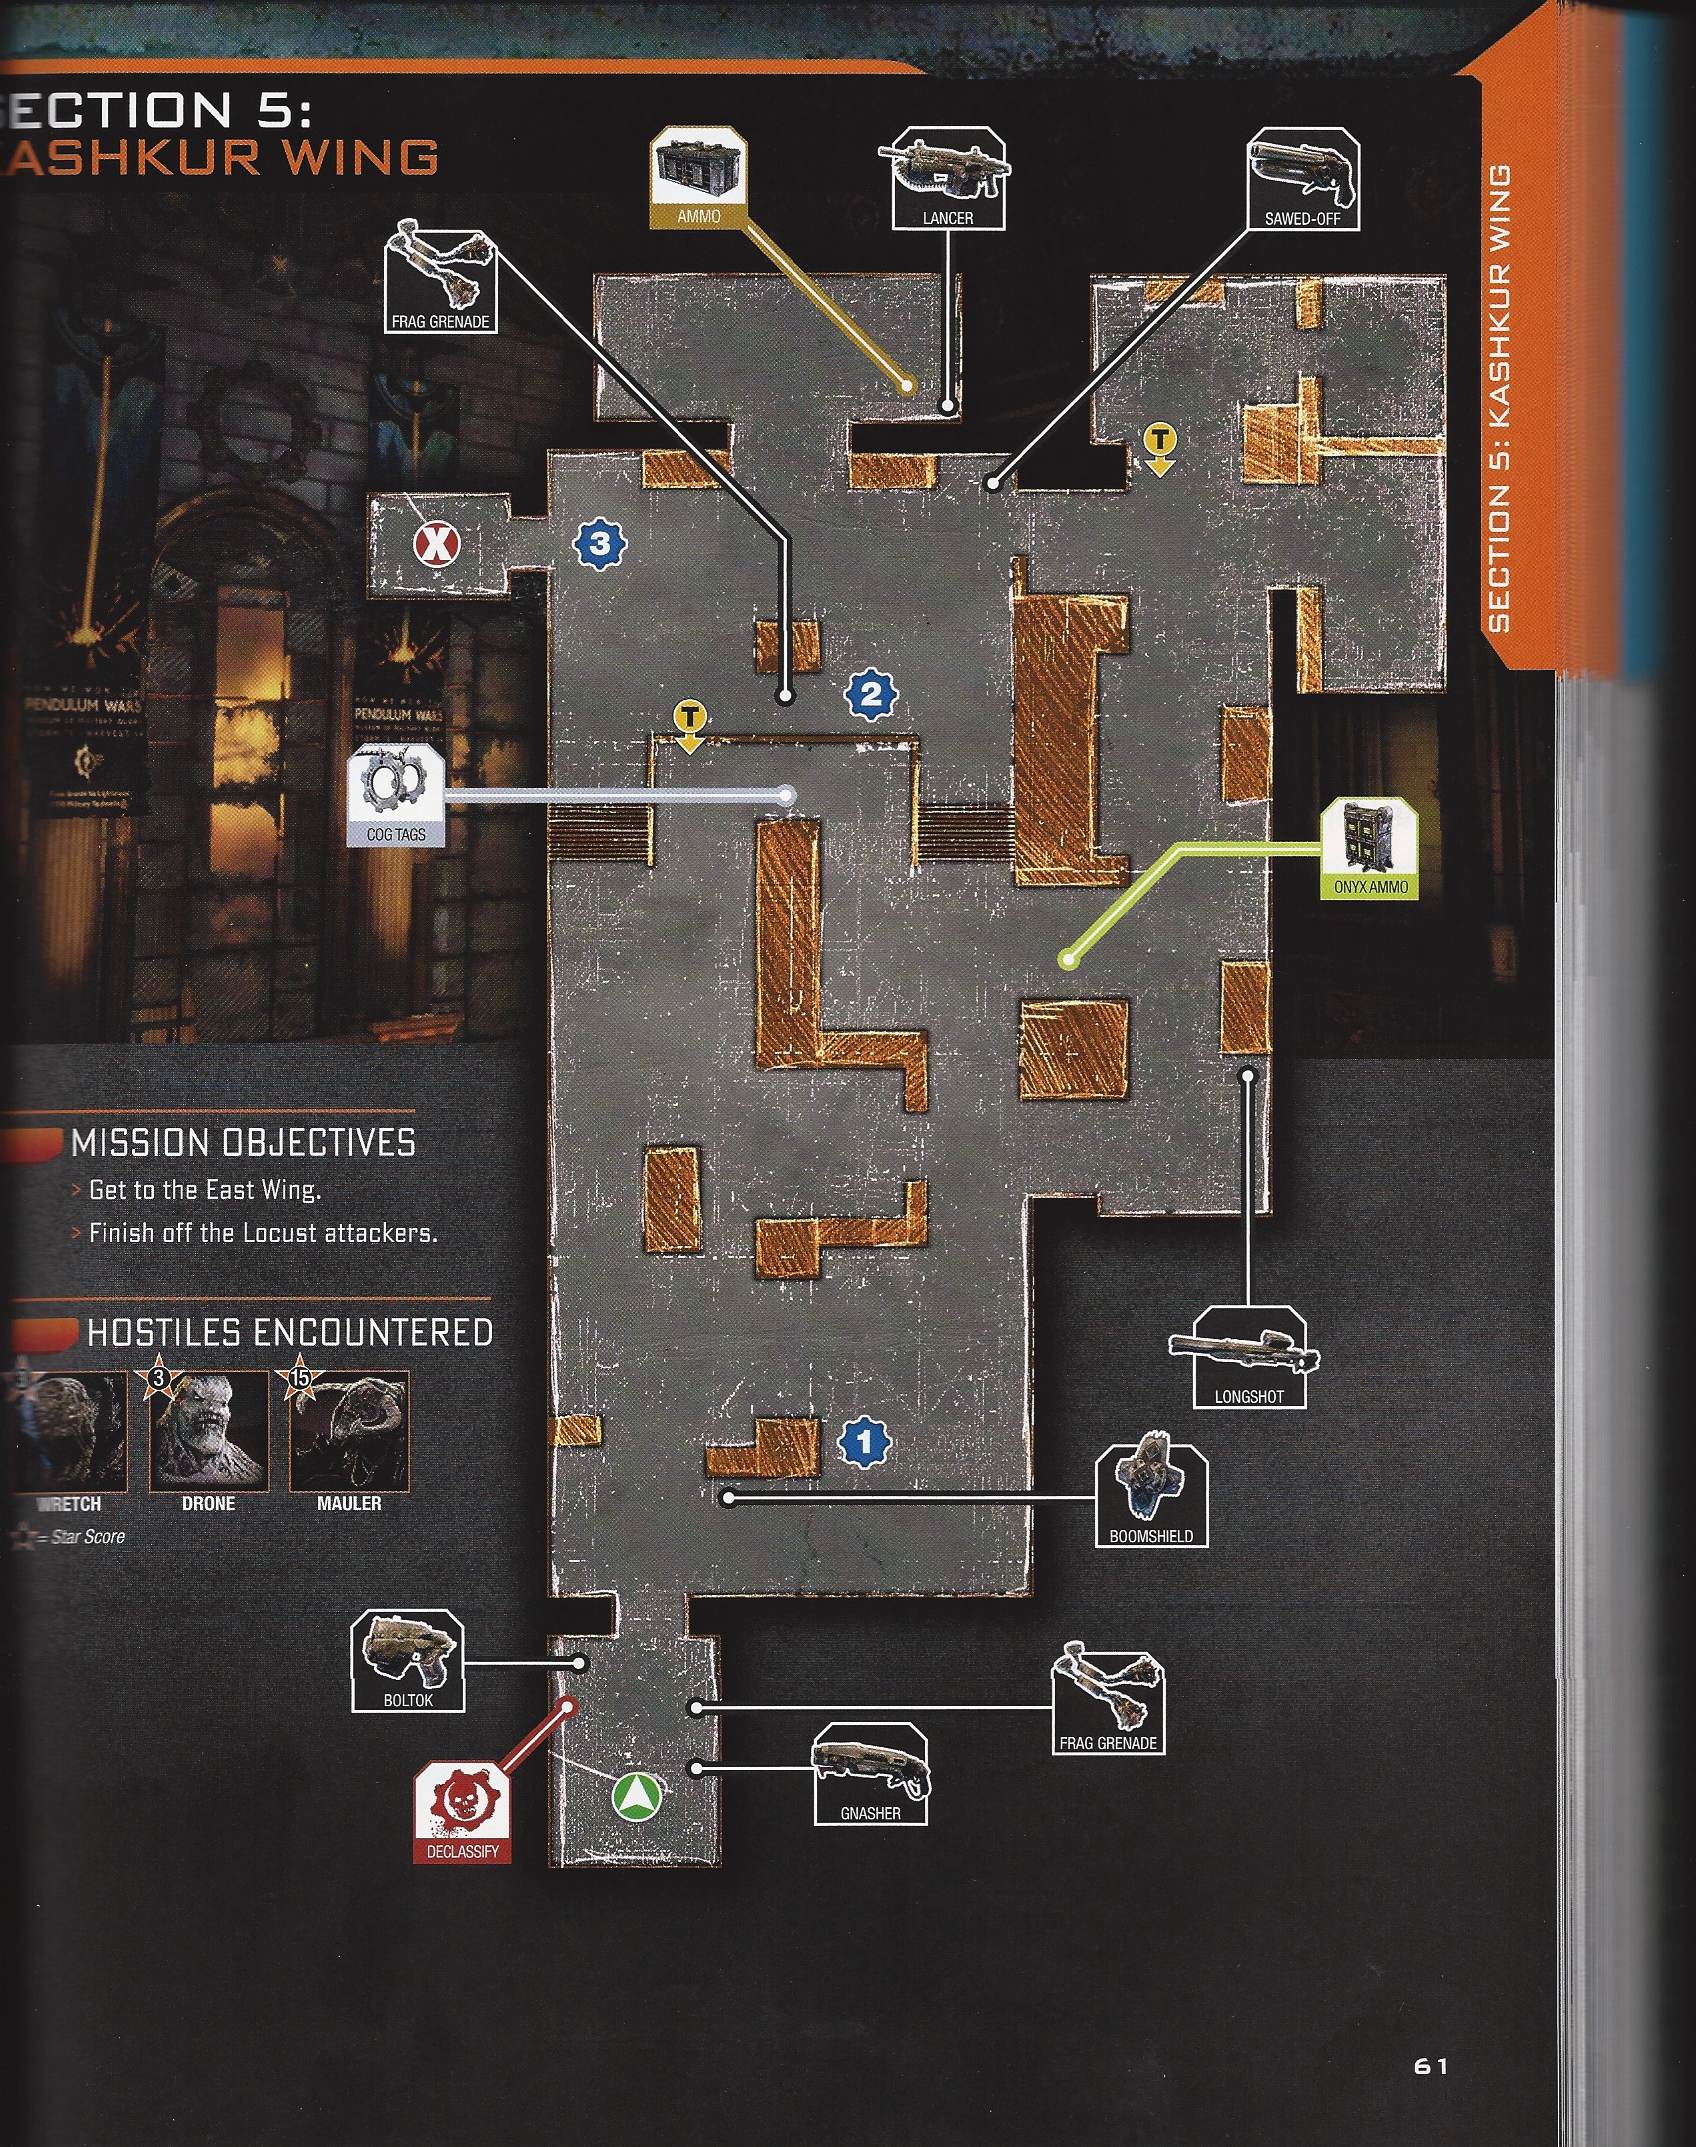
The first BioShock took gamers to a disturbing utopia at the bottom of the ocean, and BioShock Infinite took players to an equally disturbing utopia high in the clouds. Both games were filled with well-hidden collectibles and plenty of venues for exploration, which is exactly why I wanted the strategy guides in the first place. The collectibles in both games included audio files that really fill in the overall story, and since I missed a few audio files with the first game, I really wanted to make sure I found them all the first time with BioShock Infinite. As such, I had almost as high of expectations with the BioShock Infinite strategy guide as I did the video game itself. While I was able to find all of the Voxophones in this game thanks to the guide, the strategy guide completely failed me on finding another collectible. Couple this with the fact that I had problems with the strategy guide’s overall presentation, I was almost as disappointed with the BioShock Infinite strategy guide as I was with the game.

Plenty of the strategy guide was absolutely fantastic. I admit that I rarely look through the front sections of strategy guides unless I need help choosing a character or class or if the game absolutely fails in properly teaching me the control scheme. However, as I flipped through the strategy guide one day, my eyes caught two tidbits that made me stop, turn back, and give the front sections more attention. The first was the code players could tap in to unlock the 1999 Mode, which traditionally unlocks after you complete the game for the first time. It turns out you don’t have to wait for the punishing difficulty level; you only need to enter in the world famous Konami Code. A few other websites posted this after the game’s release, but I was blissfully unaware (as usual) until I noticed this in the strategy guide, and yes, it garnered a chuckle.

The second thing that surprised me about the front section of the guide was the breakdown of Gear combinations to create specific builds for Booker. For example, for the Wizard build of Booker, the strategy guide suggests wearing the Storm Hat, the Blood to Salt Shirt, the Overkill Boots, and the Head Master Pants so that Booker can primarily focus on using elemental Vigors such as Shock Jockey and Devil’s Kiss. Since I focused on staying alive as long as possible, I wish I had looked at this section sooner, so I could have tried out the Defender combination, which looks like it would have been far more effective than the combination I used.

I primarily used the strategy guide to ensure I did not miss any collectibles in the game, since this is actually the most challenging portion of the game (unless you’re playing on the hard or 1999 difficulties). The world of BioShock Infinite is massive, and it’s incredibly easy to miss the large number of collectibles scattered about, especially since so many are hidden in high places or only appear after going through Tears. I am very pleased to say that thanks to the strategy guide, I did find every telescope, Kinetoscope, and Voxophone. There is absolutely no way I would have found them all without assistance, as there was more than one occasion that I would have overlooked them when coming through a Tear, while they hid behind signs on top of buildings, or as they popped up during high action sequences that spurred me to move on instead of exploring like I should have.

Infusion Problem with BioShock Infinite strategy guide

Something doesn’t add up…

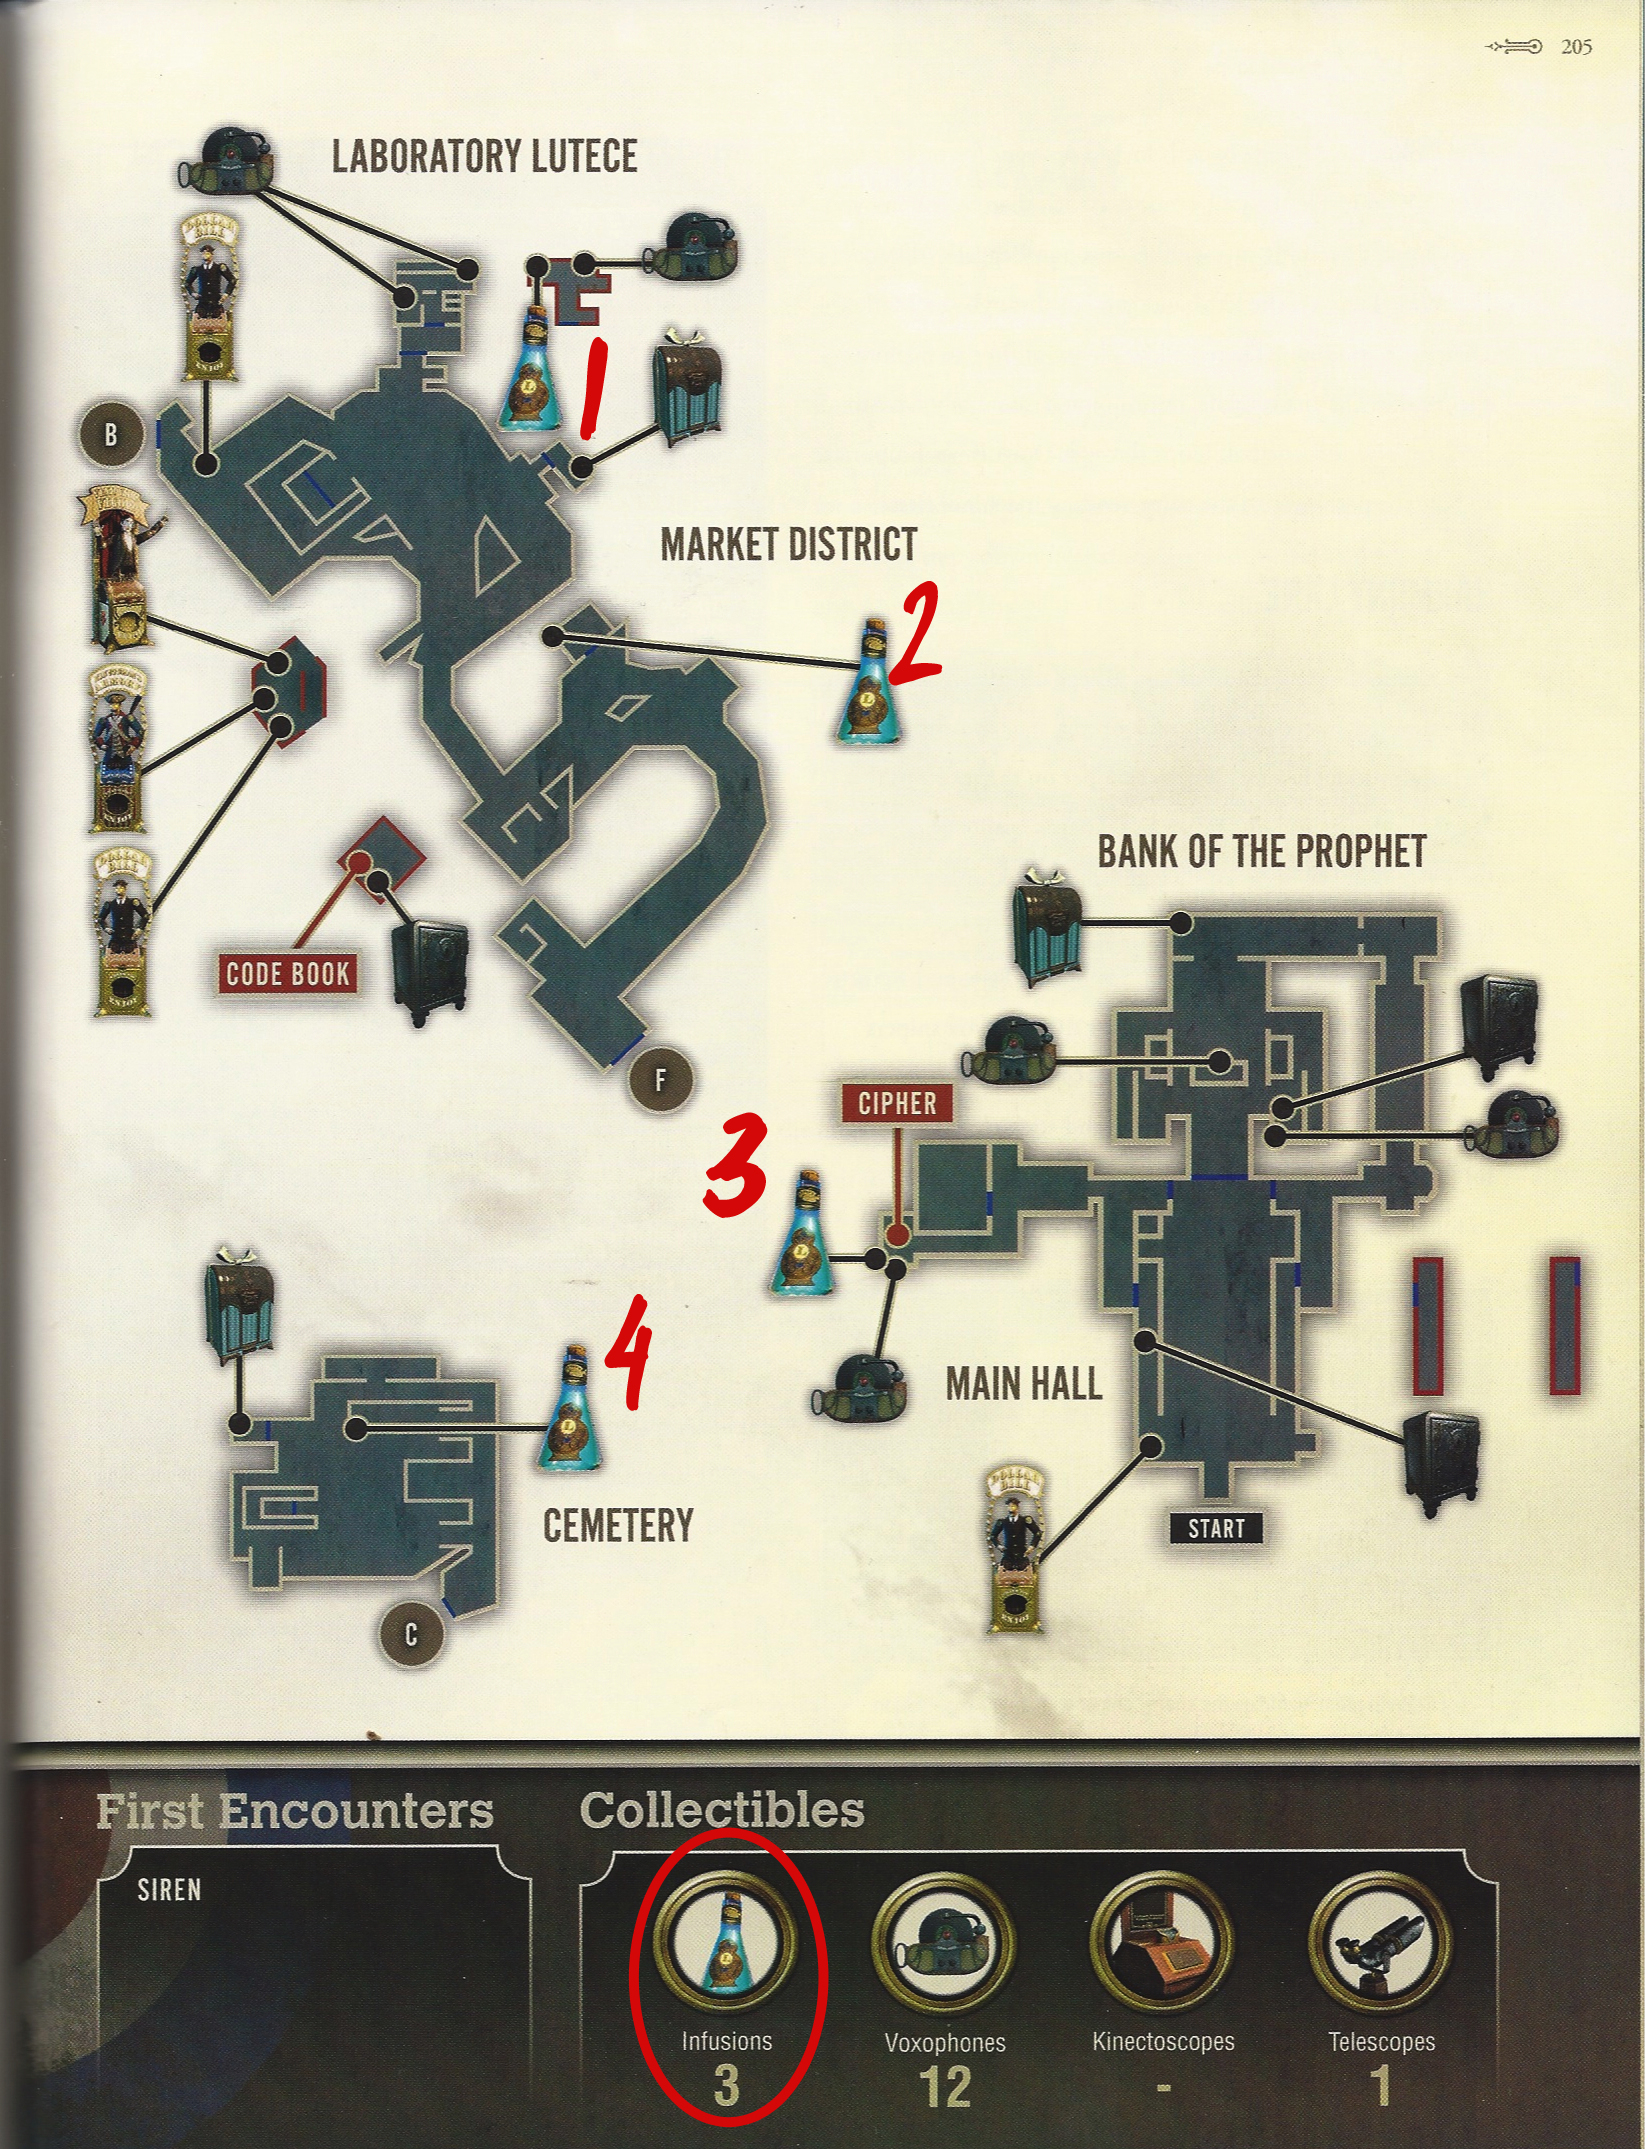
That said, however, I never found every Infusion the game offered. When that Achievement didn’t unlock, I was honestly confused, as I could have sworn I found every single one the strategy guide pointed out. The game said I found 23 Infusions, and apparently there are 30, allowing players to max out all three levels for Booker. I assumed I didn’t follow the strategy guide as carefully as I thought, so I started to count the marked Infusions, and I noticed something rather intriguing.

  • Infusions marked on maps–22
  • Infusions listed in chapter summary (see bottom of image on right)–25
  • Infusions mentioned in written walkthrough–22

I counted each of these about three times, because I couldn’t believe how they didn’t add up. As I puzzled over it, I noticed that on a few occasions, the number of the Infusions shown on the chapter maps didn’t match the number listed in the chapter summary below the map, as shown to the right. No wonder I didn’t find them all; not all of them were even listed in the strategy guide! I had hoped that maybe there was an appendix in the back that listed all the locations, but no such luck.

I also can’t help but think if the guide writers or book designers had made call-out boxes in the written walkthrough depicting where each Infusion was hidden, like they did with the Kinetoscopes and Voxophones, perhaps the all of the Infusions would be properly marked. Then again, the walkthrough has so many call-out boxes as it is, perhaps it would have worsened the strategy guide’s overall presentation.

The strategy guide is divided by game chapters (which are separated by Achievements/Trophies), then again by mission objective and scene. Each new scene kicks off with its own map and collectible summary with the written walkthrough to follow. Sometimes the written walkthroughs for a scene are placed before the scene map, which makes following along with both the writing and the maps quite confusing. I couldn’t decide while playing if this was a result of how the game is and the book designers did the best they could or if this was just a bad strategy for the book. Sometimes it was definitely the former, the product of the game, and sometimes it was the latter. As a result, I found myself looking at the book more than I wanted, forcing me to pause the game more often than I wanted, just so I could attempt to find out where I was between the walkthroughs and the maps. I do blame how long it took me to finish the game on how much time I had to stop to read the strategy guide. I like strategy guides to make my game times more efficient, and I felt like this one greatly slowed me down.

The BioShock Infinite strategy guide is very, very hard for me to recommend. On the one hand, I found two-thirds of all of the collectibles with its help, unlocked all of the side quests, and I’m certain I found all the Gear in the game even though there was no Achievement to tell me so. I also really enjoyed the extra developer commentary that was sprinkled throughout, and I most likely didn’t die as often I would have without its help. At the same time, I’m really disappointed in the Infusion problem, and I can’t get over how often I got lost in the book, which took away too much time from the game. The BioShock Infinite strategy guide is definitely above average, but it’s not one of BradyGames’ best either.

SGR Rating: 3.5

Authors: Doug Walsh and Logan Sharp
Publisher: BradyGames
Editions Available: Paperback and Collector’s Edition
Acquired via Publisher

Filed Under: Strategy Guide Reviews

StarCraft II: Heart of the Swarm Strategy Guide Review

April 16, 2013 By Chris Nitz Leave a Comment

Star Craft II: Heart of the Swarm strategy guide reviewKerrigan is back and this time players get to guide her on her quest to remove Mengsk from power. I’ve looked forward to this game as the Zerg are my race of choice in the StarCraft universe, and Blizzard did not disappoint me with Heart of the Swarm. Adding to this fun was my opportunity to review the Heart of the Swarm strategy guide from BradyGames.

As all good guides do, this one starts out with some basics on game mechanics. I’ll just assume most everyone knows how StarCraft 2 plays at this point, but if you don’t, take a few minutes to acquaint yourself with this section. Veterans should skim over it as it does provide info on the changes between Wings of Liberty and Heart of the Swarm; however, the bulk of text here is fundamental base management, resource gathering, and combat tips.

Tips, everyone loves a good tip!

Tips, everyone loves a good tip!

Blizzard did make the single-player campaign a bit easier, so I found myself only hitting this portion of the guide when I was trying to complete a few side objectives. For example, I would hunt down the tips and maps on where certain items were scattered about a map so I could quickly snag them before a timer expired or I drove the computer to an early grave. The players who want to tackle the harder difficulties will find some solid nuggets of advice that will make dominating harder opponents that much easier. At the end, we find the evolution of the swarm along with some thoughtful reasons why a player may choose one mutation over another. Also, let’s not forget how nice it is to have maps that clearly show where that third base can go and where the enemy might be hiding! While I may not have relied on this portion too heavily, when I came here for advice, it delivered while it held my hand and gave me that achievement I lusted for.

From here, we move into the multiplayer area where I am still spending a whole lot of time. Not only does BradyGames provide a solid foundation for players to start their ladder climb with, but also there is some rocking advice for those that want to make their way from bronze to masters leagues. Everything from base management to military and economy receive plenty of attention and detail. I found myself relying heavily on the Tech Tree while I honed my skills as a Zerg player, but also to use this info to know what my opponents might be doing and how to effectively counter them. What really took my game to the next level was watching profession level players while studying the units, maps, and tips that fill these pages. Yup, I’m rocking some bronze level players, and I don’t even play that seriously. Thank you, BradyGames!

While I am still using the guide as if I were cramming for a final exam, there is one thing that hinders it, and all strategy books for that matter. This does a fine job of giving players a good foundation for both destroying the single-player campaign and some legs to stand on as they try to climb the competitive scene. What print cannot do is change as patches, or even the meta of the game, ebbs and flows from month to month. Don’t get me wrong; everyone should know their tech trees, basics of economy management, and units, but as players introduce new strategies while changing existing ones, the book cannot stay current. This is just the nature of the beast.

Know thy enemy!

Know thy enemy!

At the end of the day, I love this strategy guide. Just short of the Dark Souls strategy guide, I find that this is one of the most useful books to grace my desk in recent months. I should also mention that I am reviewing the collector’s edition, so it looks really sexy next to my Wings of Liberty guide and I have to keep fighting my wife away from the paper craft toys that came with the guide. While I would have loved an art section, BradyGames did a magnificent job with the page layouts, and bringing the Zerg aesthesis to the pages. Now I am super excited to see what they do for the Protoss expansion!

SGR Rating 4/5

Author: Rick Barba, Phillip Marcus
Publisher: BradyGames
Editions Available: Hardcover
Acquired via Publisher

Filed Under: Strategy Guide Reviews

Gears of War: Judgment Strategy Guide Review

April 5, 2013 By Keri Honea 2 Comments

Gears of War: Judgment strategy guide reviewWhen Epic Games and People Can Fly announced that Gears of War: Judgment would implement a smart spawn system, thereby removing the possibility for players to memorize a level, I knew that the strategy guide writers for the game would have their work cut out for them. Whyile the smart spawn system wasn’t as extensive as I was led to believe, it still laid some tricky groundwork for the guide writers. Not to mention, each level would contain a Declassify mode, adding additional challenges for both players and the strategy guide writers to face. Of course, the strategy guide team at BradyGames was up for the challenge, and they knocked the Gears of War: Judgment strategy guide right out of the park. In fact, I enjoyed the strategy guide far more than I enjoyed the game itself.

In many ways, Judgment was structured similarly to past Gears of War games–large sections divided by smaller chapters. With Judgment, instead of breaking up the sections by scene, the sections are divided by who is testifying on behalf of the actions of Kilo squad. Within each bit of testimony, the section is broken up by 7-8 missions, which are more or less distinguished by scene. Each mission is extremely short by Gears standards; at the longest, they took me 10 minutes. At their shortest, especially if they were timed missions, they took less than four minutes. As such, you can see why the smart spawn system wasn’t as detailed as I had originally feared it to be; rather, what changed each time you visited the area was what enemies showed up. Don’t get me wrong, this still greatly changed my approach to getting through a level–defeating hordes of wretches is actually trickier than a team of drones and maulers. Because of this system, it was obvious that the writers played each level numerous times on the different difficulties so they could account for every possible scenario that would be thrown at the player. I would always know at the start of the mission what possible enemies could appear and where, even with the missions that had different waves of enemies.

Gears of War: Judgment strategy guide

Declassify call-out box is super, super handy. Notice the call-out box for the COG tag? It will let you know if it’s feasible to snatch the tag during Declassify or not!

The point of Judgment is more of getting a three star award at the end of each mission for your performance than surviving the Locust forces, so the focus of the walkthroughs was on getting the highest ranking possible first, surviving second. It was kind of assumed that if you could get three stars, you would survive. Most importantly, the walkthrough always gave strategies for getting that three-star ranking without playing the mission as Declassified. When you turn the Declassified mode on, the stars fill far faster because the mode adds a greater level of difficulty. If you’re hunting for COG tags or you just don’t want to play Declassified right away, these strategies are crucial for filling up those stars. The fastest way to fill the stars is by earning ribbons, and the strategies are quick to tell you which ribbons are possible to obtain and the best way to earn them in rapid succession. Thanks to these tips, I was able to rack up at least two stars on every mission I played that I did not Declassify–as confusing as that probably sounds.

Since the Declassified mode added an extra set of parameters to each mission, such as adding a time limit, restricting weapons, reducing visibility, or adding more difficult enemies, the guide presented a separate call-out box with the Declassified mode details and its own strategies. I greatly appreciated this for two reasons:

  1. The strategy guide went into more detail about what the Declassified setting actually did than the game would. For example, the game, for one mission, said that Kilo had a reduced ammunition supply. The guide explained that this meant Kilo started with 30 rounds of ammunition for Lancers and there were no ammo boxes on the map.
  2. By knowing fully what I was up against beforehand, I could make an educated decision as to whether I felt like playing the level Declassified or not. I cannot stand time limits in any game, but I played a few of the Declassified missions that imposed time limits thanks to the strategy guide going over how difficult this challenge was, what the time limit was for each level of difficulty, and the level of gaming finesse you had to have to get through it. If the guide said you needed to be a master at performing head shots in quick succession, I skipped it. If the guide said you had to be fast, but by using this or this weapon, you could easily do it, I at least tried it. Believe it or not, I actually did most of the timed missions.

Gears of War: Judgment strategy guideAs I’ve said before, the missions are incredibly short, save for those in the Aftermath campaign, so the maps aren’t that entirely useful for the main campaign unless you’re hunting the COG tags or you REALLY REALLY REALLY need that Onyx Ammo box. That said, it didn’t stop the strategy guide team from creating some really detailed maps. I only found two flaws with all of the maps: one map was missing a COG tag marker, and another did not have the Declassify marker. At least it’s nearly impossible to miss the Declassify markers when traversing through the campaign, and I found that one wayward COG tag easily enough since all COG tags have their own call-out boxes in the walkthrough. (For the record, thanks to the strategy guide, I found all 48 COG tags in my first playthrough.)

Since Gears of War: Judgment itself is so incredibly short, and is not that difficult on a Normal setting with no Declassify modes activated, I cannot recommend the Gears of War: Judgment strategy guide if this is all you’re going to do with the game. However, if you want those COG tags (some are not easy to find, trust me) and you want those three-star ratings on harder difficulties with the Declassify mode turned on, then BradyGames’ strategy guide is your perfect companion to Kilo squad.

SGR Rating: 4.5/5

Authors: Doug Walsh, Michael Owen, Kenny Sims, Jim Morey
Publisher: BradyGames
Editions available: Collector’s Edition
Acquired via Publisher

Filed Under: Strategy Guide Reviews

BioShock Infinite Free Guide Friday Giveaway

March 27, 2013 By Keri Honea Leave a Comment

bioshockinfiniteIrrational Games has put all BioShock fans on a super hype train for a couple of years now, which has gotten this strategy guide aficionado clamoring for the strategy guide. The game reviews have been stellar thus far, so who wants the official strategy guide to help you get everything possible out of the world of Columbia?

BradyGames has kindly donated a copy of their paperback strategy guide for this contest, so no, this is not for the hardcover Collector’s Edition. If that’s what they end up donating in the end, consider it a bonus, but do not expect it by any means.

Once again, it’s a Twitter contest, and you must live in the US to enter.

Do you have your Twitter account ready? Here’s how to enter:

  • Follow both @strategyreviews and @Brady_Games on Twitter.
  • Tweet the following: “I can’t fly through Columbia without the BioShock Infinite guide from @Brady_Games and @strategyreviews this #FreeGuideFriday!”
  • Yes, that’s cheesy, but you’re possibly going to get a fantastic free strategy guide. DO NOT COMPLAIN. The tweet must be exact, or it will not count.
  • One entry per person allowed!
  • Winner will be picked randomly on Friday, March 29th by noon CST.

Have fun and good luck!

Filed Under: Free Guide Friday

Crysis 3 Strategy Guide Review

March 19, 2013 By Blake Grundman Leave a Comment

Crysis 3 strategy guide reviewCrysis is a brand of first-person shooter that has become synonymous with pushing PC technology to the point that it taps out in virtual agony. Though never the most challenging or impressive gameplay wise, the unique wrinkles that it provided to the traditional shooter had helped the developer Crytek etch out a corner of the market where high production values were paramount above all else. As is the case with most FPS games, it would seem that the “run-and-gun” mentality of most titles would not lend themselves well to strategy guides. If you commonly think this way, oddly enough, this time you couldn’t be more wrong with the Crysis 3 strategy guide.

If chess and the garden variety first-person shooter were to have a baby, the result would be Crysis. Combining the diversely different tech found in the player’s nanosuit with all of the different weapons at the player’s disposal renders the game approachable in virtually every way known to man. Like getting the jump on enemies? Slap on the invisibility perk and shank those bastards like you are the new kid in the prison yard. Prefer to run into the middle of the fray and unleash all hell? Fire up the hardened shell and start throwing some ‘bows. The other two primary skills of speed and strength also work to compliment playing through the campaign in either a stealth or action mode. In response to this flexibility, the Crysis 3 strategy guide’s walkthrough is actually covered twice in the text, breaking down both gameplay options.

Splitting the walkthrough into two pieces is by far the best approach to covering the single-player component. This also makes it easy for the player to switch back and forth between gameplay approaches, on the fly. As long as you are familiar with how a table of contents works, you should be good to go. One important thing to note when comparing these parallel commentaries are that rather large chunks of text are re-used in both sections. While this isn’t really all that horrible considering it is more story based synopsis or observations, it might have been nice to have a different dialog between versions. Regardless, the writing is solid enough that it isn’t that big of a deal in the broad scheme of things.

I personally found the descriptions of interactions throughout the campaign breakdown to be extremely amusing. Using phrases like “start popping heads” to describe sniping is just one of many examples of text used to provide cheeky, yet completely worthwhile analysis of a situation. The call-out sections are also extremely useful when learning how to down specialized (and primarily alien) enemies for the first time. There is both important information that applies to that specific encounter, as well as any others that may come later on down the road. Be sure to pay close attention, because understanding these key concepts pay dividends in the long run.

Thankfully, the enemies are tightly scripted in Crysis 3 . This means that virtually every aspect of the walkthrough is spot on. Everything from weapon drops to enemy locations are spelled out in detail and can be either dispatched or avoided (depending upon which approach the player is using) by following the directions to the T. Rarely ever is there a case where something in the text proves to be inaccurate, which says quite a bit about the time that the author invested in the game. Sure, it is one patch away from rendering the walkthrough nothing more than expensive kindling, but as of right now things seem damn near spot on.

As useful as any guide can be helping a player through the single player campaign, rarely do you find a strategy guide that is even remotely as useful when it comes to the multiplayer portion of the game. The Crysis 3 tome is a rare exception to this rule, dedicating a staggering quarter of the entire text to the often neglected mode. Considering that this is where many would argue that the meat of the overall game lies, it is an extremely welcome change from the norm.

The author really had their work cut out for them in trying to concisely describe each of the title’s numerous multiplayer modes. If you are familiar with online shooters, most of this section will be old hat, but in the case of Hunter and Extraction mode, even seasoned veterans would be wise to take note of some of the knowledge dropped on the pages. It could make the difference between digital life and death. Another nice touch are the different suggested player roles in a team, as well as suggested loadouts for these respective positions. Additionally, every single perk and power-up is discussed, which should help the inner strategist in everyone.

In one final victory for the reader, each map has a full page dedicated to the a top-down view of layout, with certain specific locations called out for spawn points, weapon drops, or other places of interest. These maps are then complimented by a half page writeup, which discusses both strategy and the kind of gotchas that would only come from hours of trial and error. The smart gamers out there would be wise to take all of these pieces of commentary to heart if they plan on getting a leg up on the competition.

If there were one downfall to this otherwise exceptional guide, it would have to be the lack of pages dedicated to showing off the fantastic art assets of the game. Crysis 3 is the type of experience that looks beautiful, so why this wasn’t taken full advantage of is a bit baffling. Yes, these sections are certainly not crucial to the overall value of the book from an actual “guiding” perspective, but why not give the reader the chance to stop and smell the proverbial roses?

Players that are looking to improve on all aspects of their Crysis 3 experience should look no further than this strategy guide. It provides more than enough guidance to the audience, while not inundating them with useless information. Plus, the addition of a stellar section dedicated to multiplayer makes this far and away the most comprehensive guide for a first-person shooter that I have ever encountered. So what are you waiting for? Get down to business and send those aliens packing, thanks to a little help from your buddies over at BradyGames!

SGR Rating: 4.5/5

Author: Michael Lummis
Publisher: Brady Games
Editions available: Paperback
Acquired via Publisher

Filed Under: Strategy Guide Reviews

  • « Previous Page
  • 1
  • …
  • 8
  • 9
  • 10
  • 11
  • 12
  • …
  • 30
  • Next Page »

Follow us!

Subscribe!

Upcoming Strategy Guides

 Nothing here. Come back later. 😢

Latest Strategy Guide Reviews

The Walkthrough by Doug Walsh Review

Red Dead Redemption 2 Strategy Guide Review

Mega Man 11 Strategy Guide Review

God of War Strategy Guide Review

Far Cry 5 Strategy Guide Review

Friends of SGR

  • BradyGames
  • Dan Birlew – Guide Writer
  • Doug Walsh – Guide Writer
  • Future Press
  • Game Enthus
  • GameWires.com
  • Piggyback
  • Press the Buttons
  • Prima Games
  • Racing Games

Top Posts & Pages

  • Prima Games and BradyGames Officially Merge
  • Final Fantasy III Strategy Guide review by FuturePress

Copyright © 2025 · Web crafted by Warkhammer


Loading Comments...