• Home
  • About Us
  • Podcast
  • Strategy Guide Wit
  • Contact

Strategy Guide Reviews

A Strategy Guide for your Strategy Guides

  • Reviews
    • Strategy Guide Reviews
    • Video Game Reviews
    • Mini-Reviews
  • Features
    • Interviews
  • News
  • Unboxing Strategy Guides
  • Columns
    • Gaming Diary
    • Corner of Randomness
  • Videos

Comparing the The Legend of Zelda: Wind Waker HD Strategy Guide

January 30, 2014 By Keri Honea 3 Comments

Wind Waker Strategy Guides
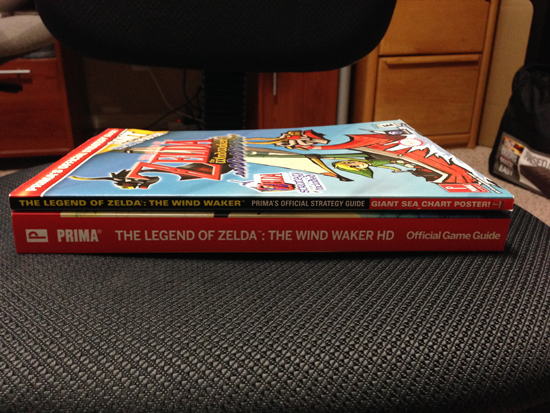
I wasn’t surprised that Prima Games was releasing a new book for the HD version of The Legend of Zelda: Wind Waker. Why reprint the original book when you can modernize its look and sell it again? That’s pretty much what Nintendo did; might as well jump on the same bandwagon. But what did surprise me was the differences in size between the books, as seen on the image to the right. The original is on top, and the new strategy guide for the HD remake is on the bottom. It’s roughly a 200 page difference.

If everything stayed the same save for an update to the graphics, why in the world is the newer book so much bigger? And more importantly, why should anyone buy the newer book?

After sitting down with both books and comparing them side by side, I will be honest with you–the original book will get you through The Legend of Zelda: Wind Waker just fine. However, The Legend of Zelda: Wind Waker HD strategy guide is the better book all the way around.

Let’s look at some comparison photos between the two.

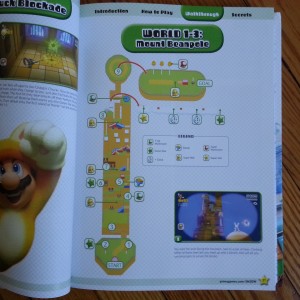
From the table of contents on the first page in both books, you can already see the difference in the layout and design.

The Legend of Zelda: Wind Waker strategy guide table of contents

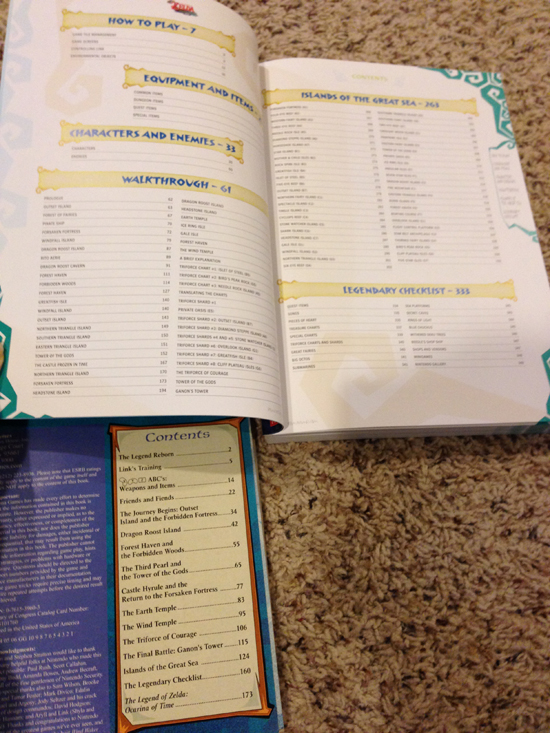
The original book compacted the entire TOC into a sidebar, whereas the HD book blew it up entirely and broke down each individual section to further help you find what you’re looking for. Case in point, look at the sections for “Islands of the Great Sea” for both books.

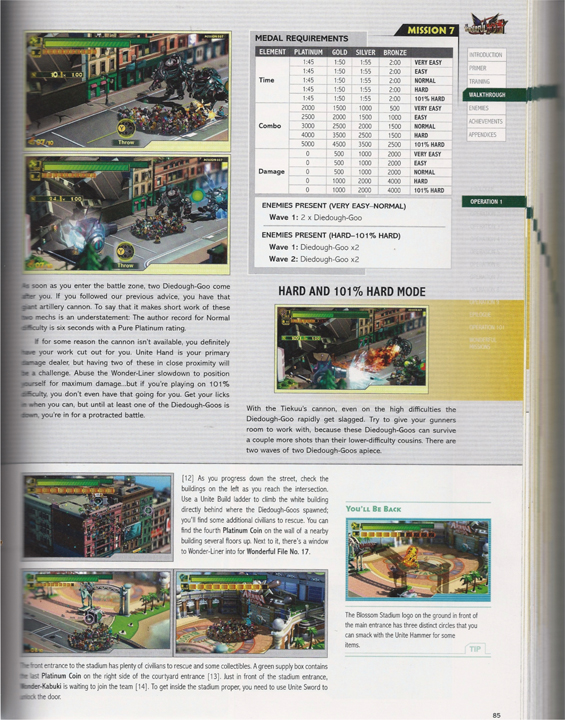
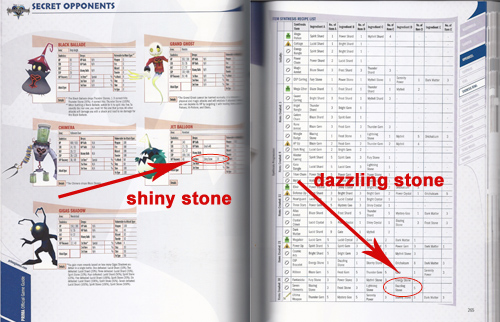
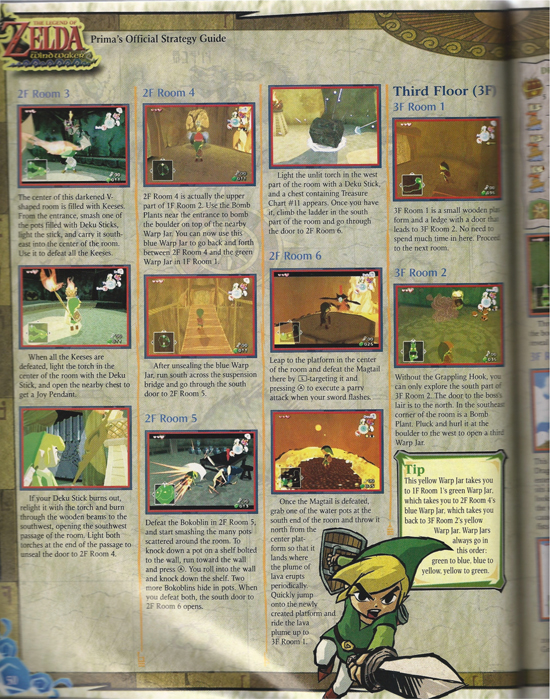
The layout of The Legend of Zelda: Wind Waker HD strategy guide is far less compact and has more detailed information in regards to, well, everything. One part I had a ton of trouble with when I played Wind Waker on the GameCube was in the first “real” dungeon on Dragon’s Roost Island. Link had to kill a Magtail that patrolled a rock in the middle of a lava pool. If Link didn’t do this, then he couldn’t throw the pots of water into the lava from the rock and progress. To say I had trouble taking care of the Magtail would be putting it lightly. Check out how much more detail the HD book provides on getting through this part.

The Legend of Zelda: Wind Waker strategy guide - Magtail The Legend of Zelda: Wind Waker HD strategy guide - Magtail

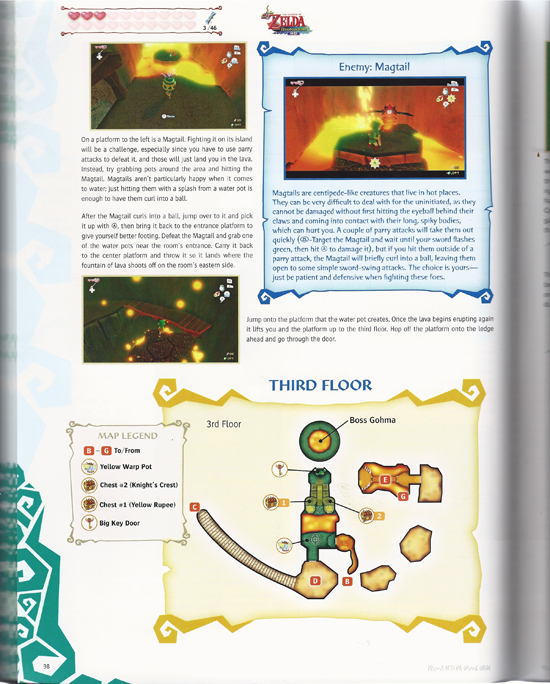
This is just the walkthrough for one little enemy in the middle of a dungeon. Imagine how much more detailed all of the information is throughout?

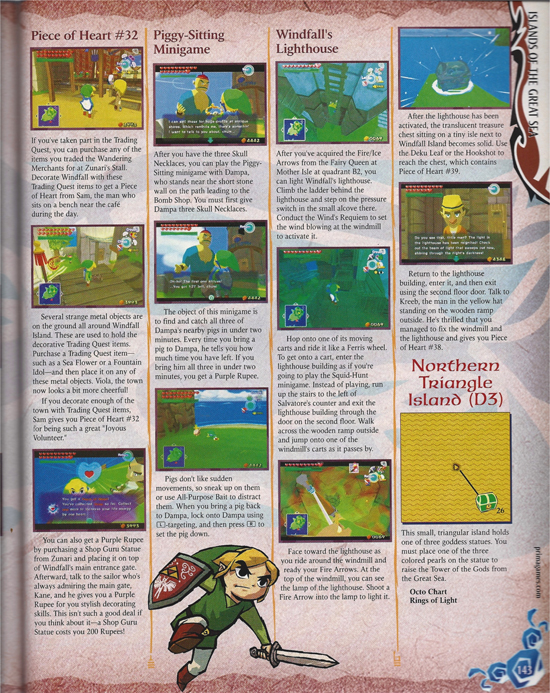
Care to see a few more examples? Here’s a side-by-side comparison of the same mini-game and collectible information from Windfall Island in the Islands of the Great Sea appendix:

OG-Islands HD-Islands

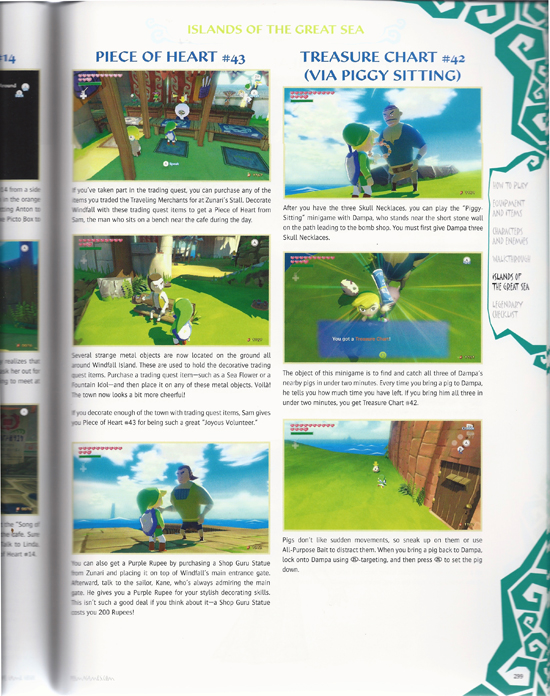
Notice how everything just looks so bunched up in the original guide? The HD guide has it more spread out with larger screenshots.

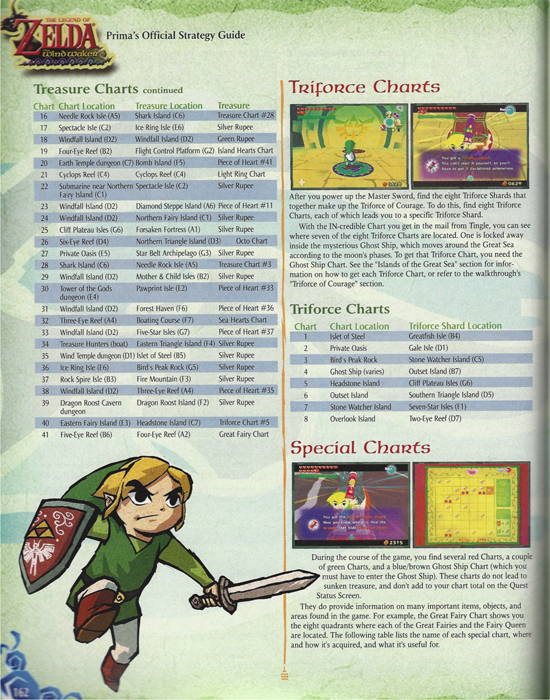
Here’s a side-by-side comparison with the Triforce Charts appendix:

OG-Charts HD-Charts

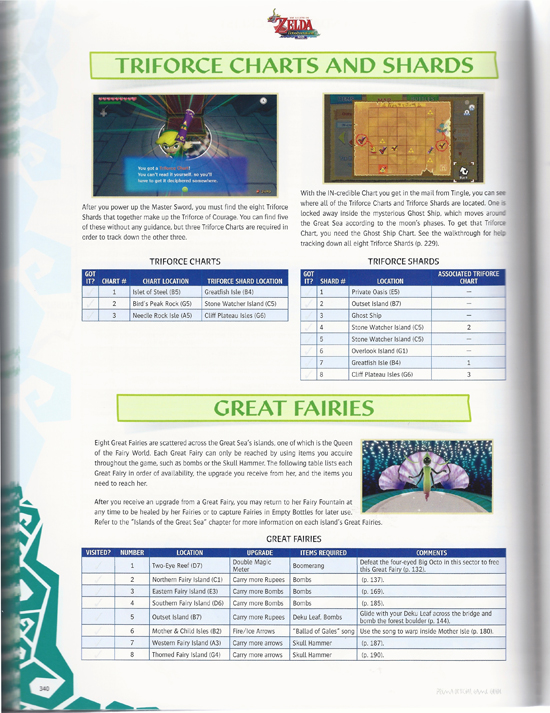
I think you can see my point, as well as why the HD guide is so much thicker than the original. When you spread out all that info that was in 4-5 columns per page to 1-2 columns, the book is going to get long in a hurry. A thicker book may seem like it’s less efficient, but I think it’s easier and faster to find what you’re looking for when information is spaced out instead of crammed into one page.

So guess which book I’ll be using whenever I find time to get into Wind Waker? I never finished the game when it originally released, but I hope with this newer, more informative, and easier to navigate (hahaha! see what I did there?) tome, I’ll be less frustrated while playing. Maybe I’ll actually finish a console Zelda game!

On the flip side, the tear-out Sea chart is the one thing that isn’t bigger in the HD guide than the original. Holy cow.

seachart
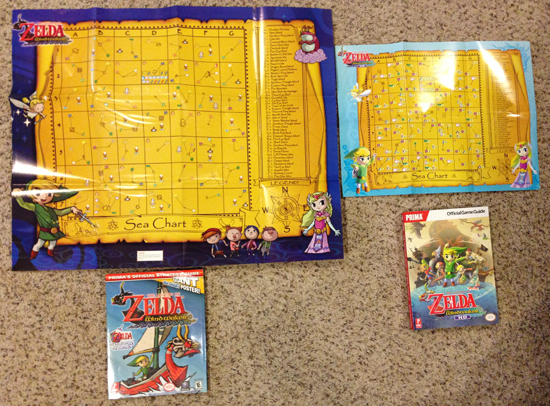
You tell me which one you think is easier to use while navigating through the seas of Wind Waker.

Authors: Stephen Stratton and Garritt Rocha
Publisher: Prima Games
Editions Available: Paperback and Collector’s Edition
Acquired via Publisher

Filed Under: Strategy Guide Reviews

Super Mario 3D World Strategy Guide Review

January 23, 2014 By Chris Nitz 2 Comments

Super Mario 3D World strategy guide reviewOh Mario, why do you have to be so friggin entertaining? Yes, the new Super Mario 3D World is a must own game for anyone with a Wii U. It blends nostalgia with new technology and then turns up the fun to 11. With such a bright and fun game, it is nice to see Prima bringing their A-Game with their Super Mario 3D World strategy guide.

After a brief introduction on how the guide is laid out, the authors dive into how the game plays. Anyone that has ever played a Mario game can pretty well skim this section as the mechanics are like meeting up with an old friend for coffee and instinctively picking up your conversation right where you left off. I do recommend stopping by the character and Power-Up/Form section as they do give good detail on how each character plays and what new items, such as the cat suit, do. For those that want to bring friends into the mix, the multiplayer portion will help keep things from getting too crazy!

The bulk of the book goes to the walkthrough. Each stage begins with an overall map of the stage with stamps, stars, 1-ups, rings, and bosses clearly marked. There are even arrows showing how the stage connects and progresses. More exploded views are marked and gone into later on in the section. This made it very easy to see where I was missing a stamp or a star as I made my way to 100% completion.

When can I have turn-by-turn directions?

When can I have turn-by-turn directions?

I found the bosses laid out fairly coherent and easy to follow. There was just enough about the battle described to clue me into any sort of nuances that I might need to look out for, while not breaking down every detail as to take away from the overall challenge

Finishing the guide is a small area containing secrets and some artwork. The secrets are short, but they fill you in on how to obtain the Luigi 8-bit game, new playable character, and some of the Easter eggs scattered throughout. Let’s not forget the ever important warp locations and where to haul a shell to rack up massive amounts of lives.

I found that navigation through the guide was fairly easy thanks to the colored side markings on the pages. Each stage is its own color, and so if I wanted to work on world four, I just flipped to the brown/rust colored area and away I went.

Overall I was happy, but there were two things that got to me. First was that some of the maps get pretty cluttered due to the amount of stuff they are trying to show off. Between all the rings, items, costumes, collectibles, and such, some maps look like the cartographer sneezed detail all over the place and was too lazy to clean it up. These are rare occasions, but something to be aware of.

The second issue I have comes with that extra art section. This book is beautiful. The cover is gorgeous, and the typography keeps the pages feeling fun and tie it into the game rather well. The added art area, while a bonus, just felt weak as it is renderings of the Mario cast. I would have loved to see something a bit more, such as painted worlds, artist sketches, or even fan art from a contest. It just felt like this was thrown in to say it was there, but the opportunity to capitalize on it was squandered.

While I understand that Mario games are typically not that complicated, I found Super Mario 3D World that much more entertaining with this guide. Not having to scour every nook and cranny for that one missing star was great. Also, let’s face it, this book just looks damn nice on a bookshelf or coffee table. Fans, you owe it to yourself to snag this!

SGR Rating 4.5/5

Author: Alexander Musa & Geson Hatchett
Publisher: Prima Games
Editions Available:
Hardcover
Acquired via Publisher

Filed Under: Strategy Guide Reviews

The Wonderful 101 Strategy Guide Review

January 15, 2014 By Keri Honea Leave a Comment

The Wonderful 101 Strategy Guide ReviewWith Platinum Games’ titles, they’re more about finishing each level with flair on the hardest difficulty known to man and collectibles than they are story. In other words, it’s gameplay, gameplay, gameplay with them, and you better be prepared for some fast action, nimble fingers, and a lot of patience as you fail…A LOT. If you want to cut out the middle steps and go straight to big profit, that’s when you pick up the strategy guide. The Wonderful 101 strategy guide from Prima Games focuses on helping players earn those platinum medals on the 101% Hard difficulty their first time, not their 101st time. At the very least, players can find all of the collectibles and unlock all of the secret missions in one go.

I am downright terrible at Platinum Games’, uh, games. They move at insane speeds, button mashing never really works, and you have to have patience due to a high death rate. All three of these elements pretty much requires me to have a strategy guide so I don’t hurl the Game Pad across the room in frustration. You might wonder why I even bother with this studio’s games, but that’s a debate for another day. The point is I couldn’t have gotten through this game without the strategy guide’s help; it was practically as glued to my hands as the Game Pad during each session.

Each mission is framed with the medal requirements for each difficulty, a list of enemies for each difficulty, and then the walkthrough complete with screenshots. The screenshots were fantastic for seeing the ideal moment when to execute a certain attack, defense, or Unite Morph. They also helped me find exactly where I needed to be heading as I occasionally got a little confused and lost (it didn’t happen often, but when it did, I was very, very lost). This presentation and layout made it very easy to quickly find where I needed help when I wasn’t following the strategy guide letter by letter.

The Wonderful 101 Strategy Guide ReviewOf course, if I wasn’t following The Wonderful 101 strategy guide letter by letter, I missed out on many, many collectibles. Instead placing collectibles in call-out boxes on the pages, the collectible pickups were mixed in with the written walkthrough. At least the collectibles are printed in bold, making them easier to see when glancing at the page. At the same time, the book has collectibles that can only be earned when replaying the mission in call-out boxes, which helps you plan when you will replay a mission and how often.

The only other issue I had with the strategy guide was the occasional misnumbering of missions. The game would tell me I was on mission 14, but the strategy guide had that mission set as mission 12. It didn’t happen often, but again, if I wasn’t following the guide by the letter, I would have to pause the game to find what I was looking for in the book. I also wish the strategy guide explained what a Unite Build was in the command portion of the book, because I unfortunately wasn’t able to play the game for a couple of weeks after playing the tutorial, and it wasn’t for several missions that the game required a Unite Build. I was completely lost at what to do, the strategy guide didn’t explain it, and I had to look it up online. Of course the command was super simple and I felt silly for forgetting how to do it, but it still should have been explained in the strategy guide. It wasn’t even explained in the tutorial walkthrough.

Even with these minor, minor complaints, The Wonderful 101 strategy guide was my security blanket during my entire insane acid trip down The Wonderful 101 road. Those who want to just burn through the story on Very Easy mode may not need what the strategy guide has to offer, but if you’re a completionist or want to get through the game as efficiently as possible, do not forget to pick up a copy of The Wonderful 101 strategy guide.

SGR Rating: 4/5

Author: Alexander Musa
Publisher: Prima Games
Editions Available: Paperback
Acquired via Publisher

Filed Under: Strategy Guide Reviews

Kingdom Hearts 1.5 Strategy Guide Review – Part 1

December 20, 2013 By Keri Honea Leave a Comment

Kingdom Hearts 1.5 strategy guide review Yep, I’m pulling a Square Enix with this strategy guide review. Since the Kingdom Hearts 1.5 strategy guide covers two full games, I’m going to have to review this guide in piecemeal. Naturally, part 1 will cover the Kingdom Hearts Final Remix portion of the strategy guide.

For whatever reason, Square Enix decided to make a Final Remix version of Kingdom Hearts because apparently they admire George Lucas and they can’t leave well enough alone. The end product added a couple of new cut scenes (which I admit are nice) and a bunch of new heartless that are a complete beating, and oh hey, these have your precious synthesis items now. That hasn’t been so nice. They also for whatever reason moved around the treasure chests, their contents, and a few of the trinity marks. Most of the chests are in the exact same spot, so why their contents had to be jumbled up is beyond me. Therefore, if you still have that lovely Kingdom Hearts strategy guide written by Dan Birlew, it isn’t exactly going to be very helpful, especially if you want to find all of the trinity marks and synthesize everything in the Moogles’ shop. However, it’s sad to say that the Kingdom Hearts 1.5 strategy guide isn’t that helpful either, as when it comes to the collectibles, it’s very obvious the authors copied and pasted a lot of the data from Dan Birlew’s guide without double-checking that it was accurate with the Final Mix.

The walkthroughs themselves were excellent. They were extremely well written, especially the passages regarding Wonderland, Monstro, and Hollow Bastion, as it is sadly easy to get completely turned around and lost in these worlds particularly Wonderland (still despise that level 10 years later). I’d like to say that I didn’t get lost in either of these worlds because I had played them once before, but that was definitely not the case, and I greatly depended on the strategy guide to help me navigate through those insane maps. The walkthroughs also helped lead you to the most efficient path of traversing through each world and picking up every available collectible along the way. For collectibles that you couldn’t pick up yet, such as those that required the glide abilities to reach, the strategy guide presented them in handy little call-out boxes so you could easily identify them when you came back through a second, third, or fourth time.

Not much changed in the Kingdom Hearts Final Mix since the game’s original release in 2002, in that the maps are the same, the bosses are the same with the same tactics, the gummi ship routes are the same, and Sora has to perform the exact same tasks as he did before. However, there are new heartless that Sora can’t defeat by simply swinging his Keyblade around willy-nilly. Some of the heartless are susceptible to magic, and some are susceptible to only certain types of magic. If it wasn’t for the strategy guide, I would have avoided these heartless at every turn just because that’s a huge headache at times. The guide helped me cut to chase and know up front what I needed to do to defeat them. Many people probably won’t care about this, but if you’re trying to harvest rare items for synthesis, you do have to deal with these annoying buggers at some point.

And that’s all the good I have to say about the strategy guide.

Collectibles are huge in Kingdom Hearts, especially in the first game where Sora can collect equipment, items, synthesis items, trinity marks, and the 99 dalmatian puppies. One of the biggest reasons why I bothered half the time to look for all of the treasure chests was not to score parts for my gummi ship; it was to find all of those wayward puppies. I even had more motivation this time to hunt down and activate each and every trinity mark because I wanted that Trophy. So I heavily relied on the strategy guide, much like I did with Dan Birlew’s strategy guide before, and its maps to help me find every single treasure chest and trinity mark. The maps were sound and crystal clear with marking the chests, its contents, and all of the trinity marks. Where the strategy guide went wrong was marking what was in each chest.

As I said earlier, the treasure chests were all in the same locations as the first game, but their contents were often very different. What may contain an Aero-G from the first game may contain puppies in the Final Mix. The labeled contents of some of the treasure chests were so wrong, I honestly wonder if the writers simply copied and pasted from Dan Birlew’s book. Sometimes the appendix for the puppies would say a group of puppies was in one location, but when you looked at the map in that world, those puppies were nowhere to be found. For example, for puppies 58-60, the appendix said that they were in a chest in the Queen’s Forest. If you look at the map, these puppies are not labeled anywhere. I checked the original guide, and sure enough, those puppies were in the Queen’s Forest. I was baffled and quite furious, but I continued my search through Wonderland as I still had a white trinity mark to activate. When I went to the secret area to activate said trinity mark, I also triggered an archway of flowers to release a chest that the strategy guide said would contain a Thundara-G. Lo and behold, that chest contained the puppies I was looking for. I was stunned. The walkthrough said it was a Thundara-G, the map said it was a Thundara-G, and not surprisingly, the original guide said it was a Thundara-G. After the third batch of puppies I found in a different location than advertised, I’m somewhat convinced the writers never finished playing the game.

Their synthesis appendix further evidenced that they did not finish playing the game. I don’t even know where to begin with the synthesis appendix. It’s two pages, and on the left side, the writers listed “all” of the items needed for synthesis. Then on the right page, they list all of the items that can be synthesized and their required ingredients. It doesn’t take long to see that the list of the left page is missing several key ingredients. So, where do you find these ingredients? It’s time to flip through the book and read up on every heartless and see what they drop. Wouldn’t it be more efficient to list where to get all of these items in the synthesis appendix as well?

Oh but that’s not the only problem with the synthesis appendix. The writers apparently used different translations for some of the items and then didn’t confirm that they used the same name in each spot. Case in point, look at the pages below.

KHFM-translationOn the heartless page, it says the heartless will drop a “shiny stone.” There is no mention of a “shiny stone” anywhere in the synthesis appendix. What is mentioned is a “dazzling stone.” I had to look up extra help online to figure out where I could get this non-existent dazzling stone, and that’s where I learned that there could be two translations. That’s not confusing at all or anything. Here’s the kicker–when you defeat that heartless in the game, it clearly says it drops a dazzling stone. What this says to me is that the authors didn’t complete the synthesis in the game, and they used scripts they received from Square Enix or another translation. Maybe the writers didn’t think that synthesis was that big of a deal, but it doesn’t excuse sloppy work.

As another piece of proof that perhaps the writers didn’t play most of the game, they didn’t even get the rewards right for completing the Coliseum cups solo. They copied what the original guide said, and that information is incorrect.

On the surface, the Kingdom Hearts 1.5 strategy guide seemed like it was going to be as great as the original guide. Everything seemed to be in place, all of the chests and trinity marks were correctly marked, the walkthroughs were clear and concise, and the appendices appeared to have everything in order. Dig a little deeper, and it’s unfortunate to find incorrect information, translation problems, and suggestions that the writers simply copied from an older strategy guide. The first half of this strategy guide has been a disappointment indeed.

SGR Rating: 3/5

Authors: Michael Searle and Cory Van Grier
Publisher: Prima Games
Editions available: Hardcover
Acquired via publisher

Filed Under: Strategy Guide Reviews

Battlefield 4 Strategy Guide Review

December 5, 2013 By Blake Grundman Leave a Comment

Battlefield 4 Strategy Guide reviewIt is not very often that a guide comes around and knocks the traditional formula on its ass. Then entered the Prima Games’ Battlefield 4 Strategy Guide at stage right, which gleefully overturned the tables that previously held all of your expectations about what a game guide should be. Gone are the days of a laborious single player campaign walkthrough. It isn’t like the developer spent years developing that as an integral component of a cohesive experience, right? After all, who needs that useless garbage when all people really care about in a Battlefield title is the multiplayer experience. Will this new approach bode well for the Battlefield 4 guide, or does the shift in focus take away from what strategy guides are all about?

If there were ever a guide that could be labeled as a grade school textbook, Battlefield 4’s would meet the description to a T. Sure the subject matter might be a bit more on the saucy side, but cover-to-cover, it is the comprehensive end all be all, for what is widely considered to be the most complex and diverse multiplayer shooter on the planet. But every good story has a beginning, and the writers saw fit to properly acknowledge that with an introduction section that covers the legacy of the Battlefield brand. This is also complimented by behind the scenes discussions with the key team members that have been a part of the series since the beginning. Though it seems almost too brief, it is fantastic to get insights into the original goals of the developers, the brand’s evolution and where it is going in the future.

DICE’s tight ties to the book are further evidenced in the “Road to Battlefield 4” section that follows. Each major mechanic section is actually penned by a key member of the game’s design team, including multiplayer lead Thomas Andersson. Each developer spends a significant page count emphasizing what were key modification and/or additions in the most recent outing, such as adjustments to class structures, the new “Levolution” system, “Commander Mode”, vehicles and much more. Having the individuals who essentially owned specific features of the final product break down what makes this newest version so special does wonders for imbuing even the most trivial of components with the passion of those who made it possible. This is a fantastic way to help re-introduce traditional Battlefield players to the new mechanics and inform newcomers what to expect when they first venture into the immense and intense world of online multiplayer.

Next up is the meat of the actual multiplayer guide, but first it is worth mentioning the interesting approach Prima took to the drafting process. Veteran guide writer David Knight has teamed up with four of the best Battlefield players in the world to co-author this massive tome. Though it is a little unclear as to who is writing each individual general commentary segment, there are numerous specific call-out portions that are dedicated to a specific member of the team as a “pro-tip.” These are actually scattered throughout the guide and provide insight into many different strategic elements that take place over the course of a match, but more on that later.

Leading things off is a thirty page “Battlefield Bootcamp” that is dedicated to breaking down all of the key aspect of the game, its mechanics, modes, interactive elements that extend beyond the warzone itself, and most importantly, standard multiplayer tactics. It is imperative that players read this area, especially virgins to the series. Even then, noobs will probably still be eaten alive, but at least they will be able to speak the same language with their online brothers in arms. There is nothing worse than being saddled with a clueless chunk of cannon fodder. This will help prevent you from being that lame duck.

What follows the “101 class” in the ways of online combat are sixty eight pages of infantry information. Some of the key topics touched upon are proper class selections, weapon and perk loadouts, and the various unlock progressions for each unit type. Additionally, there are also several more “pro-tips” for each class, from each of the contributors. It is very interesting to see four varying approaches to using the same variety of soldier. If nothing else, it further demonstrates how versatile and complex the online ecosystem can be in the world of Battlefield. While this alone would be substantial enough to stand on its own, the majority of this section is actually reserved for detailing the title’s countless weapons and their respective modifications. Though it is hard to say if the information in this section is actuate, over a month after its release, it is still at least a valuable reference point for those needing to compare the pros and cons of different firearms.

And what would a Battlefield game be without vehicles? The franchise’s multiplayer suite is probably best known for its extensive use of these mobile weapons of mass disruption. Just like every other chapter, each grouping of motorized mayhem is laid out efficiently, including a list of the equippable upgrades available for purchase and advanced tactics that will utilize them the most effectively. Most of the tactics call-outs are focused towards the seasoned veteran, but even rookies see their benefits in time.

Once this has all been combed through, then comes the most impressive and expansive portion of the entire book: multiplayer map analysis. To put it into perspective, the smallest map commentary still boasts an extremely healthy twenty four pages. Considering that there are ten individual maps covered in the book, this would help explain the collection’s impressive two hundred and seventy pages. All of the stages’ are initially led off with general impressions from the writing staff and explanations of its marque levolution(s). These are then followed with dissections of each multiplayer mode, all the way down to recommended squad compositions throughout a battle. The more objective commentary is also buffered with additional “pro-tips,” from the resident expert writers. While the information contained within is fantastically detailed and almost overly explicit, it did feel like there were many pieces of art that, though beautiful, could probably be deemed superfluous. This sometimes led to pages feeling more claustrophobic or visually distracting than necessary. Everybody loves a good side profile shot of a tank or downed helicopter, but when the game itself features a plethora of them already, it probably isn’t necessary to include these unless critical to the strategy being discussed in the text.

Anchoring this massive manuscript are extremely brief campaign and achievement/collectables section. How brief, you ask? Why, a mere eleven pages. Yes, it is understandable that multiplayer makes up a vast majority of the guide, but why even bother to include even a reference to the single player, when it is going to be glossed over so egregiously. There are any number of explanations as to why this might have occurred, but it doesn’t change the fact that the main character’s name is only mentioned once and all but the introduction page consists of a continuous wall of spreadsheets. Unless Prima has plans of selling a single player guide separately, to call this effort disappointing would be like calling Thomas Edison a tinkerer.

One last piece of the puzzle is the prominently promoted digital/mobile component. Sadly, this two ends up lacking the original content necessary to justify its existence, aside from potentially being updated should new balance changes be introduced into the game. It has yet to be shown if it will be further augmented when new DLC is released, but this might be a step in the right direction. Pouring additional gas on the flame, the single player is still an afterthought. Sure, at least there is now a video playthrough of each stage to watch, but there is no direction, voice over commentary or so much as sliver of additional information, aside from the video timestamp where collectables are uncovered and a list of weapons available in each stage.

For fans that are exclusively consumers of Battlefield 4’s online multiplayer, Prima Games’ official guide will prove to be a wealth of information, the likes of which have rarely existed outside of dedicated fan sites and enthusiast forums. However, those that are focused on a single player walkthrough will be much better served turning to specialty sites online. It is hard to say whether this is a step backwards or simply sidestepping the bigger issue of whether or not print guides for a constantly evolving online experience are even valid in the internet age. Regardless of this author’s opinions on the matter, it still doesn’t excuse neglecting to cover half of such a prominent title, without communicating that to the reader before purchase. Misleading the audience is never a good foot to start out on, so buyer beware.

SGR Rating: 3/5

Author: David Knight, Michael Cavanaugh, Michael Chaves, Marcus Lovejoy, and David Walsh
Publisher: Prima Games
Editions available: Paperback and Collector’s Edition
Acquired via Publisher

Filed Under: Strategy Guide Reviews

  • « Previous Page
  • 1
  • …
  • 19
  • 20
  • 21
  • 22
  • 23
  • …
  • 40
  • Next Page »

Follow us!

Subscribe!

Upcoming Strategy Guides

 Nothing here. Come back later. 😢

Latest Strategy Guide Reviews

The Walkthrough by Doug Walsh Review

Red Dead Redemption 2 Strategy Guide Review

Mega Man 11 Strategy Guide Review

God of War Strategy Guide Review

Far Cry 5 Strategy Guide Review

Friends of SGR

  • BradyGames
  • Dan Birlew – Guide Writer
  • Doug Walsh – Guide Writer
  • Future Press
  • Game Enthus
  • GameWires.com
  • Piggyback
  • Press the Buttons
  • Prima Games
  • Racing Games

Top Posts & Pages

  • Monday Gaming Diary: So LEGO The Hobbit for the Vita isn't Terrible
  • What I Look for in Strategy Guides: Achievements/Trophies
  • The Corner of Randomness: Happy EVO 2015
  • Farewell Kombo, and Hello Future
  • The Corner of Randomness: So Much Unboxing!

Copyright © 2026 · Web crafted by Warkhammer

Loading Comments...