• Home
  • About Us
  • Podcast
  • Strategy Guide Wit
  • Contact

Strategy Guide Reviews

A Strategy Guide for your Strategy Guides

  • Reviews
    • Strategy Guide Reviews
    • Video Game Reviews
    • Mini-Reviews
  • Features
    • Interviews
  • News
  • Unboxing Strategy Guides
  • Columns
    • Gaming Diary
    • Corner of Randomness
  • Videos

Evolve Strategy Guide Review

March 24, 2015 By Chris Nitz Leave a Comment

Evolve strategy guide reviewI was, and still am, excited about Evolve. The premise of four hunters taking down a giant monster totally has my interest. While I enjoy the game, sadly it’s already on the pile of “Games that Died Too Soon” thanks to a dwindling online community. Sadly, this will also be the case of the Evolve strategy guide by BradyGames.

This is a fairly easy guide to read and understand. As I was new to the game, as in I was kept away from spoilers and such, it was nice to learn how the various weapons and skills worked. This helped me form a plan as to what hunter I wanted to concentrate on and get the most unlocks for right at the start. This is true for the monsters as well as their attacks are spelled out and easy to know what monster fit my style of play. It was also handy to know what perks to pick for both sides, as those do make a big difference.

Could we get a bit more detail here. Like PRETTY PLEASE!

Could we get a bit more detail here. Like PRETTY PLEASE!

I found the Hunters and Monsters sections to be detailed enough to help me pick a favorite hunter and monster. Having the hunter combinations that utilize their loadouts against specific monsters was a nice touch. There are tips on how each character operates and what makes them tick. However, the tips are rather basic. Telling readers that a healing class should sit back from the fight and only swoop in when needed is pretty much Gaming 101 at this point. Having more advanced strategies would have made this guide a lot more useful.

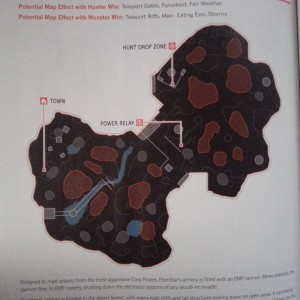
The maps are a mixed bag. I like knowing where the monster spawns in relation to where the hunters drop and the power core. The various map effect details (dependent on game mode) will help new players as they are not only fighting one another, but also the environment as well. Knowing what a man eating plant looks like will come in very handy when running away from the Goliath in hopes of living to fight another round.

While the maps are good for an overview, there isn’t much else to them. There are no prime routes marked for hunters or monsters. The lack of detail, outside of spawn and drop zone location, is very disenchanting. Having markings of where the bigger wildlife spawn points are, bird flock locations, and vantage points would have made these maps that much more useful.

Now this is full of win!

Now this is full of win!

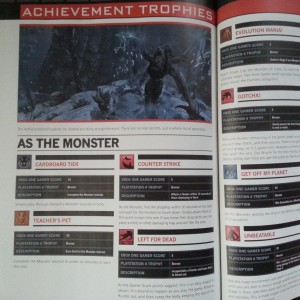
For those who want to get all the accolades, badges, and achievements will find the guide is very helpful here. Accolades and badges come in spreadsheet form and contain all the info that is needed to obtain these. The nicest part about this section is that the achievements are more than just a table with the name and point value. This guide actually details out what is necessary in order to snag every achievement available. That is not something we see in a lot of guides, and it is something I’d love to see more of.

As with any guides for a game of this nature, take all numbers and stats with a grain of salt. Patches, balance tweaks, and so on can easily render the numbers in this guide useless in one fell swoop. This guide also can’t be updated with future maps and hunter releases, and so the value of this information is rather limited to the game launch window.

Overall, the Evolve strategy guide is a great introduction to what players can expect from Evolve. I found that it was easy to read while drinking coffee or over a lunch break. I then was able to plan out what I wanted to focus on and unlock during my future Evolve play sessions. However, seasoned veterans will find this is more of a Sunday read than anything that is going to actually detail out solid strategies to make one a better hunter or monster. As is the game, pick your side and determine the value of it for yourself.

SGR Rating 3/5

Author: Michael Owen and Will Murray
Publisher: BradyGames
Editions Available: Paperback
Acquired via Publisher

Filed Under: Strategy Guide Reviews

The Order: 1886 Strategy Guide Review

March 6, 2015 By Keri Honea Leave a Comment

The Order: 1886 strategy guide reviewWhen I first heard that there would be a strategy guide for The Order: 1886, I was rather stoked. The game appeared to have so much potential as a combat-heavy shooter featuring steampunk weapons, a deep story, and werewolf fights. I have a feeling that BradyGames thought the same thing, hence why they proposed creating such a strategy guide for Ready at Dawn and Sony. After playing the game the first time for review, I formulated three reasons why there would be a The Order: 1886 strategy guide: 1)collectibles, 2) stealth sections, and 3) trophy hunting.

For the most part, that is exactly why the strategy guide will be used at all as all of the combat is very straight forward and simple. At least what it does is rather spot on with minor, minor complaints.

When I say it’s spot on, I mean that I was able to obtain a Platinum trophy in the game. Doing so not only requires completing certain combat feats, but also finding every single gosh-darn collectible. And these collectibles are not straight forward and easy to find, unlike the firefights. I found several on my own, but some are way off the beaten path in areas I didn’t know I could even get to until the strategy guide pointed them out. Plus a few of the phonograph cylinders could be easily overlooked in one scene in particular, because if you searched certain spots before locating the cylinders, a cut scene would trigger and force you to move on.

Collectibles! (And lots of screenshots)

Collectibles! (And lots of screenshots)

As an added bonus for completionists, all of the collectibles are listed in an appendix as well as the walkthrough. I do have to caution users that you do have to follow the strategy guide verbatim for the collectibles, as once you pass through one area, there is no going back to retrieve that wayward collectible. You’ll have to wait until you complete the game, which will unlock all of the individual chapters to play.

When I looked through the appendices for the trophy list, as I always do, I was initially disappointed that the list did not include advice for where it is best to obtain these trophies. Some of the trophies, the “Brilliant!” trophy in particular that requires shooting an airborne grenade during Blacksight, seemed impossible for me to achieve without a smidge of help. I honestly thought I would never get all of the trophies, and I focused on getting what I could my second time through the game as well as the collectibles. I really, really wanted to make sure the guide was 100% accurate on the collectibles.

My fears were unfounded, as some of those more “complicated” combat trophies were mentioned in the game’s walkthrough, such as that Brilliant! trophy. And yes, that’s exactly how I obtained that specific trophy; it was 100% with the strategy guide’s help.

Thanks for the lack of stealth help.

Thanks for the lack of stealth help.

With the final need for the strategy guide, the stealth portions, the strategy guide was a bit lacking. There are two distinct sections that require stealth, and only one properly guided you. In the first section, which took place on the airship, the guide told you exactly where to hide, showed you with screenshots, and even marked it on maps for efficient stealth kills without getting seen. In the United India Company gardens, you’re simply told to go take down the six roaming around. Oh, okay then. A suggested order for taking them down would have been great, or even marks on the map of their patrols would have been useful. My first time playing was a nightmare as I didn’t have help (and the QTE mechanics with stealth kills only made it worse).

At least they were very detailed in how to survive each werewolf encounter, whether it’s a werewolf boss fight or fending off the regular Lycans. In fact, it was because of the strategy guide’s recommendation to equip the Falchion for its stunning ability that I was able to develop a quick rhythm when it came to putting them down.

Other than the collectible and trophy hunting, The Order: 1886 strategy guide kind of ends up as a glorified art book. Each page is just covered with screenshots, because if you had to rely on words to fill the pages, the guide would be thinner than it already is. There is no bonus art section in the back, because the book is already crammed full of screen shots and character art. If they added any more, they might as well create a flipbook depicting all of the cut scenes in the game.

Other than the lack of assistance with one stealth area, The Order: 1886 strategy guide does an amazing job at helping players cover every nook and cranny of the game. The game is short as it is, so you might as well try to get as much out of it as possible. Not to mention, if it can help me of all people obtain a Platinum trophy, it can help absolutely anyone achieve the same.

Rating: 4.5/5

Author: Rick Barba
Publisher: BradyGames
Editions available: Paperback
Acquired via Publisher

Filed Under: Strategy Guide Reviews

Dying Light Strategy Guide Review

March 3, 2015 By Chris Nitz 1 Comment

Dying Light strategy guide reviewDying Light is an interesting blend of shooter, scavenger, and parkour simulator. While the story was rather bland, the game itself was a friggin’ good time. Sadly, that good time didn’t translate to the Dying Light strategy guide from Prima Games. Usually I tackle my guide reviews in a section-by-section format, but I want to try something new. So I’m just going to write what I thought was bad and good from this guide.

Unfortunately, the part where most readers will spend their time is in the walkthrough and side quest portions of this guide, and those are really rough. I found both of these to be littered with inaccuracies on how to tackle a specific quests. Either the strategy guide would tell me to go to the wrong place, or it would leave out vital tasks that needed doing before the quest could be completed. There were quite a few times when I’d have to go to Dr. Google and ask its advice, because the guide just left me hanging and questioning what the heck I needed to do/go next.

Gotta love the art!

Gotta love the art!

Another point of contention comes in the form of the character development part. Outside of the experience and progression table, there isn’t anything here that is not already clearly shown within the game. It would have been nice to have some pointers on how to develop the character to make the earlier portions of the game a bit easier. Sure, I don’t have to follow those tips, but it would have been nice to see them included.

The biggest issue with this guide comes down to the collectible section. There is a map and a correlating picture for each item, but these don’t always match up with what is actually in the game. The map doesn’t mark all the collectibles accurately, which left me high and dry at times. When the map was right, there were times that the attached screenshot was incorrect. I don’t know if the author had already snagged the item before doing a screen capture, but it made this section feel very incomplete and disjointed.

What the collectible section really needed was tips on how to snag the more complicated items. Until you get the grappling hook, trying to parkour the terrain to get to some difficult place can be an exercise in frustration. Having some direction would have helped. It doesn’t make things better when I spend ten, or more, minutes getting to a place that was shown on the map to have a collectible, and yet I’m greeted with a big fat nothing.

Lastly, the multiplayer could use some love and attention. The guide has some basic maps and tips on how thing work when online. However, anyone wanting to learn more about being the monster will find absolutely nothing on the matter. There is just nothing of solid in this section, and for a game with so much that can be done with friends, this is not okay.

Yet, the strategy guide still has some redeeming qualities. When it comes to presentation, the book rocks it. The pages look like they are dingy and come from the game. The side navigation markers made it easy to get to specific areas without much of a hassle. The artwork, especially in the bestiary, is phenomenal.

I liked that the blueprints actually had info on where you obtain them and what they provide. Granted the map still suffers the same kinds of issues as the collectibles, but not nearly as bad. I used the blueprint section a lot more than I thought I would.

I like it when you scream!

I like it when you scream!

When the guide nails a mission or challenge, it does so in such a solid manner. There is a hefty amount of reading, so be prepared to spend a few moments digesting a heaping portion of text. However, when all that text leads to a successful mission without any major hiccups, it’s a glorious time.

What I really dug about this guide comes in the last few pages. These contain all the Easter eggs, developer tips, and little quips on how to make the game a bit easier. It was fun to read that there was a Mario Bros. reference in the guide and then being able to find it in the game. It’s not exhaustive, but enough that I spent some time actually enjoying the world and getting a laugh between all the work of caving in zombie heads.

When it comes down to it, the Dying Light strategy guide is hard to recommend. There are times it nails down its job and provides concise and useful info. Sadly, the amount of misinformation, bad maps, and lack of thoroughness just drag this guide down and make it unreliable. This is one guide that it is best to skip and just save yourself the headache by using online resources.

SGR Rating 2.5/5

Author: Michael Lummis
Publisher: Prima Games
Editions Available: Paperback
Acquired via Publisher

Filed Under: Strategy Guide Reviews

Grand Theft Auto V Remastered Strategy Guide Review

February 6, 2015 By Chris Nitz Leave a Comment

Grand Theft Auto V strategy guide reviewThe Grand Theft Auto series has grown so much from its humble beginnings on the PS1. The latest installment in this franchise brought on three cast members and a wealth of side activities. It’s no wonder that the new, remastered guide for the new generation of consoles from BradyGames is so big. There is just a lot to do in this game.

The Grand Theft Auto V Remastered strategy guide starts with the basics of the game. This is a good place to do some reading as it does breakdown how the three protagonists differ from one another. This is also where there is a hefty amount of text on how things like wanted levels work, how to get around the city, and all the achievements in the game. Be prepared with a bookmark as this is also where the all-important map of the island is found.

Following the basics is a listing of every vehicle in the game. Anyone that wants to know how a particular garbage truck compares to that random semi, this is that section. Each vehicle, boat, and plane has a small bar chart detailing the speed, braking, acceleration, and traction. Boats and planes have their cost attached to them, and various car mods are listed for each car that is capable of being tuned.

Gotta love a great map!

Gotta love a great map!

With the basics out of the way, it is onto the meat of the game. The main story missions are broken into their own section. Following this is the Strangers and Freaks missions, and then all the hobbies and pastimes get their own section. I lumped these three sections together as they all follow the same basic formula. Missions are broken down into a step-by-step process. Maps display pertinent information, and there are a few screenshots to help players make sure they are on the right path as they work towards the end of the game.

Random events are a bit less detailed than missions. Each event has location, what characters can participate in the event, rewards, and any additional nuances clearly displayed in a banner. There is then a small blurb about how the event plays out and what happens should one choice be made over another. It is recommended to read about the event before tackling it, as things in this game can escalate rather quickly.

Hobbies and events is pretty much a blending of missions and random events. What makes this section fairly useful are the maps. Races are much easier thanks to the route being clearly displayed. The various challenges, such as guns, have blurbs on how they work and how to make the challenge a bit easier. For anyone that wants to live the life of a taxi driver, this is your roadmap to making millions. Well, maybe not millions, but a few bucks at least.

The miscellaneous section is where completionists will spend a hefty amount of time. This is where all the hidden packages, monkeys, submarine pieces, and other collectables are found. Each set of collectables comes with a map with locations clearly marked, and there are screenshots to further aid in finding those pesky monkey statues. This is probably one of the more useful sections of the guide.

The strategy guide wraps up with GTA: Online. This is a good starting point for what new players can expect from the online game. This is also where the creator mode gets some attention. Anyone looking to design their own races or deathmatch arenas, this is the section to study. Anyone that is porting their character from the PS3/360 version of GTA: Online will probably find little need to even browse this chapter.

While this strategy guide is thick and contains a lot of info, it is plagued with issues. Navigation is a royal pain. I was constantly flipping around the guide trying to find that one mission or info on that one car. I had so many bookmarks scattered about just so I could find my way around. Things such as placing a breakdown of weapons randomly into the middle of player basics just breaks the flow of the guide. These things are better left at the end of the section, opposed to shoving it between how stealth and wanted levels work.

Oh "tips", you're so brilliant.

Oh “tips”, you’re so brilliant.

The issues continue into all the missions and activities. I found there is barely enough info given to get players through any particular task. However, there is never an explanation of why a player might want Trevor over Franklin for a task. The little tips that are highlighted are often useless nuggets such as you build strength by playing sports or punching people. There were plenty of times I was left wanting more information, and had to turn to the Internet for that guidance I was seeking.

Outside of some basics of how GTA: Online works, and the creator mode, there is no meat here either. Some breakdown of the basic races and jobs would have been killer here. I understand that things will change as patches come along, but not including these basics just feels so lazy. Getting that online character situated into a living space and acquiring a car is but a fraction of what happens in this game mode.

The Grand Theft Auto V Remastered strategy guide is a hard guide to judge. On one hand, there is a healthy amount of information in here. It does its job and got me through the game and crazy amount of side content. On the other hand, navigating this guide was almost as challenging as the game. The lackluster GTA: Online section could have been so much better and useful. The fact that what content that is included is so bland is also a turn off. By the time I finished it, I was left wanting more substance and less filler. The best thing you can do before snagging this is to find it in a store, flip through it, and decide from there if it is worth your investment.

SGR Rating 3/5

Authors: Tim Bogenn, Rick Barba
Publisher: BradyGames
Editions Available: Paperback
Acquired via Publisher

Filed Under: Strategy Guide Reviews

Skylanders Trap Team Strategy Guide Review

December 23, 2014 By Keri Honea 4 Comments

Skylanders Trap Team strategy guide reviewAs much as I love little toys, it’s amazing I never got into Skylanders before. It’s all thanks to my eldest son and his wish for Skylanders SWAP Force for his birthday that I saw the genius behind the games. Yes, they’re for little kids, but like the LEGO games, there are plenty of ways to make it “worthy” for adults too. The difficulty can be hiked up as far as you want it, and if you seek out all of the collectibles, something most kids won’t have desire to do, or even more hardcore, go after 3-star ratings for each level, there’s more than enough to keep adults on their toes with this game. In fact, these last few reasons are the best reasons for a Skylanders Trap Team strategy guide. If you want to get those 3-star ratings, trap all the villains the first run-through, efficiently complete the villain side quests, and find all of those collectibles, this strategy guide is nearly essential. I say nearly because to no fault of BradyGames, they don’t tell players how to unlock certain gates because at the time, they literally could not.

Perhaps I should explain that first before I get into the rest of the strategy guide.

Skylanders Trap Team strategy guide

It’s a mystery hat behind a mystery gate…

As is part of the Skylanders’ schtick, each level has a few areas that can only be unlocked using specific Skylanders with certain elemental powers. There are Fire, Air, Magic, Undead, Life, etc. and etc. gates all throughout the game. In Trap Team, there are some gates marked with a lovely question mark, and not only does the game tell you that this gate requires an unknown element, but the strategy guide never once says how these gates can be unlocked. Just recently, Activision released two new packs of toys for Light and Dark elements, so now, nearly two months post release, players can finally unlock all of those gates and snag the last few collectibles and stars. I have a hard time believing that BradyGames knowingly refused to put in that information, that Trap Team toys of new elements would release at a later date. I believe that they knew how to unlock these gates, especially since the appendices explain what is behind each gate, but they were not allowed to explain. At least, that is what I hope.

Everything else with the strategy guide is rather spot on, if not a little padded. They presented tables for each of the Skylanders toys that had previously released, which showed each series they came from, which game, and their elemental powers. Then they dedicated a full page presentation to each of the new Skylanders for Trap Team. Sure, it’s nice to see a breakdown of each of the toys’ powers, which could possibly influence which toys to purchase first, but it also could have been easily displayed in a table for each element. They did the same for every trappable villain as well, so most of the strategy guide is dedicated to Skylander and villains, about over one-third of all the pages.

Skylanders Trap Team strategy guide

Prep is key!

The walkthrough portions contain maps of the areas with most of the collectibles (except those behind gates) and the gates pinpointed within. Each level also instructs the player which trapped villains they should bring to the area to complete the villain side quests. All of the gates except for those requiring the unknown elements are also detailed, including how to snag every hidden collectible. Too many are rather tricky, and I know I would have overlooked a couple without the strategy guide pointing them out.

One thing I do wish the strategy guide contained in the walkthrough was little call-out boxes for the Achievements/Trophies. Certain levels have random tasks one must complete to get that Achievement or Trophy, and they aren’t all that obvious. For example, chapter 3 has a special Trophy for smashing four stone Chompy statues. There are Chompy statues all over the creation, and it appears impossible to smash one of them, let alone four of them. A little explanation saying, “Hey, there’s a special Achievement/Trophy in this area to do this, and it’s best accomplished doing this.” I might have overlooked this if tips were given in the appendices, but they were not.

The back sections, before the appendices, are crucial for those who want to find all of the collectibles scattered hither and yon about the Skylands Academy that constantly grows throughout the story. Also, there are vital survival tips for Kaos and Arena modes, both of which must be ventured into for Achievements and Trophies as well as fun. It’s all part of that added difficulty for seasoned players thing I was telling you about. The Skylanders Trap Team strategy guide just helps alleviate some of the frustration and makes running through it a bit more efficient.

There’s a lot of worthy information packed into the Skylanders Trap Team strategy guide, but is it exactly a necessity for the game? No, not really. It’s more of a nice companion for Skylanders fans, a nice way to carve your shopping list for future toys and nice little pieces of prep advice to efficiently run through the levels.

SGR Rating: 3.5/5

Authors: Howard Grossman and Ken Schmidt
Publisher: BradyGames
Editions Available: Paperback and Collector’s Edition
Acquired via Publisher

Filed Under: Strategy Guide Reviews

  • « Previous Page
  • 1
  • …
  • 9
  • 10
  • 11
  • 12
  • 13
  • …
  • 44
  • Next Page »

Follow us!

Subscribe!

Upcoming Strategy Guides

 Nothing here. Come back later. 😢

Latest Strategy Guide Reviews

The Walkthrough by Doug Walsh Review

Red Dead Redemption 2 Strategy Guide Review

Mega Man 11 Strategy Guide Review

God of War Strategy Guide Review

Far Cry 5 Strategy Guide Review

Friends of SGR

  • BradyGames
  • Dan Birlew – Guide Writer
  • Doug Walsh – Guide Writer
  • Future Press
  • Game Enthus
  • GameWires.com
  • Piggyback
  • Press the Buttons
  • Prima Games
  • Racing Games

Top Posts & Pages

  • Monday Gaming Diary: Me and Master Chief
  • Gaming Diary: PAX East Write-up
  • Dragon's Crown Mini-Review
  • Gaming Diary: Gaming with Friends is Fabulous
  • Getting inFamously Bored

Copyright © 2026 · Web crafted by Warkhammer


Loading Comments...