• Home
  • About Us
  • Podcast
  • Strategy Guide Wit
  • Contact

Strategy Guide Reviews

A Strategy Guide for your Strategy Guides

  • Reviews
    • Strategy Guide Reviews
    • Video Game Reviews
    • Mini-Reviews
  • Features
    • Interviews
  • News
  • Unboxing Strategy Guides
  • Columns
    • Gaming Diary
    • Corner of Randomness
  • Videos

Pikmin 3 Strategy Guide Review

October 15, 2013 By Chris Nitz 5 Comments

Pikmin 3 strategy guide reviewWell, I finally cracked and went and bought a Wii U. The combination of Zelda themed system, free game, and Pikmin 3 helped to solidify this decision. I can honestly say that I am enjoying the system and I am glad I held off for just a bit on the purchase. Also, yes, Pikmin 3 is so much fun!

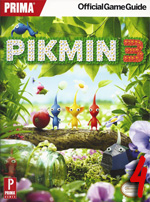
For those that might not remember, Pikmin is a game where the player is stranded on a strange world and they must use cute little creatures called Pikmin to tackle various tasks in order to get off the planet. The game is a mix of third-person action and strategy. Thankfully, Prima is here to help players get off this colorful world in as little time as possible with their Pikmin 3 strategy guide.

As this is the first time I have touched a Pikmin game in a few years, I spent a few moments familiarizing myself with it in the How to Play section. The author was kind enough to include controller breakdowns for the Wii U GamePad and Pro controller as well as the Wii Remote and Nunchuk. Anyone needing a slight refresher on how the game operates, this is a good starting point.

Old school GPS!

Old school GPS!

From there, the strategy guide jumps into the lengthy walkthrough portion. In here, there is a breakdown of each area by day. Tips on how to handle specific tasks, puzzles, or enemies are bountiful. Each new day starts with a map that shows the optimal path and stopping points to make the most efficient use of time. The day then ends with a checklist of tasks that hopefully players were able to finish off.

One of the best parts of this section is the detailed info on boss fights. While the bosses may not be overly complicated, the breakdown of the battle helped keep me from crying over seeing the tragedy that consists of Pikmin ghosts floating into the sky. In all honesty, this is one of the better boss battle step-by-step breakdowns I have read in some time.

From here, it is off to the Area Breakdown portion. This is a good compliment to the walkthrough as this contains key item locations and what is necessary to acquire them. Anyone running low on juice or just looking for a specific character, this is the place to come. Those that want to find all the data files will need to jump one more section, but it’s nothing too terrible as all the fruit locations are gone and only the files are highlighted. I think these two sections could have easily been combined, but neither of them are terribly long or complicated to quickly find help in.

The Art is way OP!

The Art is way OP!

Filling the next two sections is all kinds of goodies on the various characters scattered about as well as items and obstacles. If there is an enemy that is causing trouble, there is a good chance some battle plans can be made while reading up on their behavior here. These two areas are great for research, but I did not heavily rely on them.

Now, those who beat the game, or just want a diversion, the Missions provide a decent challenge. In this chapter, the author gives readers a fair amount of tactics on how to best achieve platinum status on every mission. I spent a few minutes reading the recommended tactics and looking over the map. While this did not yield a perfect run every time, it did make things quite a bit easier.

The last two items the guide covers are the Bingo Battles and a big checklist of things to accomplish in the game. The Bingo Battles are just a collection of maps of each stage while the checklist gives readers an aid to helping them keep completes objectives under control.

I want to take a moment to just compliment Prima on the art work they included on this guide. Instead of the usual game art assets, Prima used plastic models and terrain to setup scenes throughout the guide. This is something that caught me off guard, but I thoroughly appreciated. I found more than once being sucked into the pictures and just staring at it for a good amount of time. It might seem like a small touch, but one that made me appreciate the guide that much more.

Is this Apple Maps or something?

Is this Apple Maps or something?

The single factor that starts to take away from the Pikmin 3 strategy guide is when it comes to navigation through its bountiful pages, especially the walkthrough portion. You see, this section is broken down by days, which makes sense at first, but it quickly becomes a nightmare the deeper into the game one goes. As the goals start to become harder to obtain, I found myself flipping back and forth between Walkthrough, Area Breakdown, and to a lesser extent, Characters, rather frequently. Thankfully I did this before jumping into each day, but it did add some time as I looked at what needed to be done, study the map, read up on new enemies, memorize fruit locations, and hope that I did not forget anything at the same time. Yup, it sucks when the cat tips the book off the couch at night and your bookmark slips out and you have to spend some time trying to figure out where you were in the guide as your days no longer match up due to having to take an extra day to finish up the prior’s activities.

Easing the navigation is a tabbed reference system on the right side of the book. I found this to be immensely helpful as I was constantly flipping through the book. There is one small issue with this tabbed system in that the first 187 pages, it reads: Characters/Items and Obstacles/Data Pads. Yet, on page 189 that suddenly changes to Data Files/Characters/Items and Obstacles. Yes, that did cause some confusion at first and why it changes is beyond me.

Despite the massive amount of thumbing from section to section during my time in Pikmin 3, this is a rock solid strategy guide for anyone trying to get through this strange new world in as little time as possible, and without starving to death. The boss battle info and artwork in this guide are damn near worth the entry fee alone. Oh Pikmin, why must you be so friggin cute!

SGR Rating 4/5

Author: Nick von Esmarch
Publisher: Prima Games
Editions Available: Paperback
Acquired via Publisher

Filed Under: Strategy Guide Reviews

Diablo III for Consoles Strategy Guide Review

October 11, 2013 By Keri Honea 2 Comments

Diablo III strategy guide reviewWait, hold up a second…didn’t we already review a strategy guide for Diablo III? Why yes, we did over a year ago. However, Blizzard has ported this PC game to consoles, and BradyGames felt like they needed to revamp the strategy guide to fit the new style of game. Since Blizzard changed numerous aspects of Diablo III even while it was a PC game, the strategy guide sadly needed to be edited again anyway (not the fault of the writers, publishers, etc., mind you). As a complete newbie to the world of Diablo, I had zero idea what to expect from the game and the strategy guide. Since the game initially appeared to me to be a mindless hack-n-slash, I wasn’t sure I would need the strategy guide at all, but I was wrong, and the guide really helped me when I needed it.

Since I am such a novice to Diablo, I knew nothing about the character classes. I thought I could wing it since it seems to be an RPG, right? The classes are typically the same for every RPG, so hey, I should be good on my own. Yeah, not quite. As soon as I saw the names of the classes, I knew I needed some research. There’s a wizard and a witch doctor? What’s the difference? Is the monk similar to monks in JRPGs? A demon hunter? Is that a fancy name for ranger? I had to turn off the game and do something I rarely do–read the introduction information to the strategy guide.

Diablo III strategy guide boss fightThe Diablo III strategy guide kicks off with nearly 100 pages of information on just the character classes. It includes information about the style of play of each character, where they excel in combat, their equipment, and all of their skills. I was able to learn exactly what type of class would best suit me for my first time to play (which was a Barbarian…should surprise no one) and my typical play style.

Another thing the strategy guide did for the classes was for each boss fight, it listed the recommended level for the Hero at each difficulty and what skills the classes should know and equip for optimal success. Since your Hero is pretty weak early on the game, this information was absolutely invaluable. I was able to get through each boss fight the first time with little difficulty, and it really was thanks to the recommended skills. Oftentimes, I didn’t have these particular skills equipped, and it didn’t take long to discover how quickly I would have died if I went in to each boss battle with my typical skills and runes.

Diablo III strategy guide mapOne thing that greatly surprised me about the strategy guide was the lack of maps. I assumed since this was obviously a dungeon crawler, there would be maps detailing all of the treasure chests, item pick-ups, places for side quests, etc. The strategy guide pointed out that the game is randomly generated each time you play, so it became readily apparent to me that creating maps would be nigh impossible. So what the strategy guide did instead was map out in its own way all of the possible dungeon offshoots you can find in a particular area. Also, whenever you would reach a specific zone in a dungeon, the guide would mention all possible side quests that could randomly generate and how to complete them. Again, I don’t know how the writers handled this without pulling their hair out.

The appendices are really where the strategy guide shines the brightest. Every list you can think you might want is in there, including a superb crafting guide with recipe lists, a list of every piece of lore and its dungeon location, and every single possible conversation as well as how it unlocks. Just with these appendices, you can complete almost half of the game’s challenges and thereby several Achievements/Trophies.

Of course, the strategy guide also includes the endgame information such as the paragon levels and the optional quests that unlock after you complete the harder difficulty modes–Whimsyshire and Infernal Machine. I’m not sure I’ll ever play the game enough to unlock these quests, but at least I’ll always have the know-how for finding them. They appear to be a giant pain to unlock, and I have no idea how anyone would have known about these without some sort of help.

I tried to find something that the Diablo III strategy guide fell short in, and I honestly found nothing. Considering I breezed through my first time ever playing a Diablo game thanks to this strategy guide, I suppose I really can’t ask for anything more.

SGR Rating: 5/5

Author: Doug Walsh
Publisher: BradyGames
Editions Available: Paperback and Collector’s Edition
Acquired via Publisher

Filed Under: Strategy Guide Reviews

Saints Row IV Strategy Guide Review

September 24, 2013 By Keri Honea Leave a Comment

Saints Row IV strategy guide reviewSaints Row The Third was my first foray into the Saints Row world, and I was amazed at 1) how delightfully, ridiculously silly the story was and 2) how open and expansive the game world was. I could easily spend 100s of hours on sidequests and just messing around in the world. Saints Row IV is even larger, from the number of sidequests to the sheer size of the world to the number of collectibles available. The Saints Row IV strategy guide covered it all brilliantly and efficiently, and it’s a perfect companion to any Saint who wants to complete the game to 100% including earning gold medals, completing all challenges, taking over all alien territory, and finding all collectibles.

Most strategy guides for games that contain both a main quest and sidequests separate the two quests. The reasons vary. Sometimes it’s because the sidequests have little to do with the main story. Sometimes it’s because the sidequests are so numerous and/or massive, it makes more sense to keep them separate to avoid confusion for the user. SRIV has an abundance of sidequests, but the guide writers included these walkthroughs within the main story when the quests unlock.

Saints Row IV strategy guide

Layout for sidequests lets me easily decide if this one is worth it to me now.

However, these sidequest walkthroughs aren’t always in the order they appear in the game; instead, the writers arranged the sidequests and main quests in a way that is most beneficial for the user. For example, the strategy guide may suggest one sidequest before another because one mini-game is slightly easier than it is in the other sidequest. Or the guide may suggest a particular quest so the user can obtain a perk or a weapon before tackling the next quests. Yes, it’s really holding the reader’s hand, but at the same time, it also prevents the reader from being confused or frustrated when the guide suggests using a particular weapon later down the line. This has happened to me on more than one occasion with guides and has always frustrated me to no end (i.e. Crisis Core Final Fantasy VII strategy guide). The only complaint I have is that the sidequests are not listed elsewhere, so if you skip any of them and want to do them later, you’re going to have to do some page flipping.

Saints Row IV strategy guide

Learn ahead of time what each activity expects of you and how to get that coveted gold

A lot of these sidequests are mini-games (the game calls them activities) that often include races against a clock of some sort. While most of them require simply practice to master them, the strategy guide does give a few suggestions how to get a gold ranking in each activity. Like in the mayhem activities, the guide will point out the best targets to get the cache rolling in, or prepare the user for the type of Rift closing mini-game the player will have to face–race or platforming. For the store hacking activities, the complete list of hacking solutions for each store is conveniently laid out, leaving absolutely no excuse for not hacking everything in sight. Yes, it feels a little like cheating, but I call it being efficient!

In addition to an abundance of sidequests, Saints Row IV has an abundance of collectibles. One of the collectibles, the data clusters, are not mapped out in the strategy guide, but I’m forgiving of that since there are over 1000 of them. I can’t even imagine what a map of that would look like without being a mess. The strategy guide doesn’t really map out any of the collectibles, but the collectibles are organized by region of virtual Steelport and displayed via screenshot. Since each region isn’t that huge and each screenshot is quite clear, it’s very easy to find all of the Zinyak statues, audio files, and text games.

The only appendix that is lacking at all is the weapons appendix, which sadly, does not identify any of the Easter Egg weapons, such as the Loud Locust and the trademark Dildo Bat. I had heard of the Loud Locust from a friend, and I instantly scoured the guide for any mention of this weapon or any of the Easter Eggs listed online, and none were within. Obviously, not finding these weapons will not prevent players from finishing the game or hinder the overall experience, but secrets like these should be mentioned in any strategy guide whenever possible.

The strategy guide would have received a perfect score if it had these Easter Eggs, but I can still highly recommend this strategy guide for anyone looking to complete everything in Saints Row IV. To be honest, the list of all hacking solutions is almost enough to recommend purchase to anyone.

SGR Rating: 4.5/5

Authors: Doug Walsh and Joe Epstein
Publisher: BradyGames
Editions available: Paperback
Acquired via Publisher

Filed Under: Strategy Guide Reviews

The Last of Us Strategy Guide Review

July 23, 2013 By Blake Grundman Leave a Comment

The Last of Us strategy guide reviewAs far as games go, The Last of Us was the swansong of the PlayStation 3, from the studio that had arguably created some of the best games already on the platform. It was no shock that the expectations for the title were sky-high, and justifiably so. For the first time since the dawn of this console generation Naughty Dog had gone back to the drawing board and birthed a new franchise from scratch, which is no small feat to say the very least. In a curious move, the development team veered the project from the action exploration that had been their strong suit, onto more of a traditional survival horror track. Luckily, this genre of game plays directly into the hands of strategy guide readers. Ammo sparseness and lurking clickers be damned when a player is armed with BradyGames’ newest tome, The Last of Us strategy guide. Can it help curb the tide of jugular feasting mutants, or is does it lose the fight against the game’s ever inclining difficulty curve?

It somewhat goes without saying that The Last of Us is far deeper, in terms of game mechanics, that it would initially let on. Perfect evidence of this is the guide’s massive forty page Survival Guide, used to introduce the player to all aspects of the title’s universe. Important aspects of the gameplay including things like crafting items, listening mode, different types of explosives and how to use cover effectively are all very important pieces of the puzzle that are detailed extremely effectively. Alongside these highlights are detailed rundowns of each weapon, its strengths and weaknesses, and the different perks that can be unlocked through the in-game upgrade system. And what would any introduction be without a breakdown of the assorted enemies? Lastly, this area outlines of where each faction appears, as well as provides generic commentary on how they can be effectively dispatched.

With the silly formalities out of the way, the authors rolled up their sleeves and dove headfirst into the walkthrough. Each of the game’s twelve chapters have been broken out into its own dedication section. Complete with overhead views of the map, in-game art footage, and background information not readily apparent to the player, it proves to be the perfect companion to any playthrough. Each step in the walkthrough itself is laid out brilliantly in the text and is accompanied by several thumbnail images to effectively call out other important points of interest such as collectables or upcoming set pieces that shouldn’t be missed. In another neat touch, as new characters are introduced in the story, they are given a brief breakout section where details about how they fit into the overall The Last of Us universe. Sure, it isn’t necessarily anything groundbreaking, but it is a nice touch that helps augment the cohesiveness of the campaign.

Winding hallways and same-ish looking rooms are something that have existed as tropes of game design since the medium’s creation. The Last of Us is not immune to this universal folly. Thankfully the overhead maps are at the reader’s disposal while working through the commentary. Especially in areas like the museum or winding through office buildings, knowing important upcoming landmarks, which are effectively called out in both image and textual form, greatly reduce the risk of inadvertently being turned around. Also helpful are the map’s call-outs where craftable items and ammo can be found. Later in the campaign, it is critical to pay attention to these key details, as they become increasingly scarce as the plot progresses.

Despite being an exceptionally comprehensive walkthrough, even this component is not without its own specific faults. Though every encounter may be covered to the nth degree, the placement of collectible call-outs are occasionally misplaced in the overall layout of the book. Completionists will need to either manually save frequently or read ahead in the text in order to make sure they don’t miss any items behind a cruelly placed auto-save location or the far-too-frequently-occurring door that locks behind the player. Normally this occurs when the highlighted artifact was a page or so behind the overall commentary, resulting in the need to revert to a manual save to get said item. It is suffice to say that these occurrences are irritating. The other, albeit extremely minor criticism, is the fluctuating level of detail that is invested in the strategy aspect of the explanations. Certain areas will give a checklist of steps to complete in order to conquer a tricky encounter, while others will simply call out the number of enemies that can be found wandering in a room, and send the player off blindly into the fog of battle. Yes, the latter is usually the exception to the rule, but when it does happen, it results in quite a bit of head scratching confusion and far more unnecessary carnage.

One last tip of the hat to the authors’ approach to this guide is the fact that they managed to find a way to enhance the game’s overall experience, without feeling the need to inundate the reader with unnecessary plot spoilers. If a stranger were to turn to any page of the walkthrough, other than obviously being at a loss as to the context of the action, they would have relatively little idea what is going on in the story. This is a lost art form that many strategy guide writers have lost sight of in the last couple of console generations and should be applauded.

Next up in the flow of the book is the obligatory collectibles rehash. Sure, if the reader followed the previous one hundred and fifty pages religiously this section may seem a bit redundant, but it is the formatting that makes this a valuable addition. Most collectibles are only allotted small thumbnail images in the walkthrough, so it would only make sense for these items to get much larger shots. If nothing else, these blowups are useful in finding artifacts, pendants, training manuals and comics that are difficult to locate using the aforementioned single, tiny, completely out of context freeze-frame. Another neat touch that stands as evidence of the collaboration between Naughty Dog and BradyGames on this work is a rundown of all of Ellie’s jokes that are hidden in the campaign. These interactions are certainly obscure enough that most likely the player would never encounter them on their own, so it is cute to see these moments highlighted, despite their frivolity in the big picture.

In most modern guides there is one area that falls criminally short: multiplayer. Fortunately, this doesn’t look to be the case this time around. The Last of Us’ Faction mode breakdown is complete enough to make even the greenest of players feel like a battle tested veteran…well, at least that is the case until they get their ass handed to them in a brown paper sack by the legitimate experts eagerly waiting on the other side of the lobby. Everything from clans to proper gear and loadout selection are spelled out, along with key combat techniques that would usually be learned through the ever-embarrassing trial and error process. But let’s be honest, the real stars of this twenty page segment are the multiplayer maps. Along with top-down looks at each area, there is a theoretical analysis of how the battlefields will be played. Might this change over time and patching? Most likely. But it never hurts to have a good idea what to expect, even if it ends up being slightly out of date.

Drawing the guide to a close is a brief call-out to the amount of in-game currency that can be unlocked by achieving certain tasks over the course of playing the campaign. These tags carry over to additional rounds through the game, if the player is glutton for punishment. There is also a list of all items and character skins that can be purchased by these poor delusional individuals. It isn’t exactly going out with a bang, but it will be plenty helpful to those wanting to deck Ellie out in a killer Naughty Dog T-shirt or Jak goggles.

BradyGames’ new The Last of Us strategy guide proves to be a perfect mirror of the game as a whole. It succeeds in areas that have proven to be stumbling blocks for many in the past, while itself still being an imperfect work in its own regard. The most tragic part is that issues like the problematic layout of collectible asides are most likely not the fault of the author, but rather a reflection on the editor. Minor missteps begin to compound over time, especially when the same issue pops up consistently. When these repetitive incidents result in inconveniencing the reader/player, the effect is amplified tenfold. Even with this blatant flub, the guide still manages to deliver a solid overall product that will result in a more enjoyable experience for all parties involved. “It’s dangerous to go alone! Take this.”

SGR Rating: 4/5

Author: Michael Owen and Kenny Sims
Publisher: BradyGames
Editions available: Paperback and Collector’s Edition
Acquired via Publisher

Filed Under: Strategy Guide Reviews

Remember Me Strategy Guide Review

July 11, 2013 By Keri Honea Leave a Comment

Remember Me strategy guide reviewRemember Me was supposed to be Capcom’s truly unique action game that featured a female protagonist that unfortunately was more forgettable than memorable by most critics and gamers. I admit I was greatly intrigued by the game from what I played at PAX East, but it didn’t take long to regret my purchase when I sat down with the full game. Fortunately, the Remember Me strategy guide by BradyGames was not as disappointing.

Remember Me featured a fighting-game-style form of combat, where learning combinations of button presses is crucial to surviving. It seems like it could be a button masher at first, akin to a game like DmC: Devil May Cry or even Bayonetta, but the timing of each button press is so important that simply learning the combo itself is not enough. In addition, players can create their own combos with Pressens, meaning that while you can’t change what button you press in the combo, you can change the effect a particular button press will have. For example, a simple 3-button combo is X-X-X, but you can change the effect the X button presses have with the Pressens. You can make one X heal Nilin and another X cause damage. Without these Pressens, Nilin will just punch and kick with zero effects, so they are important.

The Remember Me strategy guide does a fantastic job in coaching players through building proper Pressen combos for each situation. Before each boss fight and before each massive encounter, the guide advises players what types of Pressens they need to have in their combos for that particular time. There were a few ambushes I would not have survived without these tips, especially when the Leapers who could vanish in the dark showed up. Not only that, but the guide served as a good reminder of all of the Pressen options I had so I wouldn’t rely on a set of Pressens. Doing so only means bad things for Nilin’s survival rate.

Remember Me strategy guide collectibles
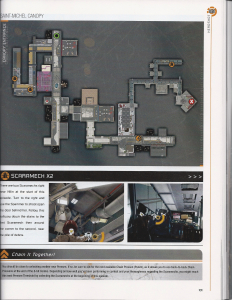
While learning all of your combos and different powers Nilin picks up from fighting bosses, players are also subjected to an obscene number of collectibles: health boosts, Focus boosts, Mnesist Memories, and Scaramechs. Since most of the world of Remember Me is rather gray and bleak (with a splash of orange here and there), it’s incredibly easy to overlook most of these collectibles. Collectible hunting is where the strategy guide shines the brightest (and it shines orange, trust me). All collectibles are marked in individual maps of each scene Nilin traverses, and then most of the collectibles have their own call-out box with screenshot in the written walkthrough. All collectibles are mentioned and highlighted in bold in the written walkthrough, but not all have helpful screenshots showing where they are. I understand why they don’t, because it could get quite cluttered on the pages, but I would have liked it nonetheless.

In addition, one of the appendices in the strategy guide shows exactly where all the Mnesist Memories are located in each chapter and even writes each of the memories out in case you just want to read up on the memories without collecting all of them (for those who aren’t Achievement-whores).

The Remember Me strategy guide is a well-rounded book for every type of gamer needing something from a strategy guide, from combat advice to collectibles to solving the memory puzzles on the first try. Completionists and collectible hunters will be especially pleased with the information provided.

SGR Rating: 4/5

Author: Doug Walsh
Publisher: BradyGames
Editions available: Paperback
Acquired via Publisher

Filed Under: Strategy Guide Reviews

  • « Previous Page
  • 1
  • …
  • 24
  • 25
  • 26
  • 27
  • 28
  • …
  • 57
  • Next Page »

Follow us!

Subscribe!

Upcoming Strategy Guides

 Nothing here. Come back later. 😢

Latest Strategy Guide Reviews

The Walkthrough by Doug Walsh Review

Red Dead Redemption 2 Strategy Guide Review

Mega Man 11 Strategy Guide Review

God of War Strategy Guide Review

Far Cry 5 Strategy Guide Review

Friends of SGR

  • BradyGames
  • Dan Birlew – Guide Writer
  • Doug Walsh – Guide Writer
  • Future Press
  • Game Enthus
  • GameWires.com
  • Piggyback
  • Press the Buttons
  • Prima Games
  • Racing Games

Top Posts & Pages

  • Monday Gaming Diary: Keeping the LEGO Marvel's Avengers in Focus
  • Weekly Poll: How Many Video Games Do You Play at Once? Redux
  • KH 358 blah blah who cares
  • SGR Coffee Break 45: Mindlessly Fun Games
  • Prima Games Podcast

Copyright © 2026 · Web crafted by Warkhammer

Loading Comments...